1. Introduction and Overview
This manual provides essential instructions for the setup, operation, and maintenance of your Generic Portable Label Printer. Designed for user-friendly operation, this printer supports both thermal and thermal transfer printing modes, offering a high resolution of 300 DPI for clear and efficient label production. It features built-in dual sensors for precise label positioning, preventing common issues like paper jams or skips. The printer is suitable for a wide range of applications, accommodating various label materials such as coated paper, matte silver paper, and care labels.
2. Product Features
- Dual Printing Modes: Supports both direct thermal and thermal transfer printing, offering flexibility for different label types and durability requirements.
- High Resolution: Achieves 300 DPI (dots per inch) for sharp, clear text and graphics on labels.
- Precise Positioning: Equipped with a light-transmitting sensor and a movable reflective sensor to ensure accurate label detection and prevent paper jams or skips.
- Large Ribbon Capacity: Designed to accommodate 300-meter carbon ribbons for extended use in thermal transfer mode.
- User-Friendly Software: Includes matching label editing software with a variety of built-in templates for quick and efficient label design.
- Versatile Application: Capable of printing on various materials including label paper, coated paper, matte silver paper, thermal paper, care labels, and PET/PP synthetic paper.
3. Setup Guide
3.1 Unpacking and Component Identification
Carefully remove the printer from its packaging. Ensure all components listed in the packing list are present. Familiarize yourself with the printer's parts as shown in the diagram below:

This diagram identifies key components of the label printer. The rear panel includes the Power port, Power switch, USB port, and Rear paper feed port. Inside, visible components are the Open cover button, Perspective window, Release button, Internal paper supply shaft, Ribbon supply shaft, Ribbon recycle shaft, Print head, Working indicator light, Paper guide, and Roller.
3.2 Connecting Power and USB
- Connect the power adapter to the printer's Power port and then plug it into a suitable electrical outlet.
- Connect the USB cable from the printer's USB port to your computer.
- Press the Power switch to turn on the printer. The working indicator light should illuminate.
3.3 Loading Labels and Ribbon
The printer supports two modes: direct thermal and thermal transfer. The loading procedure varies slightly.

The printer supports two printing modes. For direct thermal printing, thermal paper is used without a ribbon. For thermal transfer printing, a ribbon is required along with other label materials like coated paper or matte silver paper.
3.3.1 Direct Thermal Printing (No Ribbon Required)
- Open the printer cover by pressing the Open cover button.
- Place the roll of thermal labels onto the Internal paper supply shaft.
- Feed the leading edge of the labels through the Paper guide and under the Print head.
- Adjust the Paper guide to fit the width of your labels.
- Close the printer cover.
3.3.2 Thermal Transfer Printing (Ribbon Required)
- Open the printer cover.
- Install the carbon ribbon onto the Ribbon supply shaft and feed it through the designated path, ensuring it passes over the Print head.
- Secure the used ribbon onto the Ribbon recycle shaft.
- Place the roll of thermal transfer labels onto the Internal paper supply shaft.
- Feed the leading edge of the labels through the Paper guide and under the Print head.
- Adjust the Paper guide to fit the width of your labels.
- Close the printer cover.
3.4 Software Installation
The printer requires specific label editing software for optimal functionality. Please contact the seller after receiving the goods to obtain the matching label editing software and installation instructions. The software typically includes drivers for your operating system.
4. Operating Instructions
4.1 Using the Label Editing Software
Once the software is installed, launch it on your computer. The software provides a user-friendly interface for designing and printing labels.

The included label editing software offers a wide array of built-in templates for various professions and applications, simplifying label design and improving efficiency. Users can also create and save custom templates.
- Select a Template: Choose from a large number of built-in templates relevant to various industries, or create a new design.
- Edit Content: Customize text, add images, logos, barcodes, and QR codes.
- Printer Settings: Ensure the correct printer model is selected in the software settings. Adjust label size and orientation as needed.
- Print: Send the design to the printer.
4.2 Printing Various Content Types
The printer is capable of producing a diverse range of label content, including:
- Text content (e.g., product names, addresses)
- Logos and images
- Barcodes (e.g., UPC, EAN)
- QR codes
- Receipts and detailed labels

This image illustrates the printer's capability to print diverse content, including company logos, detailed receipt information, custom text, and scannable barcodes or QR codes, suitable for various business needs.
4.3 Print Quality and Resolution
The printer's 300 DPI resolution ensures high-quality output. The dual sensors contribute to precise label feeding, which is crucial for maintaining print quality and preventing misalignments.
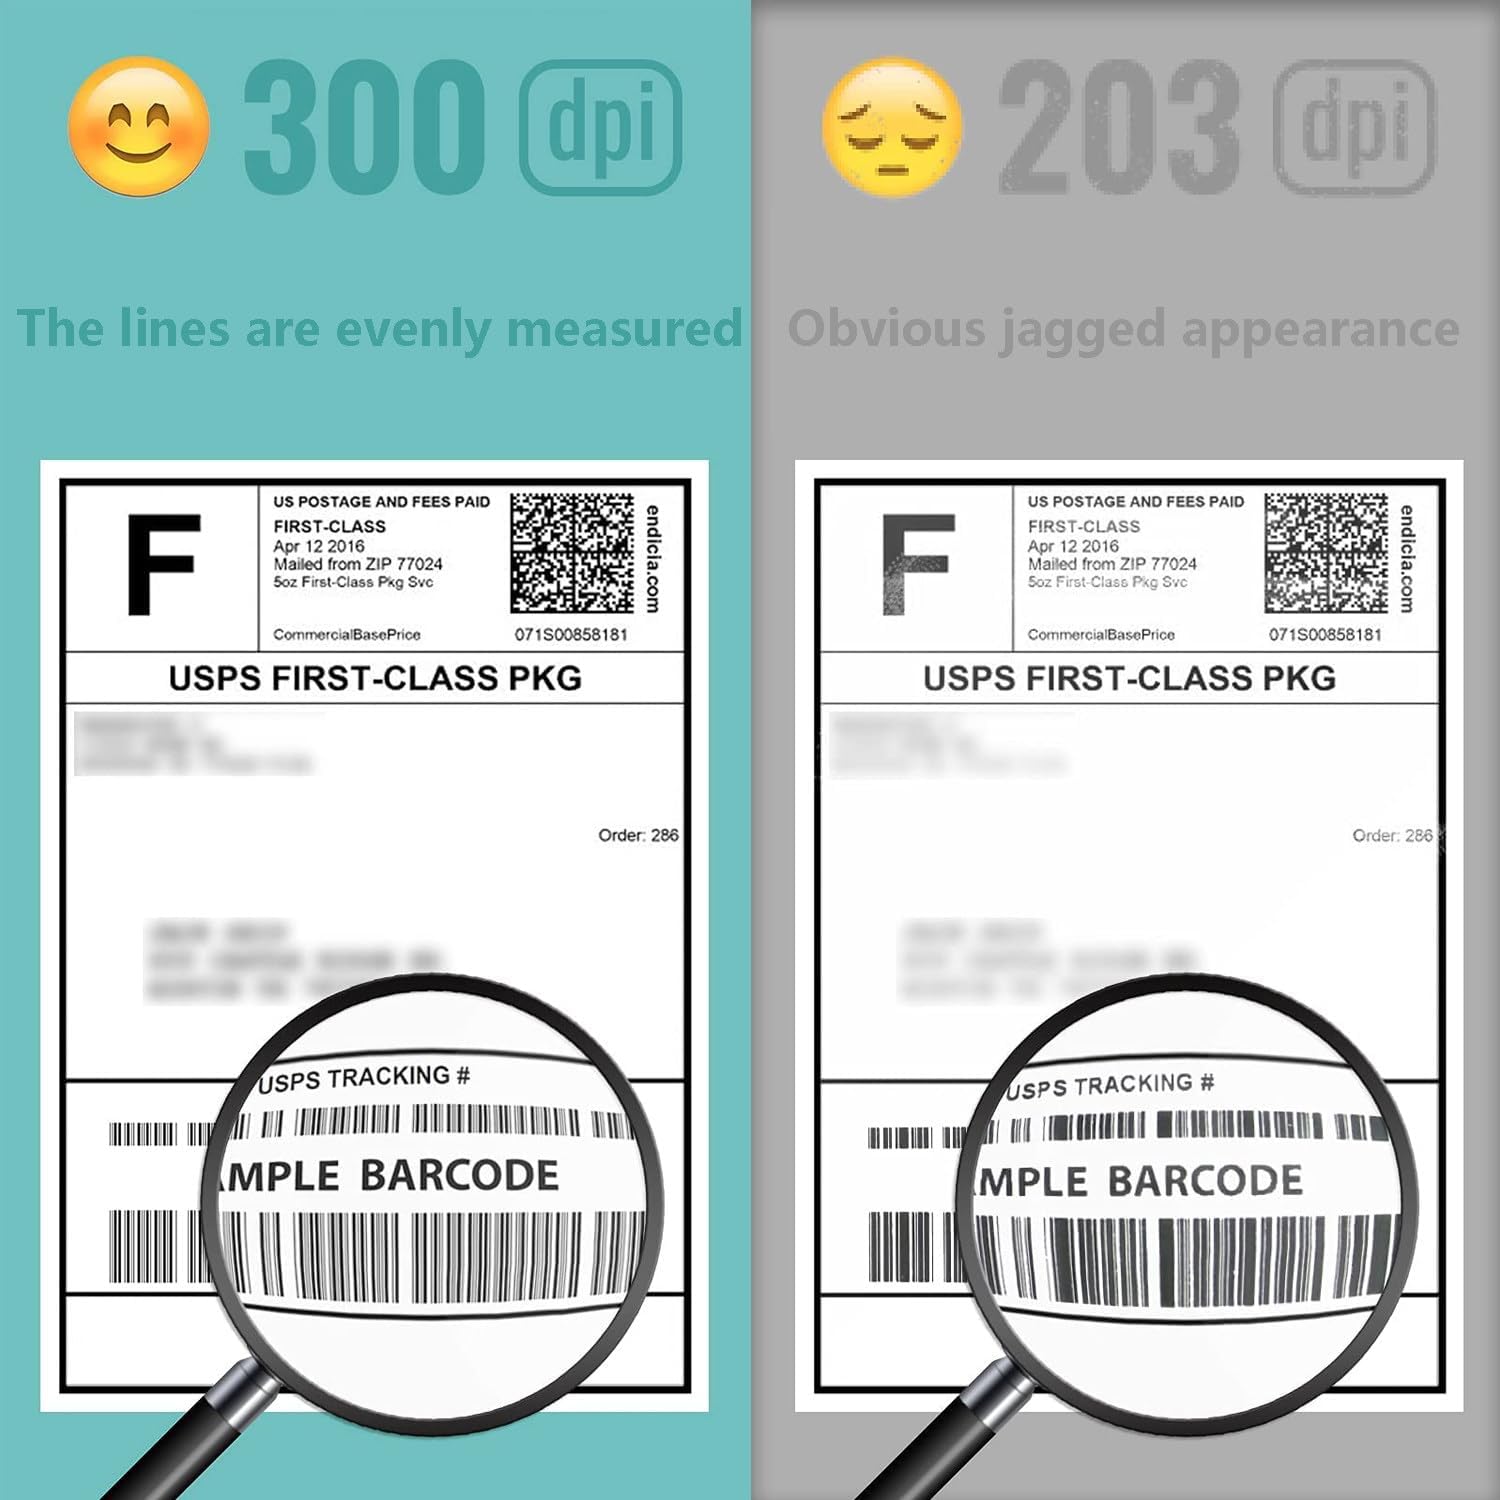
This comparison highlights the superior print quality of 300 DPI resolution, where lines are evenly measured and text is sharp, compared to the jagged appearance of 203 DPI printing.
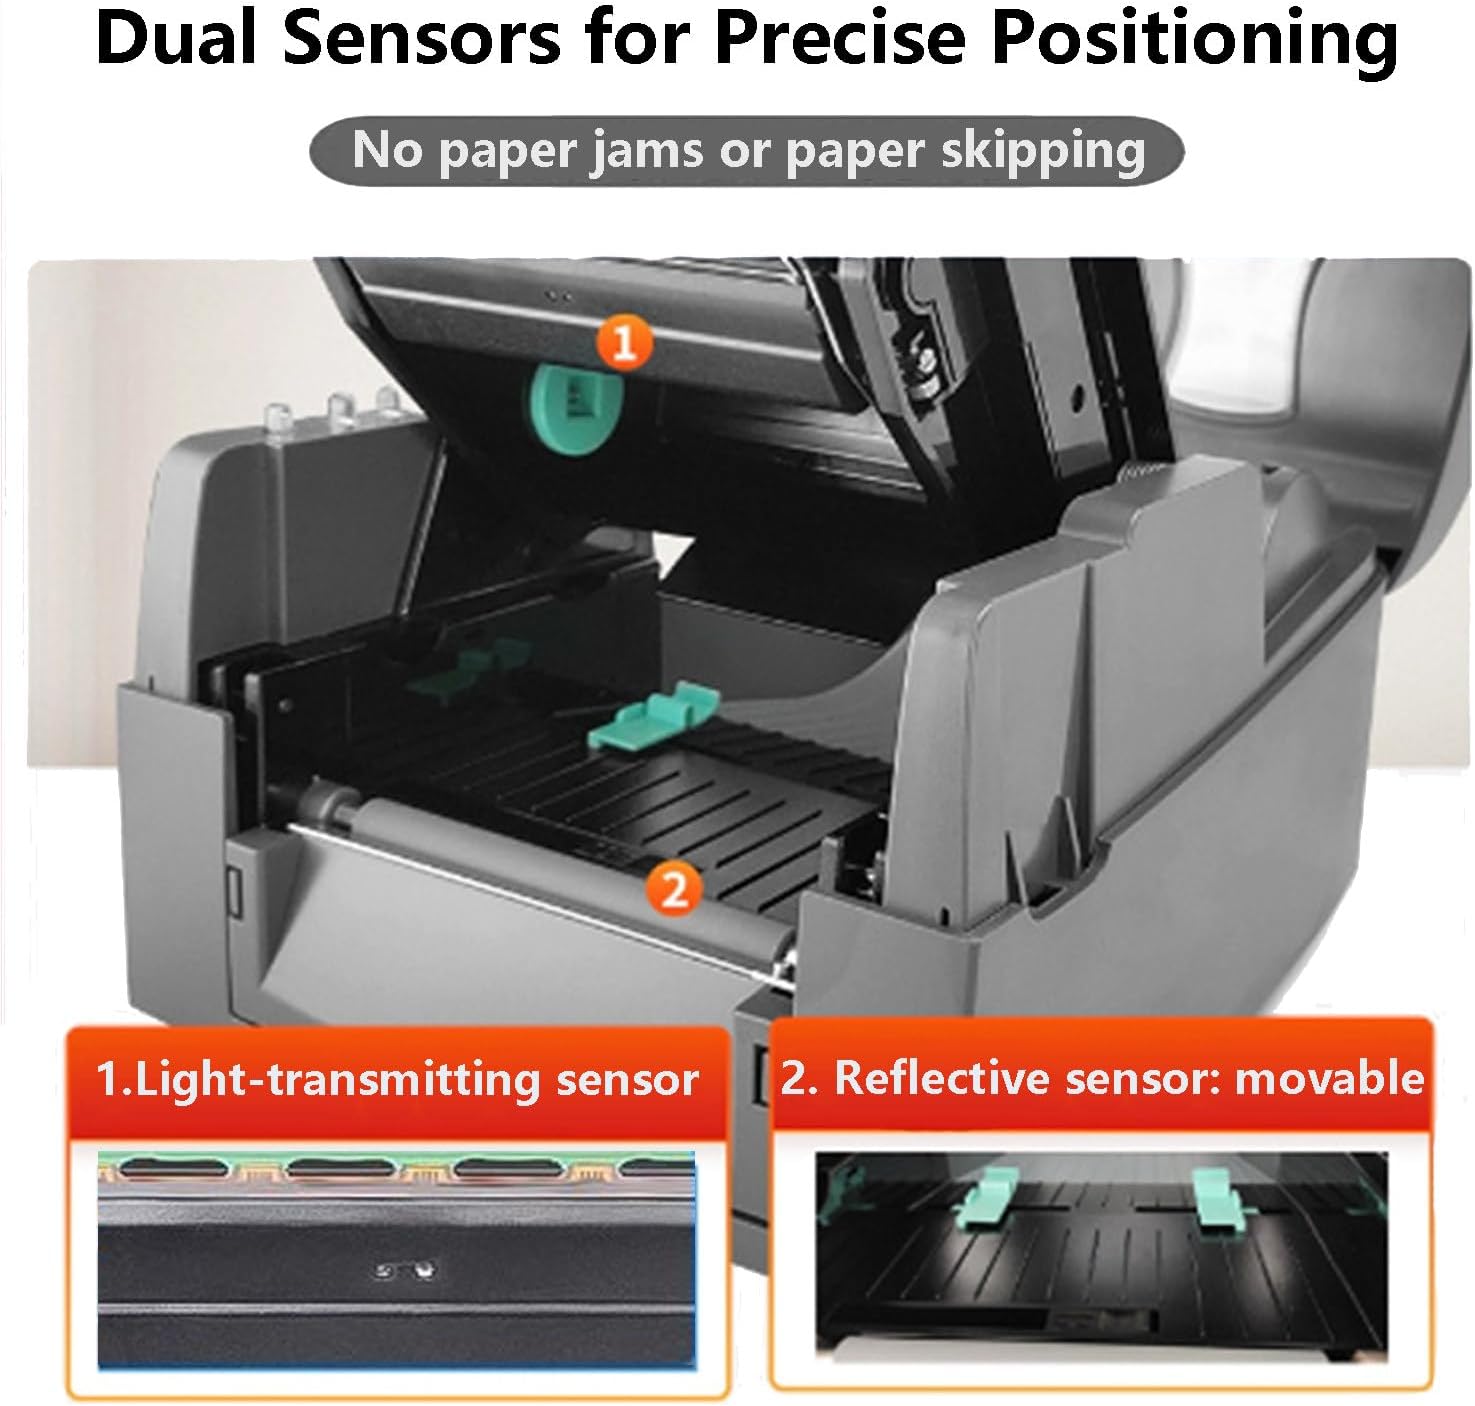
This image illustrates the printer's dual sensor system. The light-transmitting sensor (1) detects the presence of labels, while the movable reflective sensor (2) ensures precise alignment, preventing paper jams and skips during printing.
4.4 Supported Label Types
The printer is compatible with various label materials, allowing for diverse applications:
- Silver labels
- Care labels
- Copperplate labels
- Thermal labels
- Coated paper
- Matte silver paper
- PET/PP synthetic paper

This image demonstrates the versatility of the printer, showcasing different types of labels it can produce, such as silver labels, care labels, copperplate labels, and standard thermal labels. The printer can handle a wide range of label materials.
5. Maintenance
Regular maintenance ensures optimal performance and extends the lifespan of your printer.
5.1 Cleaning the Print Head
The print head should be cleaned periodically, especially if print quality degrades or after changing many rolls of labels.
- Turn off the printer and disconnect the power cable.
- Open the printer cover.
- Gently wipe the print head surface with a lint-free cloth dampened with isopropyl alcohol.
- Allow the print head to dry completely before closing the cover and reconnecting power.
5.2 Cleaning Sensors and Rollers
Dust and debris can affect sensor accuracy and paper feeding.
- Turn off the printer and disconnect the power cable.
- Using a soft brush or compressed air, carefully clean the light-transmitting sensor, movable reflective sensor, and the rubber rollers.
- Ensure no debris remains that could obstruct the sensors or rollers.
6. Troubleshooting
If you encounter issues with your printer, refer to the following common problems and solutions:
- No Power: Ensure the power cable is securely connected to both the printer and a working electrical outlet. Check the power switch position.
- Poor Print Quality:
- Clean the print head (refer to Section 5.1).
- Ensure you are using the correct type of labels and ribbon for your chosen printing mode.
- Check software settings for print density and speed.
- Paper Jams or Skips:
- Verify labels are loaded correctly and the paper guide is adjusted to the label width.
- Clean the sensors and rollers (refer to Section 5.2).
- Ensure labels are not creased or damaged.
- Printer Not Responding:
- Check the USB cable connection to both the printer and computer.
- Restart the printer and your computer.
- Verify that the printer drivers are correctly installed and updated.
- Software Issues: If the label editing software is not functioning correctly, try reinstalling it. Ensure your operating system meets the software's requirements.
If problems persist after attempting these solutions, please contact customer support for further assistance.
7. Specifications
| Feature | Specification |
|---|---|
| Printing Method | Thermal / Thermal Transfer |
| Resolution | 300 DPI |
| Printing Speed | 4 ips (5 inches/s) |
| Printing Length | 0.27 - 30 inches |
| Printing Width | Up to 4.16 inches |
| Ribbon Capacity | 300 meters |
| Sensors | Built-in light-transmitting sensor, Movable reflective sensor |
| Dimensions | 28.5 x 17.1 x 22.6 cm (11.2 x 6.7 x 8.9 inches approx.) |
| Item Weight | 3.5 kg (8.14 pounds approx.) |
8. Warranty and Support
For warranty information and technical support, please refer to the documentation provided with your purchase or contact the seller directly. Ensure you have your product model and purchase details available when seeking support.


