
1. Introduction
Thank you for choosing the FANMIS Model 6157 Dual Time Digital Analog Watch. This timepiece combines classic analog display with modern digital functions, including dual time, stopwatch, alarm, and backlight. Designed for durability and style, it is suitable for various activities. Please read this manual carefully to understand its features and ensure proper use and maintenance.
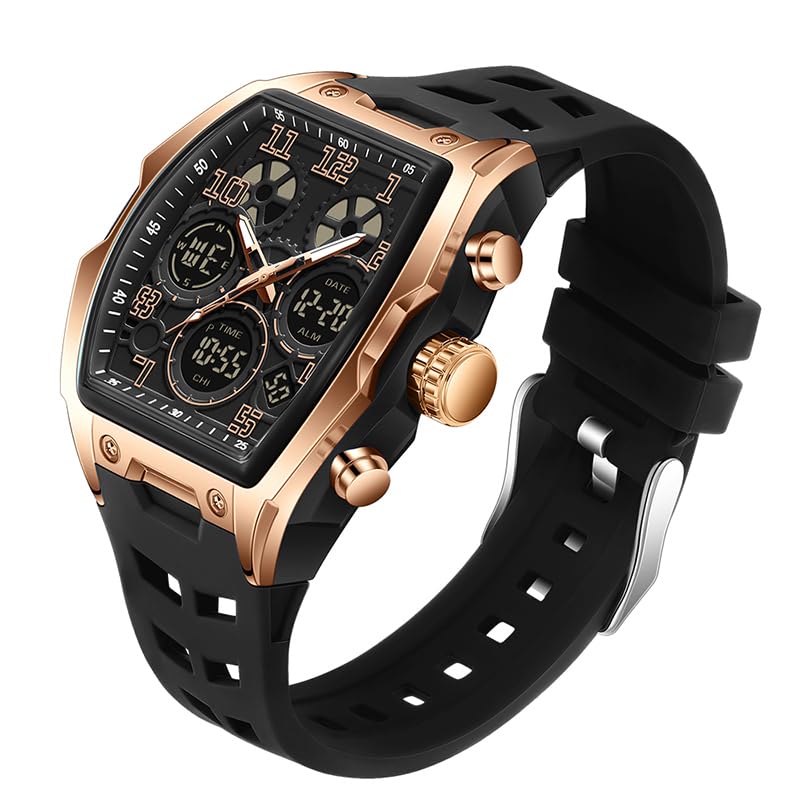
Image: The FANMIS Model 6157 watch, showcasing its rectangular dial, black and gold accents, and silicone strap.
2. Safety Information and Precautions
- Water Resistance: This watch is water-resistant up to 50 meters (5 ATM). Do not press any buttons underwater. Avoid using the watch in extreme hot or cold temperatures, as this can compromise its water resistance.
- Condensation: If mist or droplets appear inside the watch surface, contact the manufacturer or a qualified watch technician immediately for maintenance to prevent moisture corrosion of internal components.
- Impact: Avoid strong impacts or dropping the watch, which can damage the internal mechanism or external casing.
- Chemicals: Keep the watch away from solvents, detergents, perfumes, and other chemicals that may damage the strap or case.

Image: The watch partially submerged in water, indicating its 5 ATM water resistance rating, suitable for daily use like hand washing or rain exposure.
3. Watch Components
Familiarize yourself with the main components of your watch:
- Crown (A): Used for setting analog time.
- Button B (Light): Activates the backlight for the digital display.
- Button C (Mode): Cycles through digital display modes (Time, Date, Alarm, Stopwatch).
- Button D (Start/Stop): Used to start/stop stopwatch, adjust settings, or turn alarm on/off.
- Button E (Reset/Adjust): Used to reset stopwatch, or select items during setting.

Image: A hand demonstrating how to adjust the watch, highlighting the crown and side buttons.
4. Setup and Initial Settings
4.1 Setting Analog Time
- Pull out the crown (A) to the first click position.
- Rotate the crown to set the hour and minute hands to the correct time.
- Push the crown back in to its normal position to start the analog movement.
4.2 Setting Digital Time and Date
- Press Button C (Mode) repeatedly until the digital time display starts flashing, indicating it's in setting mode.
- Press Button E (Reset/Adjust) to cycle through the setting items (seconds, hour, minute, month, date, day).
- Use Button D (Start/Stop) to increase the value of the flashing item.
- Once all settings are correct, press Button C (Mode) to exit the setting mode.

Image: A detailed view of the watch face, highlighting both the analog hands and the digital sub-dials for time, date, and other functions.
5. Operating Instructions
5.1 Using the Backlight
Press Button B (Light) to illuminate the digital display for a few seconds, allowing for visibility in low-light conditions.
5.2 Stopwatch Function
- Press Button C (Mode) until 'ST' or 'STOPWATCH' appears on the digital display.
- Press Button D (Start/Stop) to start the stopwatch.
- Press Button D (Start/Stop) again to pause the stopwatch.
- Press Button E (Reset/Adjust) to reset the stopwatch to zero.
5.3 Alarm Setting
- Press Button C (Mode) until 'AL' or 'ALARM' appears on the digital display.
- Press Button E (Reset/Adjust) to select the hour or minute to set.
- Use Button D (Start/Stop) to adjust the flashing hour or minute.
- Press Button C (Mode) to confirm and exit the alarm setting mode.
- To turn the alarm on/off, press Button D (Start/Stop) while in the 'AL' mode. An alarm icon will indicate if it's active.
Video: A demonstration of the FANMIS watch's features, including the digital display, analog hands, and various functions like time setting and backlight activation.
6. Maintenance
6.1 Cleaning Your Watch
Wipe the watch case and strap regularly with a soft, dry cloth. For silicone straps, a damp cloth with mild soap can be used, followed by thorough drying.
6.2 Battery Replacement
The watch is powered by a 9V battery (included). When the display dims or the watch stops functioning, the battery may need replacement. It is recommended to have the battery replaced by a professional watch technician to ensure proper sealing and maintain water resistance.
6.3 Storage
When not in use for extended periods, store the watch in a cool, dry place away from direct sunlight and strong magnetic fields.
7. Troubleshooting
- Watch not keeping accurate time: Check if the crown is fully pushed in. If the digital display is dim or blank, the battery may need replacement.
- Digital display not working: Ensure the battery is not depleted. If the issue persists after battery replacement, contact customer support.
- Water inside the watch: Immediately stop using the watch and seek professional service to prevent further damage.
8. Specifications
| Feature | Detail |
|---|---|
| Model Name | 6157 |
| Case Material | Zinc Alloy + ABS |
| Band Material | Silicone |
| Display Type | Analog-Digital |
| Movement Type | Quartz |
| Water Resistance Depth | 50 Meters (5 ATM) |
| Case Diameter | 51 Millimeters |
| Case Thickness | 17 Millimeters |
| Band Length | 22.5 Centimeters |
| Item Weight | 0.08 Kilograms |
| Battery | 1 x 9V battery (included) |

Image: A diagram illustrating the key dimensions of the watch, including case width, dial height, total length, and strap width.
9. Warranty and Support
9.1 Limited Warranty
This FANMIS watch comes with a limited warranty covering manufacturing defects. Please refer to the warranty card included with your purchase for specific terms and conditions. The warranty does not cover damage resulting from improper use, accidents, or unauthorized repairs.
9.2 Customer Support
For any questions, technical assistance, or warranty claims, please contact FANMIS customer support through the retailer where the product was purchased or visit the official FANMIS website for contact information.