
1. Product Overview
This SURPASS Garage Door Hardware Kit is designed to replace or upgrade essential components for 16'x8' and 18'x8' double garage doors. The kit includes durable nylon rollers, galvanized hinges, top brackets, and wire ropes, all engineered to enhance the smooth and quiet operation of your garage door system. The components are built for longevity and resistance to rust, ensuring reliable performance.
2. Package Contents
The SURPASS Garage Door Hardware Kit includes the following components:
- 12 x Nylon Rollers (6200ZZ sealed bearing)
- 6 x #1 Hinges
- 2 x #2 Hinges
- 2 x #3 Hinges
- 2 x #4 Hinges
- 2 x Top Brackets
- 1 pair x Bottom Brackets
- 2 x Wire Ropes (10.8 ft / 3.3m)
- Screws for installation

Figure 2.1: All components included in the hardware kit.
3. Specifications
| Component | Specification |
|---|---|
| Brand | SURPASS |
| Material | Metal (Galvanized Steel for hinges/brackets), Reinforced Nylon (Rollers) |
| Roller Type | Nylon with 6200ZZ Sealed Bearings |
| Roller Lifespan | Approximately 100,000 cycles |
| Roller Load Capacity | Up to 160 lbs per roller |
| Roller Stem Length | 4 inches |
| Wire Rope Length | 10.8 ft (3.3m) |
| Wire Rope Thickness | 1/8 inch |
| Item Weight | 7.14 Kilograms (Total Kit) |
| Required Assembly | Yes |
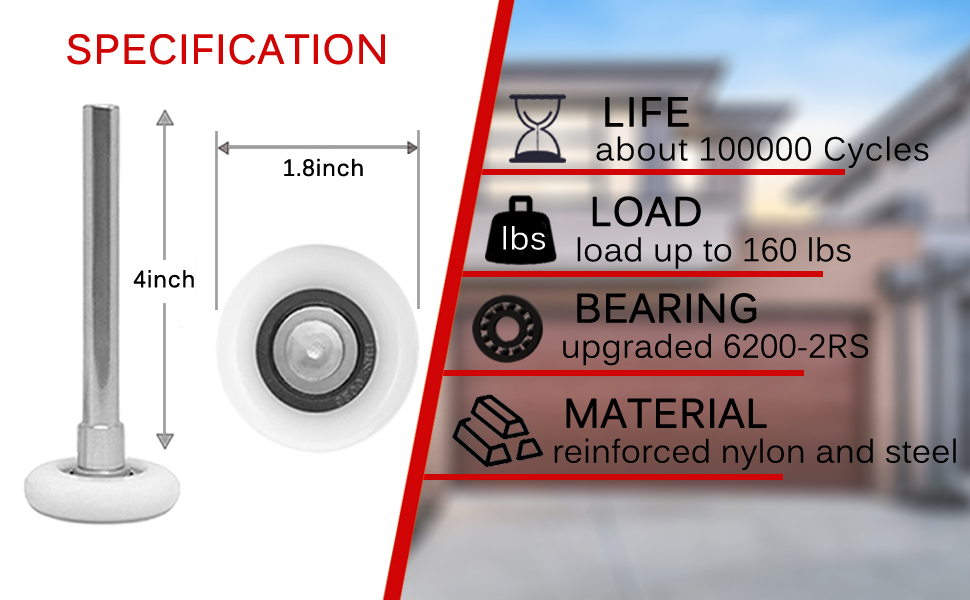
Figure 3.1: Detailed specifications for the nylon rollers.
4. Setup and Installation
Safety Warning: Garage door springs are under extreme tension and can cause serious injury. It is highly recommended to consult a professional for spring-related work. Ensure the garage door is fully open and secured before attempting any hardware replacement. Wear appropriate safety gear, including gloves and eye protection.
4.1 Tools Required
- Wrench set or socket set
- Screwdriver (Phillips and/or flathead)
- Pliers
- Measuring tape
- Safety glasses and gloves
4.2 Installation Steps
- Preparation: Ensure the garage door is fully open and disengage the garage door opener. Secure the door in the open position using C-clamps or vice grips on the vertical tracks just below the bottom rollers to prevent accidental closure.
- Roller Replacement: Carefully remove the old rollers one by one. For side rollers, slightly bend the track open to slide them out. Insert the new nylon rollers into the tracks. The 6200ZZ sealed bearings are designed to reduce noise and resist dust.
- Hinge Replacement: Replace hinges one at a time to maintain door stability. The kit includes different numbered hinges for specific panel locations:
- #1 Hinges: Installed between the first and second panels, and also for all middle panels.
- #2 Hinges: Installed between the second and third panels.
- #3 Hinges: Installed between the third and fourth panels.
- #4 Hinges: Installed between the fourth and fifth panels.
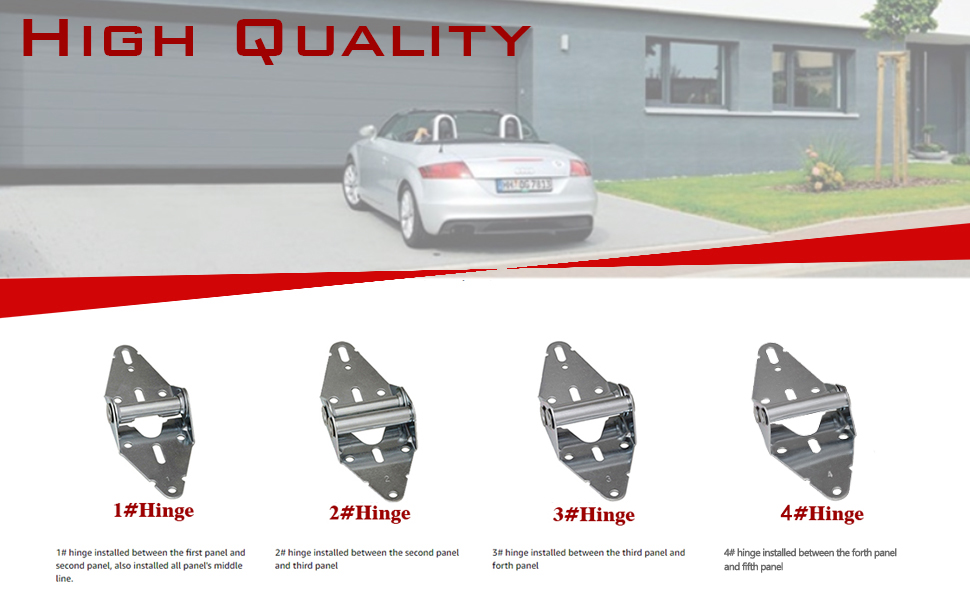
Figure 4.1: Hinge placement guide for sectional garage doors.
- Top Bracket Installation: Install the top brackets at the top corners of the garage door. These brackets hold the top rollers and connect to the garage door opener arm.
- Bottom Bracket and Wire Rope Installation: The bottom brackets are critical for the tension system. Attach the wire ropes to the bottom brackets and route them correctly around the drums at the top of the door. This step often involves working with the torsion spring system, which requires professional expertise due to high tension.
- Final Check: After replacing all components, remove the clamps securing the door. Manually operate the door a few times to check for smooth movement, proper alignment, and any binding. Re-engage the garage door opener and test its operation.
Video 4.1: Overview of garage door hardware components and their general appearance. This video provides a visual reference for the kit's contents.
5. Operating Instructions
Once the hardware kit is installed, the garage door should operate smoothly and quietly. Ensure that the door moves freely along its tracks without sticking or excessive noise. If you notice any issues, refer to the Troubleshooting section.
6. Maintenance
Regular maintenance helps prolong the life of your garage door hardware and ensures safe operation:
- Lubrication: Annually apply a silicone-based garage door lubricant to the rollers, hinges, and springs. Avoid using grease or oil, as these can attract dirt and debris.
- Inspection: Periodically inspect all hardware components for signs of wear, damage, or corrosion. Check for loose screws or bolts and tighten them as needed.
- Cleaning: Keep the garage door tracks clean from dirt, dust, and debris that can impede roller movement.
7. Troubleshooting
If you encounter issues with your garage door after installing the hardware kit, consider the following:
- Noisy Operation:
- Ensure rollers and hinges are adequately lubricated.
- Check for any loose hardware components and tighten them.
- Inspect tracks for obstructions or bends.
- Door Sticking or Uneven Movement:
- Verify that all rollers are properly seated in their tracks.
- Check the alignment of the tracks.
- Ensure hinges are correctly installed and not binding.
- Damaged Components:
- If any component appears bent, cracked, or excessively worn, it should be replaced immediately.
For complex issues or if you are unsure about a repair, it is recommended to contact a qualified garage door technician.
8. Warranty and Support
SURPASS stands behind the quality of its products. This Garage Door Hardware Kit comes with a 3-year free replacement guarantee or a refund without reason. For any product inquiries, technical assistance, or to initiate a warranty claim, please contact SURPASS customer service through your purchase platform or the official SURPASS website.