1. Introduction
The MiBOXER SWR Smart Switch is an advanced lighting control solution designed for seamless integration into modern lighting systems. It combines 2.4GHz wireless technology with traditional push-button functionality, offering both smart and manual control options for a flexible and user-friendly experience. This manual provides essential information for the safe and effective installation, operation, and maintenance of your SWR Smart Switch.
2. Safety Information
Please read all safety instructions carefully before installation and operation. Failure to follow these instructions may result in electric shock, fire, or other hazards.
- Installation should only be performed by a qualified electrician or trained professional.
- Always disconnect power at the circuit breaker before installing or servicing the switch.
- Ensure all wiring connections are secure and comply with local electrical codes.
- Do not operate the switch with wet hands or in damp environments.
- Do not exceed the maximum load capacity specified in the product specifications.
- Keep the device away from children.
3. Product Overview
The MiBOXER SWR Smart Switch offers versatile control for various electrical equipment, supporting both 2.4G remote control and traditional push-button operation.

Figure 3.1: Front view of the MiBOXER SWR Smart Switch, showing input/output terminals and model information.
Key Features:
- 2.4G Remote Control: Supports remote control with a distance of up to 30 meters.
- Push-Button Functionality: Allows for manual control.
- Multi-Timer Function: Supports various timing functions for automated control.
- Wide Compatibility: Compatible with a range of electrical equipment.
- Memory Function: Recalls the last-used setting automatically.
4. Specifications
Technical specifications for the MiBOXER SWR Smart Switch.
| Parameter | Value |
|---|---|
| Model Number | SWR |
| Input Voltage | 100-240V~ 50/60Hz |
| Output Current (Max) | 10A |
| Working Temperature | -10~40°C |
| Control Distance | 30m (2.4G) |
| Item Weight | 2.08 ounces |
| Package Dimensions | 3 x 3 x 1.5 inches |
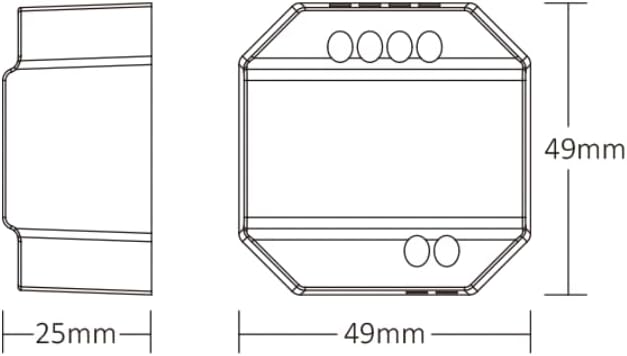
Figure 4.1: Dimensional drawing of the SWR Smart Switch, showing its compact size (49mm x 49mm x 25mm).
5. Setup and Installation
Important: Ensure power is disconnected at the main circuit breaker before beginning any installation. Professional installation is recommended.
Wiring Instructions:
The SWR Smart Switch supports two common wiring methods for integration with a push switch (rocker switch).

Figure 5.1: Connection diagram illustrating two methods for wiring the SWR Smart Switch with a push switch and an electrical appliance.
Method 1: The push switch is connected to the L1 and SWITCH terminals. The main Live (L) and Neutral (N) inputs are connected to the L and N input terminals respectively. The output Live (L) and Neutral (N) are connected to the electrical appliance.
Method 2: The push switch is connected to the L and SWITCH terminals. The main Live (L) and Neutral (N) inputs are connected to the L and N input terminals respectively. The output Live (L) and Neutral (N) are connected to the electrical appliance.
Installation Steps:
- Power Off: Turn off the main power supply at the circuit breaker to avoid electric shock.
- Prepare Wires: Strip approximately 7mm of insulation from the wires.
- Connect Input: Connect the Live (L) and Neutral (N) wires from your power source to the 'L' and 'N' input terminals on the switch.
- Connect Output: Connect the Live (L) and Neutral (N) wires leading to your electrical appliance (e.g., light fixture) to the 'L' and 'N' output terminals on the switch.
- Connect Push Switch (Optional): If using a traditional push switch, connect its terminals to the 'L1' and 'SWITCH' terminals (Method 1) or 'L' and 'SWITCH' terminals (Method 2) as per the diagram.
- Secure Device: Mount the SWR Smart Switch securely within a suitable electrical box or enclosure.
- Restore Power: Once all connections are secure and verified, restore power at the circuit breaker.
6. Operating Instructions
Manual Control:
If a push switch is connected, you can manually turn the connected appliance on or off by pressing the physical switch. The switch will retain its last state due to the memory function.
Smart Control (2.4GHz Wireless):
The SWR Smart Switch can be controlled wirelessly using a compatible MiBOXER 2.4G remote control (sold separately) or integrated into a smart home system via a 2.4GHz gateway.
- Pairing with 2.4G Remote: Refer to your MiBOXER 2.4G remote control's manual for specific pairing instructions. Typically, this involves powering on the SWR switch and then performing a pairing sequence on the remote within a short timeframe.
- Tuya Smart App Control: For app control, a 2.4GHz gateway is required. Once connected to the gateway, the switch can be managed via the Tuya Smart app, allowing for remote control, scheduling, and scene creation.

Figure 6.1: Illustration of Tuya smart app control interface, demonstrating color and brightness adjustments, requiring a 2.4GHz gateway.
Voice Assistant Integration:
When integrated with a compatible 2.4GHz gateway and the Tuya Smart app, the SWR Smart Switch can be linked with popular voice assistants like Amazon Alexa and Google Assistant for voice-activated control.

Figure 6.2: The SWR Smart Switch is compatible with Amazon Alexa and Google Assistant when connected through a compatible gateway.
7. Maintenance
- Cleaning: Disconnect power before cleaning. Use a soft, dry cloth to wipe the surface of the switch. Do not use abrasive cleaners or solvents.
- Inspection: Periodically check for any loose wiring or signs of damage. If damage is found, discontinue use and consult a qualified electrician.
- Firmware Updates: If using with a smart gateway, check the Tuya Smart app for any available firmware updates for improved performance and features.
8. Troubleshooting
- Switch Not Responding:
- Check if the power supply is connected and active.
- Verify all wiring connections are secure.
- Ensure the connected appliance is functional.
- 2.4G Remote Control Not Working:
- Ensure the remote control has fresh batteries.
- Re-attempt the pairing process between the switch and the remote.
- Check for obstructions or excessive distance between the switch and remote (max 30m).
- App Control Not Working:
- Verify that the 2.4GHz gateway is powered on and connected to your home Wi-Fi network.
- Ensure the SWR switch is successfully paired with the gateway in the Tuya Smart app.
- Check your internet connection.
- Intermittent Operation:
- Check for potential sources of 2.4GHz interference (e.g., other wireless devices, microwaves).
- Ensure the switch is not overloaded beyond its 10A maximum capacity.
9. Warranty and Support
MiBOXER products are designed for reliability and performance. This product comes with a standard manufacturer's warranty against defects in materials and workmanship. Please refer to the warranty card included with your purchase or visit the official MiBOXER website for detailed warranty terms and conditions.
For technical support, troubleshooting assistance, or warranty claims, please contact MiBOXER customer service through their official website or the retailer from whom you purchased the product. When contacting support, please have your product model number (SWR) and purchase information readily available.


