1. Introduction
This manual provides essential information for the safe and efficient operation of your Riflewell 6.5 Cu ft Large Double Door Digital Security Safe Box. Please read these instructions thoroughly before installation and use, and retain them for future reference.
The Riflewell KM-75DD safe is designed to secure valuables with its robust construction and advanced locking mechanisms. It features a double-door design, digital keypad access, dual alarm system, and internal LED lighting.

Image: The Riflewell 6.5 Cu ft Large Double Door Digital Security Safe Box, showcasing its dual digital keypads and overall design.
Video: A 360-degree view of the Riflewell safe, providing a comprehensive visual overview of its exterior design and features.
2. Safety Information
- Always store emergency keys in a secure location away from the safe. Do not store them inside the safe.
- Ensure the safe is mounted securely to prevent unauthorized removal.
- Keep the user manual and any codes in a separate, secure location.
- Avoid exposing the safe to extreme temperatures or humidity.
- Do not attempt to force the safe open if the digital lock malfunctions. Use the emergency key or external power source.
3. Package Contents
Verify that all items are present in the package:

Image: Diagram showing the included components: 4 emergency keys, 4 foot mats, 2 USB Type-C cables, 6 expansion screws, and 1 user manual.
- 1 x Riflewell 6.5 Cu ft Digital Security Safe Box
- 4 x Emergency Keys
- 6 x Expansion Screws
- 1 x USB Type-C Cable (for emergency power)
- 4 x Non-slip Pads
- 1 x User Manual
4. Product Features
- Double Door Design: Allows separate access and organization for different valuables.
- Digital Keypad: Features 3D glowing buttons for quick and error-free access.
- Dual Alarm System: Activates after 3 consecutive incorrect password entries or violent vibration, emitting a 70-decibel alarm.
- Mute Function: Allows silent operation of the keypad.
- Emergency Access: Includes emergency keys and a universal USB Type-C port for external power in case of battery depletion.
- Construction: Made from reinforced low carbon alloy steel with pry-resistant thicken doors and 5 solid locking bolts.
- Interior Features: Soft lining to protect valuables, internal LED lights, and a metal storage box.
- Drop Slot: Convenient front slot for depositing money or documents without opening the main door.
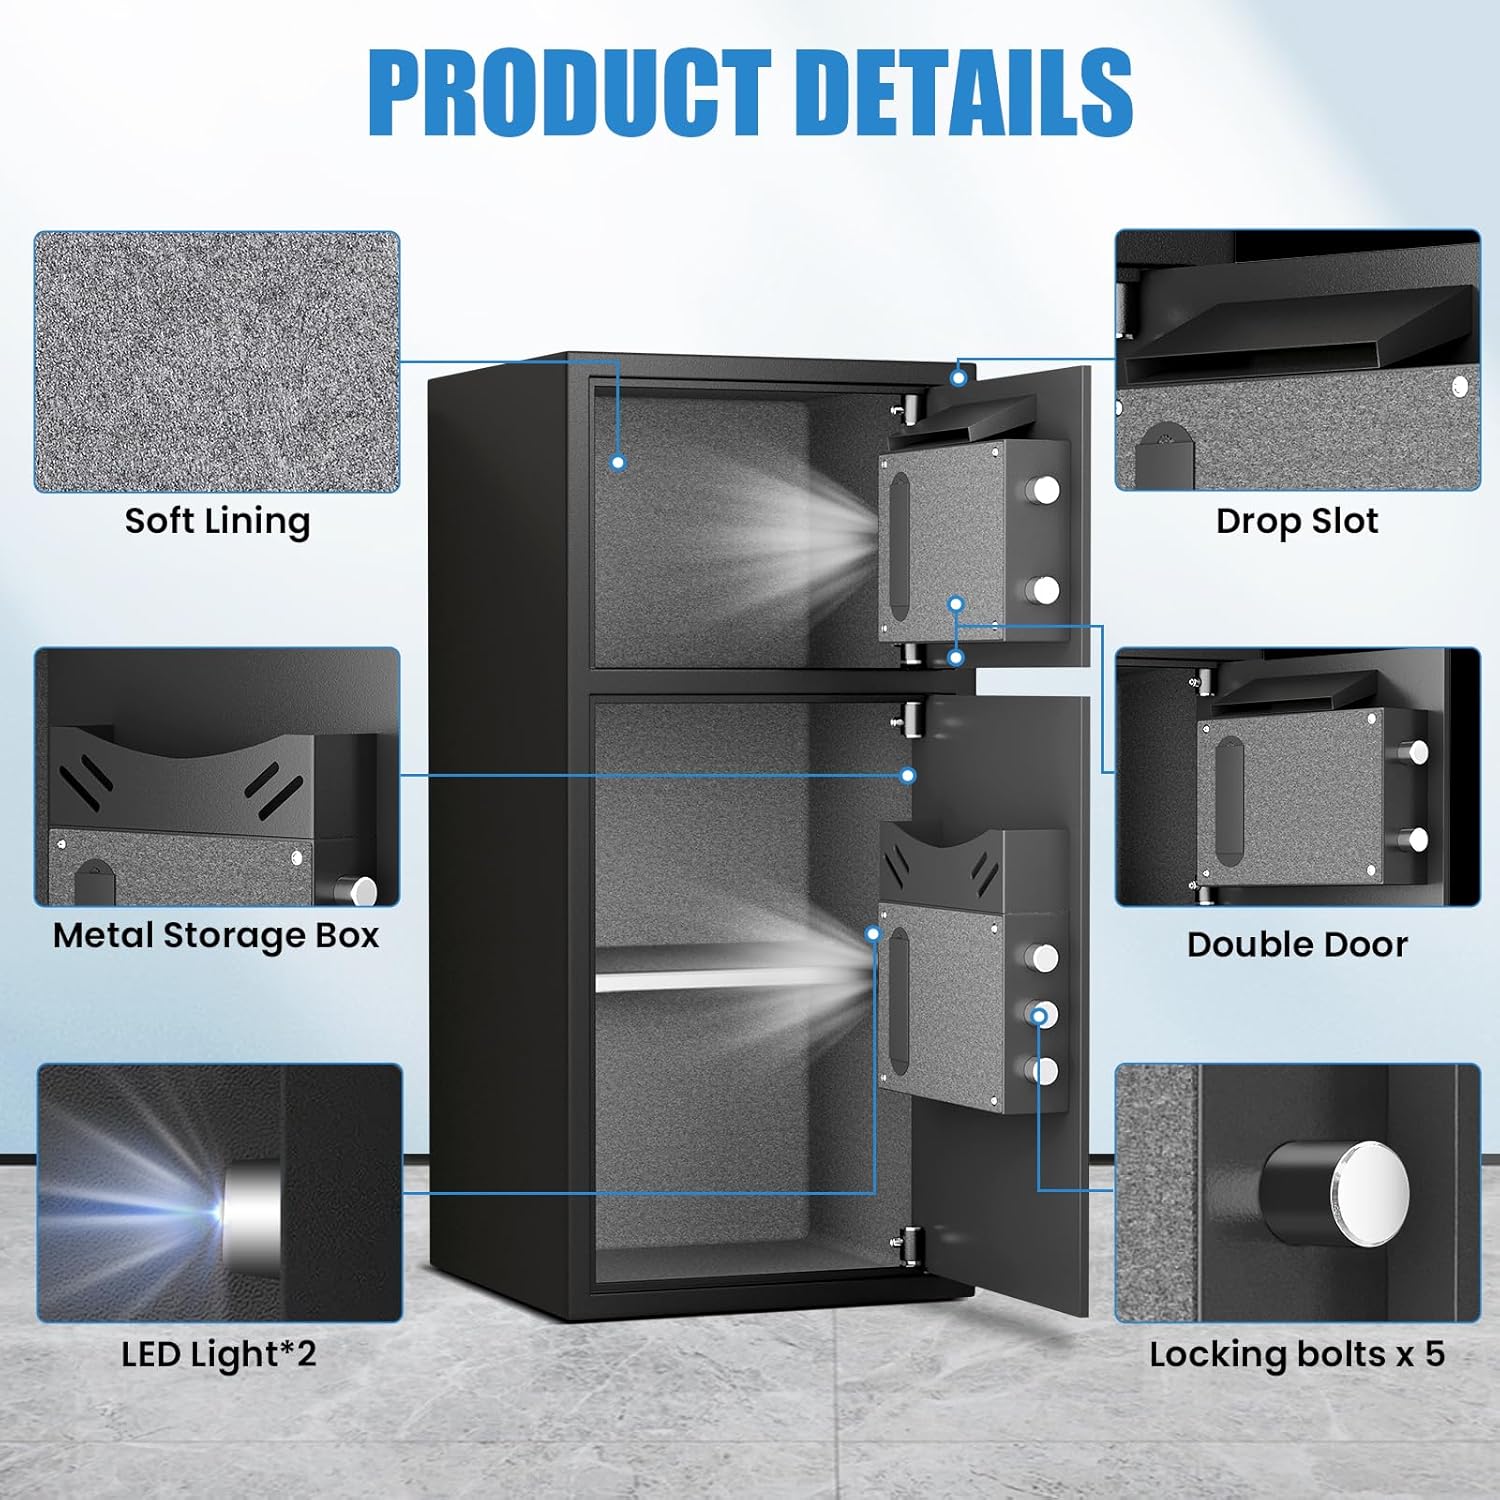
Image: Detailed view of the safe's interior, highlighting the soft lining, drop slot, metal storage box, LED lights, and the robust 5-bolt locking mechanism.

Image: A graphic detailing the safe's construction, showing the locking bolts, the metal storage box on the door, the drop slot, and the protective velvet interior.
Video: This video demonstrates the fireproof and waterproof capabilities of the safe, showcasing its protective features against environmental damage.
5. Setup
5.1 Unpacking
Carefully remove the safe from its packaging. Inspect for any damage. Keep all packaging materials until you are satisfied with the product.
Video: A factory drop test demonstrating the durability of the safe's packaging and construction. This video shows the safe being dropped in its packaging and then unpacked, revealing the intact safe and protective foam corners.
5.2 Battery Installation
The digital keypad requires batteries to operate. Locate the battery compartment on the inside of the safe door. Insert the required number of AA batteries, ensuring correct polarity. Close the battery compartment cover securely.
5.3 Setting Your Passcode
Follow the instructions provided in the quick start guide to set your personal passcode for each door. It is recommended to choose a strong, memorable code and test it before closing the safe.

Image: A detailed view of the digital keypad, highlighting the glowing buttons and the hidden emergency keyhole, which is crucial for setting up the passcode and for emergency access.
Video: A user demonstrating the internal compartments and key access for the Riflewell double-door safe. This video provides a practical look at how to open each compartment using the keys and shows the battery placement.
5.4 Mounting Instructions
The safe can be securely mounted to a wall or floor using the provided expansion screws. There are pre-drilled holes on the back and bottom of the safe for this purpose. Choose a stable location and follow standard mounting procedures to ensure maximum security.

Image: An illustration demonstrating the "Easy to Install" feature, showing the pre-drilled holes on the safe and the use of expansion bolts for secure mounting to a wall.
6. Operating the Safe
6.1 Opening the Safe
Your Riflewell safe offers multiple opening methods:
- Digital Keypad: Enter your programmed passcode followed by the '#' button. Turn the knob to open the door.
- Emergency Key: In case of forgotten passcode or battery failure, insert the emergency key into the hidden keyhole, turn it, and then turn the knob to open.
- External Power (USB Type-C): If batteries are depleted and emergency keys are not readily available, connect a USB Type-C cable to the external power jack. This will power the keypad, allowing you to enter your passcode.

Image: A visual guide to the three methods of opening the safe: using the emergency key, entering a password on the keypad, or using a USB Type-C cable for external power combined with a password.
6.2 Using the Drop Slot
The upper compartment features a convenient drop slot on the front. This allows for quick and easy deposit of money, envelopes, or small documents without needing to open the main safe door.
6.3 Using the Metal Storage Box
The interior of the safe includes a metal storage box, ideal for organizing smaller items such as pistols, ammunition, or other compact valuables.
6.4 Mute Function
To operate the safe silently, activate the mute function. Refer to the quick start guide for specific instructions on enabling and disabling this feature.
6.5 Dual Alarm System
The safe is equipped with a dual alarm system that triggers under two conditions:
- Three consecutive incorrect passcode entries.
- Detection of violent vibration or tampering.
The alarm emits a sound of up to 70 decibels to alert you to potential security breaches.
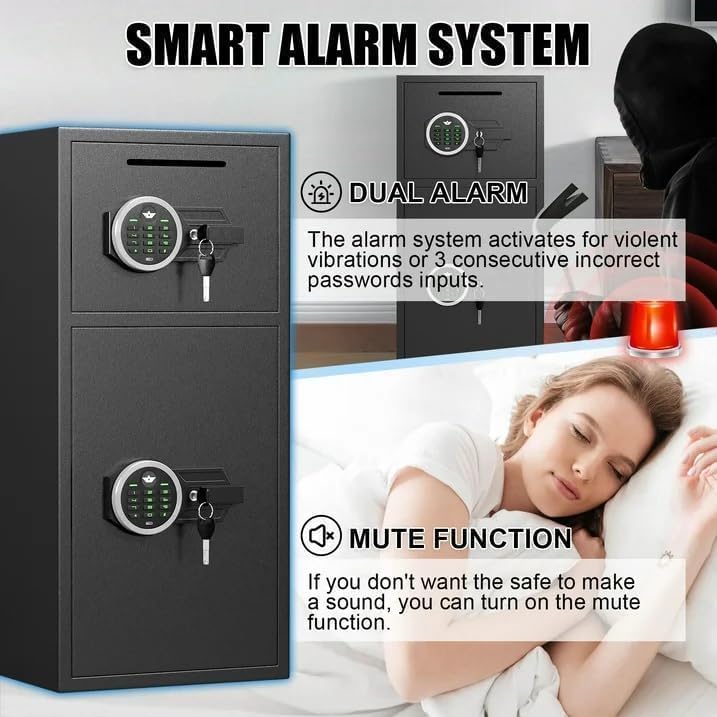
Image: A graphic illustrating the smart alarm system, which activates with dual alarms for violent vibrations or three consecutive incorrect password inputs. It also shows the mute function for silent operation.

Image: A visual representation of the safe's alarm system, showing red concentric circles emanating from the safe, symbolizing the audible alarm activation.
7. Maintenance
7.1 Battery Replacement
When the battery indicator light signals low power, replace all batteries in the compartment with new AA batteries. Ensure the safe is open during replacement to avoid being locked out. If batteries die while the safe is locked, use the emergency key or external USB-C power.
7.2 Cleaning
Clean the exterior of the safe with a soft, damp cloth. Avoid abrasive cleaners or solvents that could damage the finish. Do not allow water to enter the keypad or internal components.
8. Troubleshooting
| Problem | Possible Cause | Solution |
|---|---|---|
| Keypad not responding | Dead batteries. | Replace batteries or use external USB Type-C power. |
| Safe won't open with passcode | Incorrect passcode entered; batteries low. | Re-enter passcode carefully; replace batteries or use external power. Use emergency key if necessary. |
| Alarm sounds unexpectedly | Incorrect passcode attempts; physical impact/vibration. | Enter correct passcode to disarm. Avoid strong impacts to the safe. |
| Door does not close properly | Obstruction in the door frame; locking bolts misaligned. | Check for obstructions. Ensure the safe is on a level surface. |
9. Specifications
| Feature | Detail |
|---|---|
| Brand | Riflewell |
| Model Number | KM-75DD |
| External Dimensions | 13.8"D x 13.8"W x 29.5"H |
| Capacity | 6.5 Cubic Feet |
| Lock Type | Electronic Combination Lock |
| Material | Low Carbon Steel |
| Special Features | Dual Alarm System, Mute Function, LED Light, Drop Slot |
| Mounting Type | Freestanding, Tabletop (can be wall/floor mounted) |
| Item Weight | 46.1 Pounds |

Image: A diagram illustrating the multi-layered construction of the safe, including high-temperature ion, anti-rust coating, carbon process steel, austenitic steel, and low carbon alloy steel, emphasizing its robust build.
10. Warranty and Support
Riflewell offers a one-year product service for this safe. For any issues or inquiries, please contact customer service. Our 24-hour online customer service team is available to assist you. Key matching service is also available.
To contact customer service via Amazon:
- Log in to your Amazon buyer's account.
- Find your order for the Riflewell safe.
- Click "Get help" to contact the seller for product support.

Image: A graphic depicting customer service representatives, symbolizing the available professional after-sales support.


