1. Introduction
This manual provides detailed instructions for the safe and effective use of the Orion Motor Tech 31-piece Master Coolant Pressure Tester and Vacuum Refill Kit. This comprehensive tool set is designed for automotive professionals and DIY enthusiasts to accurately diagnose cooling system leaks and efficiently refill coolant.
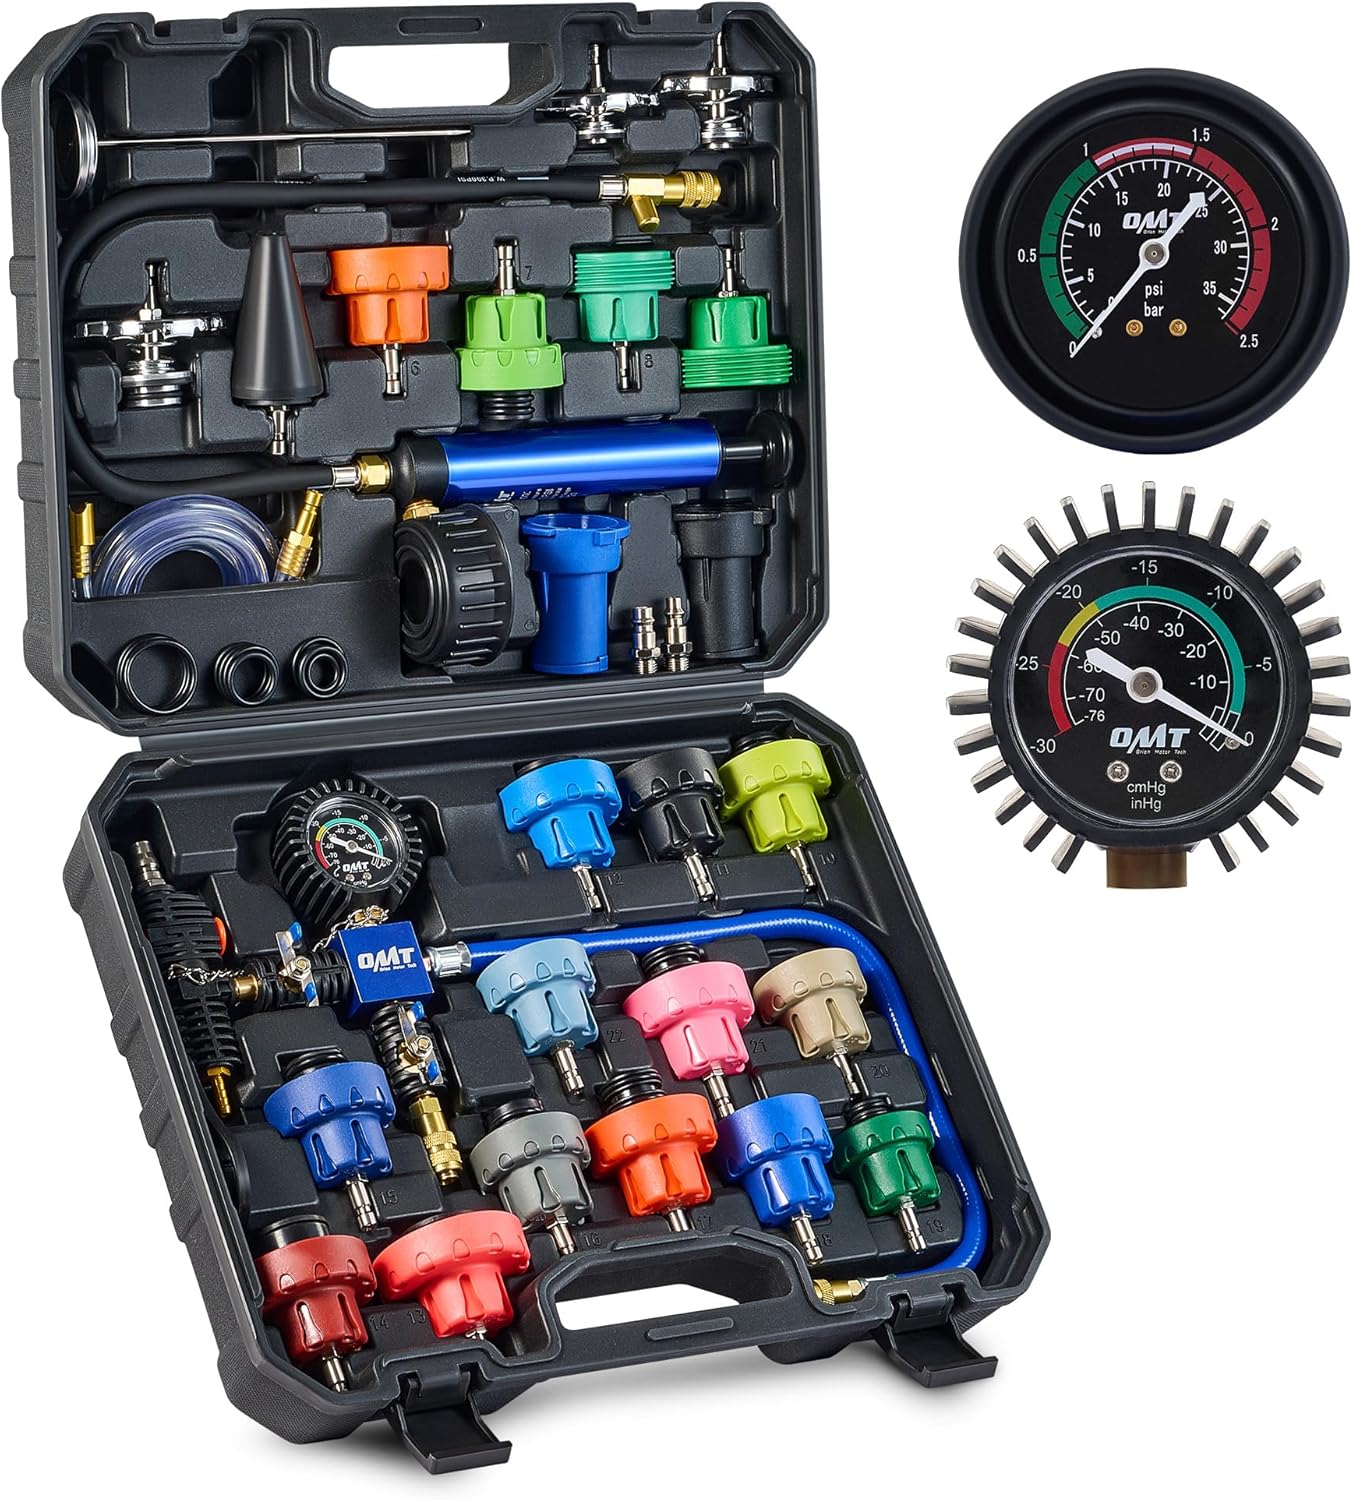
Image 1.1: The complete Orion Motor Tech 31-piece Coolant Pressure Tester Kit, including the pressure tester, vacuum refill tool, and various adapters, neatly organized in its custom-molded carrying case.
2. Product Overview and Components
The Orion Motor Tech Coolant Pressure Tester Kit is a 31-piece set engineered for precision and durability. It includes all necessary components for comprehensive cooling system diagnostics and maintenance.
2.1 Kit Contents:
- 22x Radiator Adapters
- 1x Universal Adapter
- 1x Manual Vacuum Pump
- 1x Vacuum Purge & Refill Tool
- 1x Probe Thermometer
- 1x Filling Hose
- 1x Exhaust Hose
- 17x O-Rings
- 1x European Air Intake Joint
- 1x American Air Intake Joint
- 1x Wrench
- 1x Instructions Manual (this document)

Image 2.1: A comprehensive layout of all 31 components, including various radiator adapters, the vacuum purge and refill tool, vacuum pump, probe thermometer, hoses, O-rings, and air intake joints.
2.2 Key Features:
- Leak Detection: Accurately identifies leaks in the header and expansion tanks, head gasket, radiator core, heater matrix, water pump, and pipes.
- Coolant Refilling: Ensures air pocket-free coolant refilling for optimal system performance.
- Wide Compatibility: Includes 23 adapters compatible with a broad range of vehicle makes and models.
- Easy Organization: Features color-coded adapters and molded size markings for quick identification, stored in a custom-molded carrying case.
- Durable Construction: Manufactured from high-quality aluminum alloy, nylon, rubber, and brass for long-lasting reliability.
3. Setup
Before beginning any testing or refilling procedures, ensure the vehicle's engine is cool and not under pressure. Always wear appropriate personal protective equipment (PPE), including safety glasses and gloves.
- Prepare the Work Area: Ensure a clean, well-lit, and stable environment for working on the vehicle's cooling system.
- Identify Radiator Cap Type: Determine the correct adapter from the kit that matches the vehicle's radiator or expansion tank cap. The adapters are color-coded and have molded size markings for easy selection.
- Inspect Components: Before each use, inspect all hoses, O-rings, and adapters for any signs of wear, cracks, or damage. Replace any compromised parts to ensure proper sealing and accurate readings.
- Connect Air Intake Joint (if applicable): If using an external air source for the vacuum purge and refill tool, connect the appropriate EU or US air intake joint.

Image 3.1: Illustrates the self-locking quick-disconnect parts, durable O-rings for tight sealing, and colored coating with number markings for easy identification of adapters.
4. Operating Instructions
4.1 Coolant Pressure Testing (Leak Detection):
- Remove Radiator Cap: Carefully remove the vehicle's radiator or expansion tank cap once the engine is cool.
- Select Adapter: Choose the correct adapter from the kit that fits the radiator neck or expansion tank opening.
- Attach Pressure Pump: Securely attach the manual vacuum pump with the pressure gauge to the selected adapter.
- Pump to Pressure: Slowly pump the hand pump until the pressure gauge reaches the recommended pressure for the vehicle's cooling system (refer to the vehicle's service manual or radiator cap for specifications). Do not exceed the maximum recommended pressure.
- Monitor Pressure: Observe the pressure gauge for at least 5-10 minutes. A drop in pressure indicates a leak in the system.
- Locate Leak: Visually inspect all cooling system components (hoses, radiator, heater core, water pump, connections) for signs of coolant leakage.
- Release Pressure: Once testing is complete, carefully release the pressure by pressing the pressure relief valve on the pump.
- Remove Tool: Detach the pressure pump and adapter from the vehicle.

Image 4.1: Depicts the pressure leak testing process, showing the probe thermometer for measuring coolant temperature and the pressure gauge for monitoring system integrity.
4.2 Coolant Vacuum Purge & Refill:
This procedure ensures the cooling system is refilled without air pockets, which can cause overheating and damage.
- Drain Old Coolant: Ensure the cooling system is completely drained of old coolant.
- Attach Vacuum Purge Tool: Select the appropriate adapter and securely attach the vacuum purge and refill tool to the radiator neck or expansion tank.
- Connect Air Source: Connect an air compressor (not included) to the air intake joint on the vacuum purge tool.
- Create Vacuum: Open the air valve on the tool to create a vacuum in the cooling system. Monitor the vacuum gauge until it reaches the desired level (typically -25 to -28 inHg). Close the air valve.
- Hold Vacuum: Allow the system to hold the vacuum for 2-5 minutes. If the vacuum drops, there is still a leak in the system that needs to be addressed before refilling.
- Prepare Coolant: Place the filling hose into a container of pre-mixed coolant.
- Refill System: Open the coolant valve on the vacuum purge tool. The vacuum will draw the coolant into the system. Continue until the system is full.
- Remove Tool: Once refilling is complete, close the coolant valve, disconnect the air source, and remove the tool and adapter.
- Top Off and Bleed: Top off the coolant level as needed and follow the vehicle manufacturer's instructions for bleeding any remaining air from the system.

Image 4.2: Displays the various gauges for accurate readings: the probe thermometer (32-400°F / 0-200°C), the vacuum filler gauge (0 to -30 inHg / -10 to -76 cmHg), and the vacuum pump pressure gauge (0-35 psi / 0-2.5 bar).
5. Maintenance
Proper maintenance of your Orion Motor Tech Coolant Pressure Tester Kit will ensure its longevity and continued accuracy.
- Cleaning: After each use, wipe down all components with a clean, damp cloth to remove any coolant residue. Do not use harsh chemicals that could damage rubber or plastic parts.
- Inspection: Regularly inspect hoses for cracks or kinks, O-rings for wear or deformation, and gauges for damage. Replace any worn or damaged parts immediately.
- Storage: Store all components neatly in the custom-molded carrying case in a cool, dry place, away from direct sunlight and extreme temperatures.
- Lubrication: Periodically apply a small amount of silicone grease to O-rings to maintain their sealing properties and prevent drying out.

Image 5.1: An exploded view of the kit components, emphasizing the premium materials used in construction, such as the aluminum alloy pump, rubber-coated gauge, nylon colored coating, and brass connectors, all designed for durability.
6. Troubleshooting
| Problem | Possible Cause | Solution |
|---|---|---|
| Pressure/Vacuum does not hold | Loose connection, damaged O-ring, faulty adapter, leak in cooling system |
|
| Inaccurate gauge readings | Damaged gauge, extreme temperature, air in hose |
|
| Coolant not refilling properly | Insufficient vacuum, clogged hose, air leak in tool setup |
|
7. Specifications
| Attribute | Detail |
|---|---|
| Brand | Orion Motor Tech |
| Model | Radiator Pressure Tester |
| Item Model Number | RCP-0031-BK |
| Item Weight | 10.56 pounds |
| Package Dimensions | 16.85 x 13.66 x 6.57 inches |
| Manufacturer Part Number | MPN1RCP0031-BK |
| Number of Adapters | 22 Radiator Adapters + 1 Universal Adapter (Total 23) |
| Vacuum Pump Pressure Range | 0-35 psi (0-2.5 bar) |
| Vacuum Filler Gauge Range | 0 to -30 inHg (-10 to -76 cmHg) |
| Thermometer Range | 32-400°F (0-200°C) |
| Materials | Aluminum Alloy, Nylon, Rubber, Brass |
8. Warranty and Support
Orion Motor Tech products are built for durability and reliable performance. For specific warranty information and customer support, please refer to the warranty card included with your product or visit the official Orion Motor Tech website. Keep your purchase receipt as proof of purchase for any warranty claims.
For technical assistance or inquiries, please contact Orion Motor Tech customer service through their official channels.


