
1. Introduction
Thank you for choosing the Milton Rapid Digital Air Fryer 4.2L. This appliance is designed to provide a healthier way to cook your favorite foods, using rapid air circulation technology to fry, bake, grill, and roast with significantly less oil. Please read this instruction manual thoroughly before first use to ensure safe operation and optimal performance. Keep this manual for future reference.
2. Important Safety Instructions
When using electrical appliances, basic safety precautions should always be followed to reduce the risk of fire, electric shock, and injury.
- Always ensure the voltage indicated on the appliance matches your local mains voltage before connecting.
- Do not immerse the main unit, cord, or plug in water or any other liquid.
- Keep the appliance and its cord out of reach of children.
- Do not operate any appliance with a damaged cord or plug, or after the appliance malfunctions or has been damaged in any manner.
- Avoid touching hot surfaces. Use handles or knobs. Always use oven mitts when handling hot components.
- Ensure proper ventilation around the appliance during use. Do not block any air vents.
- Do not place the appliance against a wall or against other appliances. Leave at least 10 cm free space on the back and sides and 10 cm free space above the appliance.
- Unplug from the outlet when not in use and before cleaning. Allow to cool before putting on or taking off parts.
- This appliance is for household use only. Do not use outdoors.
- Do not overfill the basket.
- Never use the appliance without the basket and pan properly in place.
3. Product Overview
3.1 Components
- Main Unit
- Digital Touch Control Panel
- Air Inlet
- Air Outlet Vents
- Removable Frying Basket
- Removable Frying Pan
- Power Cord

Figure 1: Milton Rapid Digital Air Fryer 4.2L main unit with basket handle.
3.2 Control Panel
The digital touch control panel allows for precise temperature and time adjustments, as well as access to preset cooking functions.
- Power Button: Turns the appliance on/off.
- Temperature Control: Adjusts cooking temperature (80°C - 200°C).
- Timer Control: Sets cooking time.
- Preset Menu Icons: Selects pre-programmed settings for common dishes.
- Digital Display: Shows current temperature and time.

Figure 2: Close-up of the digital touch control panel with various icons.
4. Setup and First Use
4.1 Unpacking
- Remove all packaging materials from the appliance.
- Check that all components are present and undamaged.
- Remove any stickers or labels.
4.2 Initial Cleaning
- Wash the frying basket and pan with hot water, a mild dishwashing liquid, and a non-abrasive sponge.
- Rinse and dry thoroughly.
- Wipe the inside and outside of the main unit with a damp cloth.
4.3 Placement
- Place the appliance on a stable, horizontal, and heat-resistant surface.
- Ensure there is at least 10 cm of free space around the back, sides, and above the appliance for proper air circulation.
4.4 First Use (Burn-in)
During the first few uses, the air fryer may emit a slight odor, which is normal and will dissipate. To minimize this, perform a 'burn-in' cycle:
- Insert the clean basket and pan into the main unit.
- Plug the appliance into a grounded wall outlet.
- Set the temperature to 200°C and the timer to 10 minutes.
- Allow the appliance to run through the cycle in a well-ventilated area.
5. Operating Instructions
5.1 Basic Operation
- Place the food in the frying basket. Do not exceed the MAX fill line.
- Slide the frying pan with the basket back into the main unit until it clicks into place.
- Plug the power cord into a grounded wall outlet. The power button will illuminate.
- Press the power button to turn on the appliance. The digital display will show default settings.
- Adjust the temperature using the temperature control buttons (up/down arrows) to your desired setting (80°C - 200°C).
- Adjust the cooking time using the timer control buttons to your desired duration.
- Press the power button again to start cooking. The fan and heating element will activate.
- During cooking, you can pull out the pan to shake or turn food. The appliance will pause automatically and resume when the pan is reinserted.
- Once the timer reaches zero, the appliance will beep and automatically shut off.
- Carefully pull out the pan and remove the food. Use heat-resistant tongs or utensils.

Figure 3: Food placed inside the air fryer basket for cooking.
5.2 Using Preset Menus
The Milton Rapid Digital Air Fryer features 8 preset menus for convenience:
- Follow steps 1-3 from Basic Operation.
- Press the power button to turn on the appliance.
- Tap the desired preset menu icon on the control panel. The appliance will automatically set the recommended temperature and time for that food type.
- You can manually adjust the temperature and time after selecting a preset if needed.
- Press the power button again to start cooking.
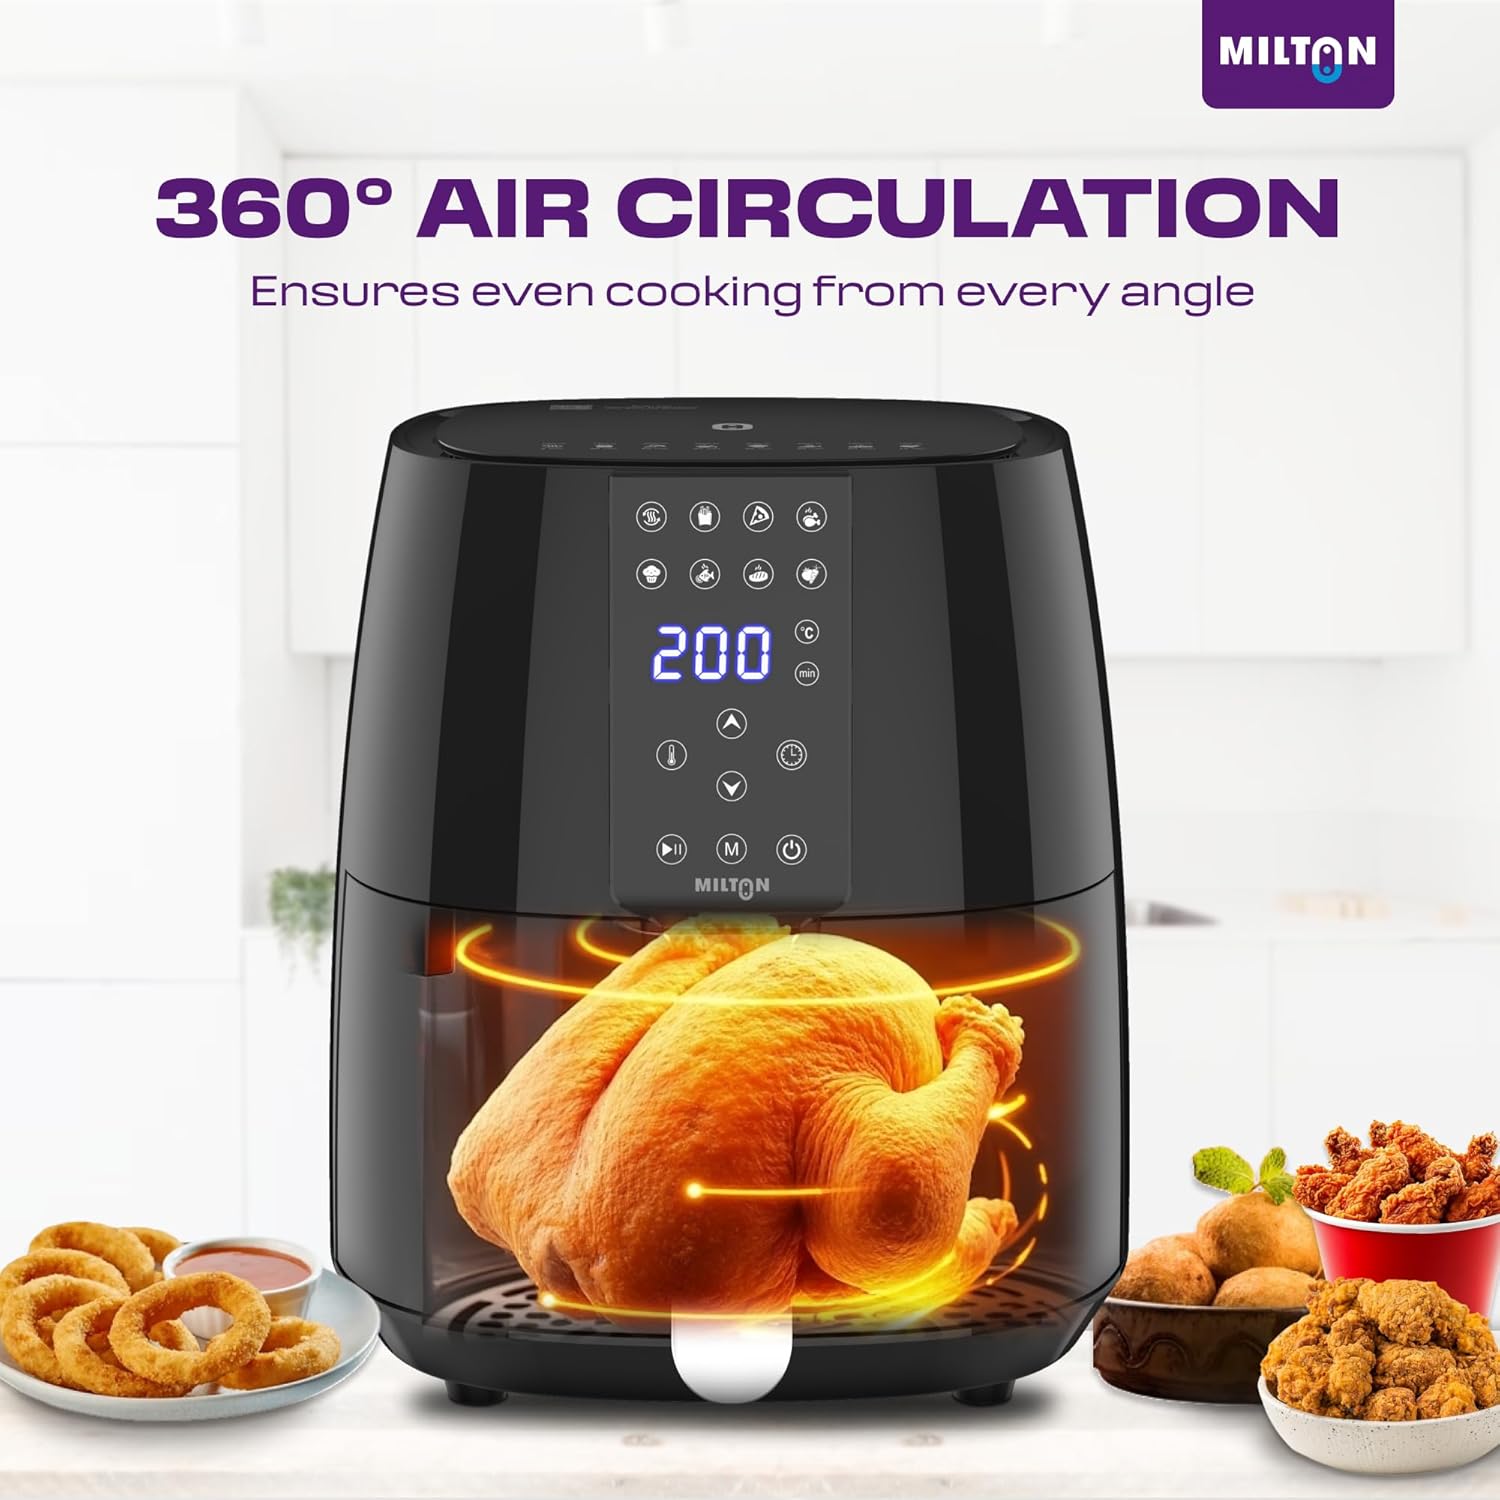
Figure 4: Digital display showing various preset menu options like Fries, Chicken, Pizza, and more.
5.3 360° High-Speed Air Circulation
This air fryer utilizes 360° high-speed air circulation technology to ensure even cooking and crispy results with minimal oil. The powerful 1450W motor and convection fan distribute heat uniformly around the food.
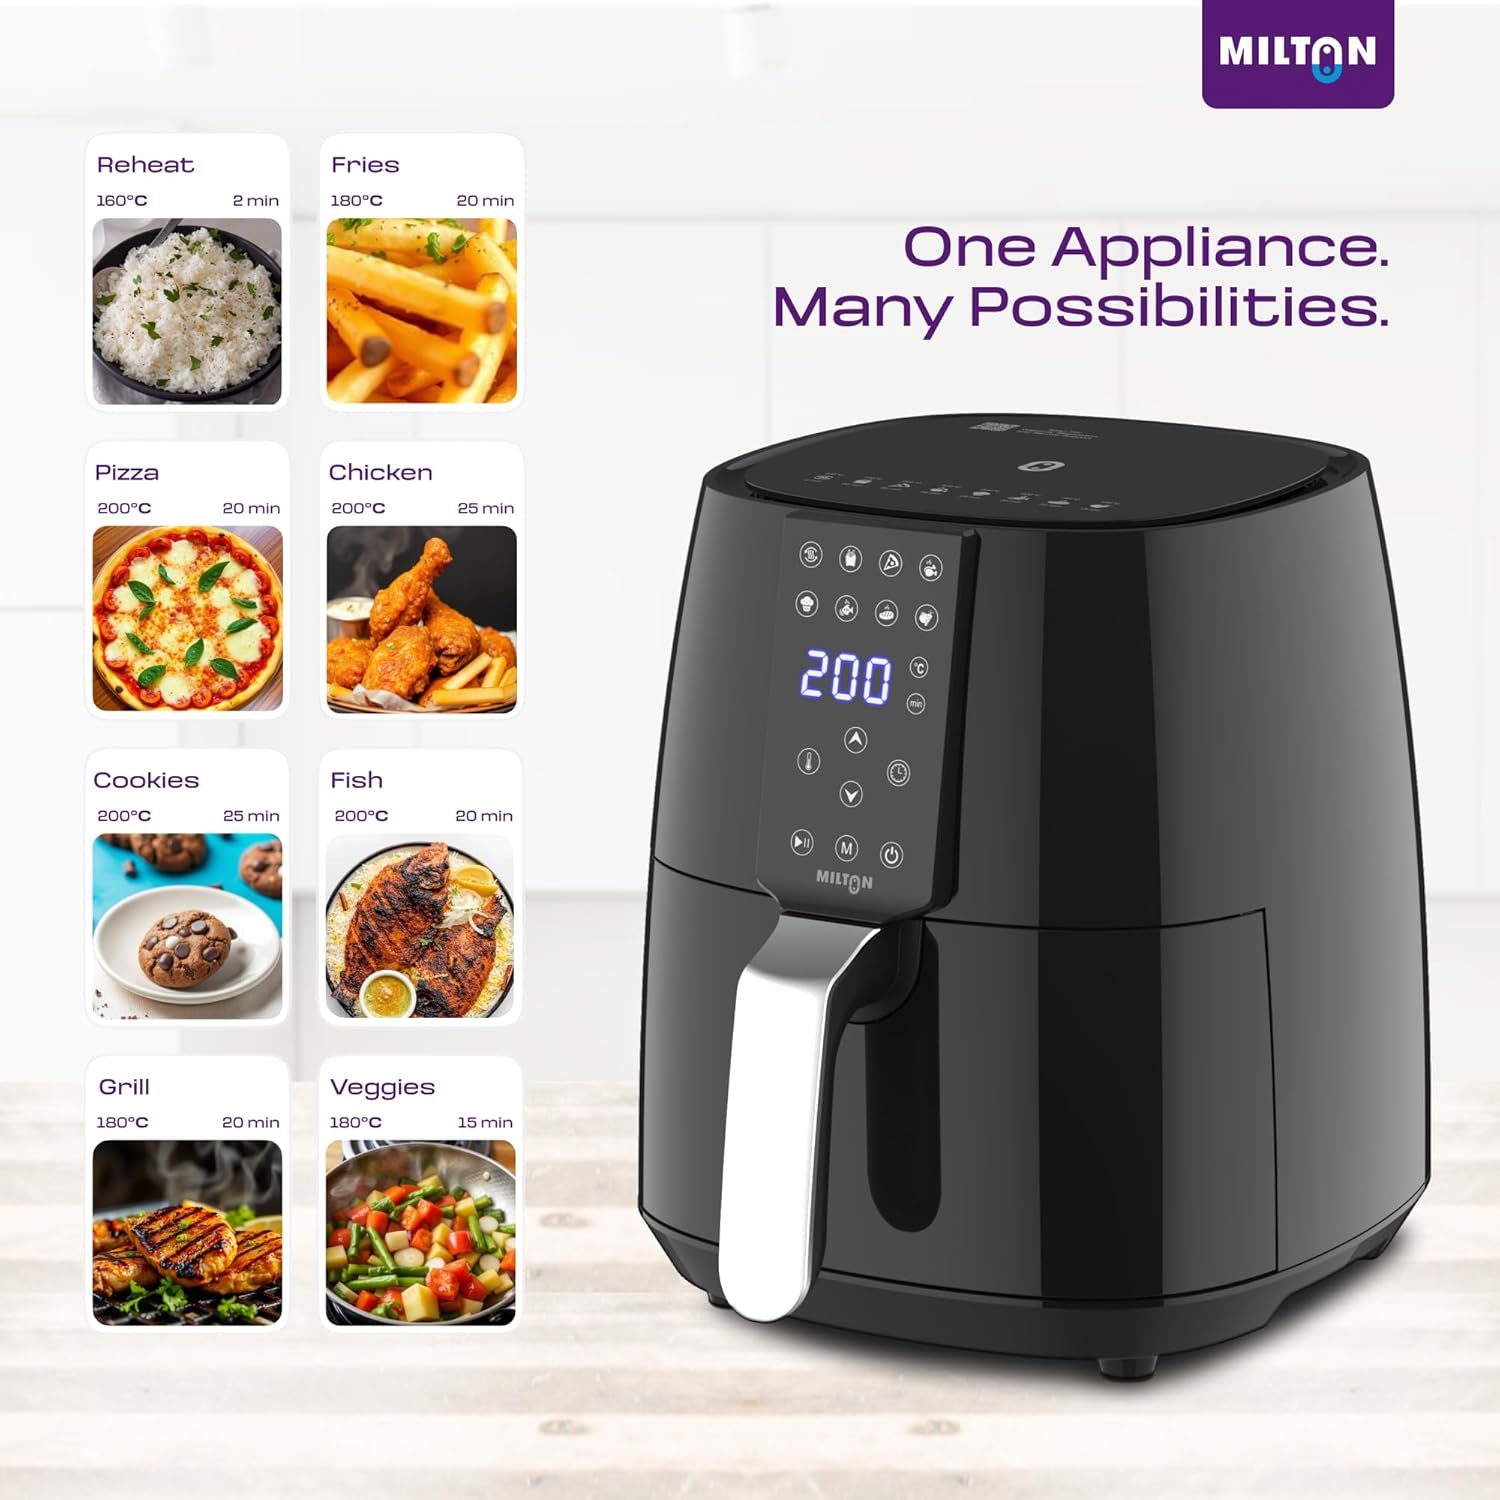
Figure 5: Illustration of 360° hot air circulation for even cooking.
6. Cleaning and Maintenance
Clean the appliance after every use.
6.1 Before Cleaning
- Unplug the appliance from the wall outlet.
- Allow the appliance to cool down completely before handling.
6.2 Cleaning Removable Parts
The frying basket and pan are dishwasher safe. Alternatively, they can be cleaned by hand:
- Remove the frying basket from the pan.
- Wash both parts with hot water, a mild dishwashing liquid, and a non-abrasive sponge.
- For stubborn food residue, soak the pan and basket in hot water with dish soap for approximately 10 minutes.
- Rinse and dry thoroughly before reassembling.
6.3 Cleaning the Main Unit
- Wipe the exterior of the appliance with a damp cloth. Do not use abrasive cleaners.
- Clean the inside of the appliance with a damp cloth and mild detergent.
- Clean the heating element with a cleaning brush to remove any food residue.
- Ensure all parts are completely dry before storing or next use.
7. Troubleshooting
| Problem | Possible Cause | Solution |
|---|---|---|
| Air fryer does not turn on. | Appliance is not plugged in. The frying pan is not inserted correctly. | Plug the power cord into a grounded wall outlet. Push the frying pan into the main unit until it clicks into place. |
| Food is not cooked evenly. | Too much food in the basket. Food was not shaken during cooking. | Cook smaller batches. Shake the basket halfway through cooking. |
| White smoke comes from the appliance. | Fat residues from previous use. Too much oil used. | Clean the pan and basket thoroughly after each use. Use less oil or pat food dry before air frying. |
| Food is not crispy. | Food type not suitable for air frying. Temperature too low or time too short. | Ensure food is suitable for air frying. Increase temperature or cooking time. |
8. Specifications
| Feature | Detail |
|---|---|
| Model Name | Milton Rapid Digital Air Fryer 4.2L |
| Capacity | 4.2 Liters |
| Power | 1450 Watts |
| Temperature Range | 80°C - 200°C |
| Control Method | Touch Control Panel |
| Product Dimensions (D x W x H) | 30.5D x 29.5W x 30.5H Centimeters |
| Item Weight | 3.8 Kilograms |
| Special Features | Automatic Shut-Off, Temperature Control, Timer, 8 Preset Menus, 360° High-Speed Air Circulation |
| Material | Plastic (Outer), Nonstick Coating (Inner) |
| Dishwasher Safe Parts | Frying Basket, Frying Pan |
| Included Components | 1 Air Fryer, User Manual |
9. Warranty and Customer Support
9.1 Manufacturer's Warranty
This Milton Rapid Digital Air Fryer 4.2L comes with a 1-year manufacturer's warranty from the date of purchase. The warranty covers manufacturing defects under normal household use. Please retain your proof of purchase for warranty claims.
9.2 Customer Support
For any queries, assistance, or warranty claims, please contact our customer support team:
- Phone: 9355645866
- Email: Info@miltonhomeappliances.com
- Operating Hours: Monday to Saturday, 10:00 AM to 5:30 PM (Excluding National Holidays)
Please have your product model and purchase details ready when contacting support.