1. Introduction
Thank you for choosing the HOSOM Entry Door Handle. This manual provides detailed instructions for the installation, operation, and maintenance of your new door handle. Please read this manual thoroughly before installation and keep it for future reference to ensure proper function and longevity of your product.
This heavy-duty satin brass keyed door handle is designed for secure front entrances and bedrooms, offering both security and a modern aesthetic.
2. Product Overview
The HOSOM Entry Door Handle features a robust design with dual safety mechanisms, suitable for various door types.

Figure 2.1: Top and bottom view of the HOSOM Entry Door Handle, showcasing its elegant satin brass finish and robust construction.
Key Features:
- Dual Safety: Suitable for locking two sides of exterior door handles, with one side locked by a turn-button and the other by a key, providing enhanced security.
- Door Compatibility: Adjustable latches fit 2-3/8'' (60mm) or 2-3/4'' (70mm) backsets. The door lock set fits 1-3/8" (35mm) to 1-3/4" (40mm) thickness doors.
- Premium Material: Crafted from heavy-duty and rustproof zinc alloy with ANSI Grade 3 certification for lasting durability.
- Modern Design: Features a trendy slim look with slightly rounded edges and wave-style handles, adding a stylish touch to your home.
- Easy to Install: Designed for quick and user-friendly assembly with just a screwdriver.

Figure 2.2: Detailed product size diagram, showing key measurements for the handle and latch components.

Figure 2.3: Diagram illustrating door thickness and backset compatibility, ensuring the handle fits most standard doors.

Figure 2.4: Illustration of the universal adjustable latch, showing settings for 2-3/8" (60mm) and 2-3/4" (70mm) backsets.

Figure 2.5: The reversible handle design allows for installation on both left-handed and right-handed doors, providing versatile application.
3. Specifications
| Attribute | Value |
|---|---|
| Brand | HOSOM |
| Model | 1 Pack Entry-Satin Brass |
| Material | Brass, Zinc |
| Color | Entry-Satin Brass |
| Exterior Finish | Gold |
| Product Dimensions | 6.89"L x 5.91"W |
| Included Components | Screw, Installation Hardware |
| Lock Type | Key Lock |
| Handle Material | Zinc |
| Hand Orientation | Ambidextrous |
| Item Weight | 1.87 pounds |
| Size | 1 Pack |
| Finish | Satin |
4. Installation
The HOSOM Entry Door Handle is designed for easy installation. Follow these steps carefully to ensure a secure and functional setup.
4.1. Package Contents
Before you begin, verify that all components are present in the package:
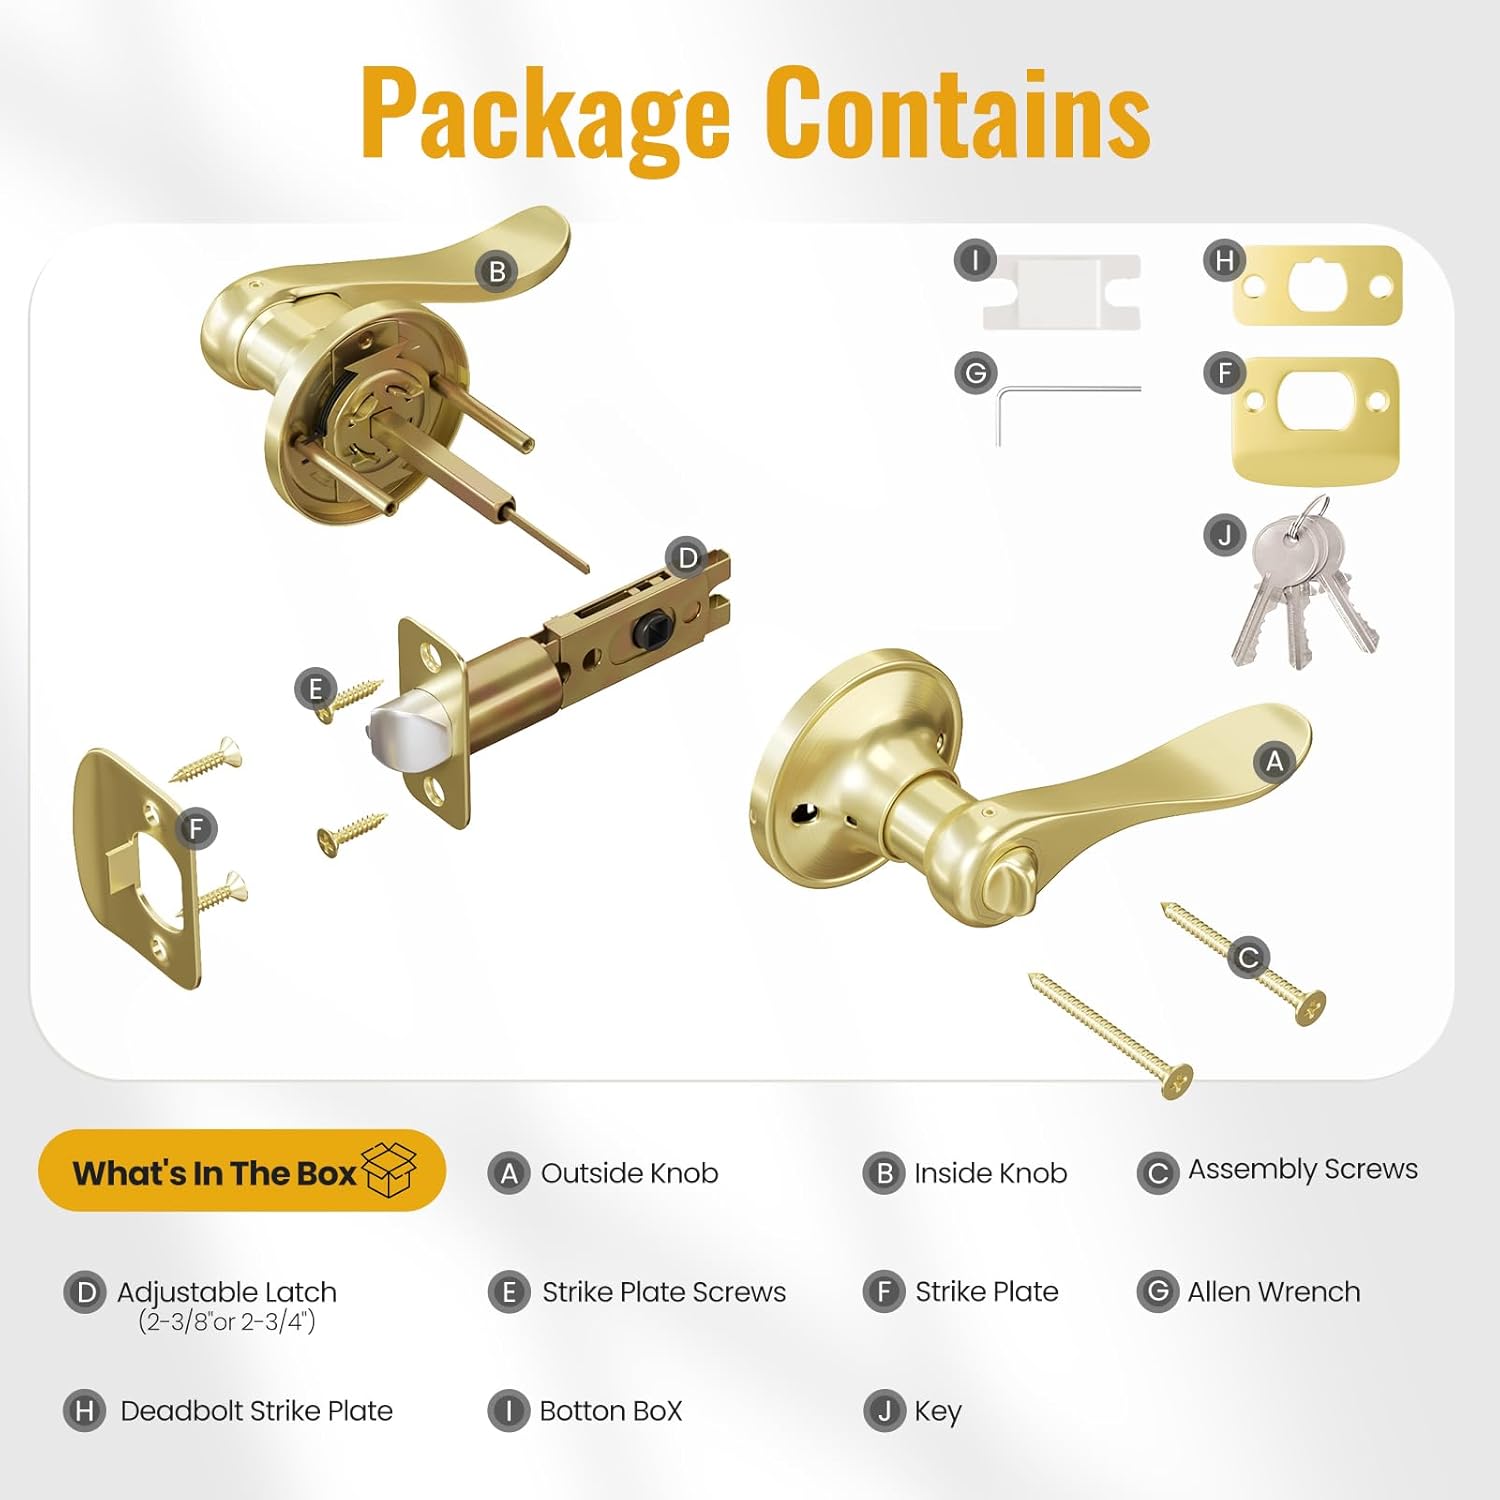
Figure 4.1: Contents of the HOSOM Entry Door Handle package, including all necessary hardware for installation.
- A: Outside Knob
- B: Inside Knob
- C: Assembly Screws
- D: Adjustable Latch (2-3/8" or 2-3/4")
- E: Strike Plate Screws
- F: Strike Plate
- G: Allen Wrench
- H: Deadbolt Strike Plate
- I: Botton Box (likely a typo for "Bolt Box" or similar component)
- J: Key
4.2. Installation Steps
A screwdriver is the only tool required for assembly.

Figure 4.2: Visual guide for key installation tips, showing component alignment and securing.
- Prepare the Door: Ensure your door has the correct bore holes and backset. The adjustable latch can be set for either 2-3/8" (60mm) or 2-3/4" (70mm) backsets.
- Install the Latch: Insert the adjustable latch (D) into the door edge. Ensure the bevel of the latch bolt faces the door frame. Secure with screws.
- Install the Exterior Handle: Place the outside knob (A) through the bore hole, ensuring the spindle aligns with the latch mechanism.
- Install the Interior Handle: Position the inside knob (B) on the interior side, aligning it with the exterior handle and latch.
- Secure the Handles: Use the assembly screws (C) to firmly connect the interior and exterior handles through the door. Tighten securely but do not overtighten.
- Install Strike Plate: Attach the strike plate (F) and deadbolt strike plate (H) to the door frame using the strike plate screws (E). Ensure they align perfectly with the latch bolt when the door is closed.
- Test Functionality: Close the door and test the handle's operation from both sides. Ensure the latch retracts smoothly and the lock engages properly with the key and thumb-turn.
Note: The striker plate is typically round. Avoid strong impact or distortion during installation to prevent damage.
5. Operation
Operating your HOSOM Entry Door Handle is straightforward, providing secure access and privacy.
5.1. Locking and Unlocking

Figure 5.1: The exterior side features a keyhole for locking/unlocking, while the interior side has a thumb-turn button for convenient locking.
- From the Exterior: Insert the provided key into the keyhole and turn to lock or unlock the handle. Remove the key after operation.
- From the Interior: Use the thumb-turn button located on the interior handle. Rotate the button to engage or disengage the lock.
5.2. Emergency Unlock Feature

Figure 5.2: The door lock features an emergency unlock on the exterior and a thumb-turn on the interior for easy access from both sides.
In case of an emergency or accidental lockout from the exterior, the handle is equipped with an emergency unlock feature. A small tool (such as a paperclip or the provided Allen wrench) can be inserted into the small hole on the exterior knob to disengage the lock. This feature is primarily for privacy handles but is noted for entry handles as well for emergency access.
6. Maintenance
Proper maintenance will ensure the longevity and smooth operation of your HOSOM Entry Door Handle.
- Cleaning: Clean the handle regularly with a soft, damp cloth. Avoid using abrasive cleaners, harsh chemicals, or solvents, as these can damage the satin brass finish.
- Lubrication: Periodically apply a small amount of graphite lubricant or a silicone-based spray to the latch mechanism and key cylinder to ensure smooth operation. Do not use oil-based lubricants as they can attract dust and grime.
- Tightening Screws: Over time, screws may loosen. Periodically check and tighten all visible screws, especially the assembly screws, to maintain stability and prevent wobbling.
- Inspection: Inspect the handle for any signs of wear, damage, or corrosion. Address any issues promptly to prevent further deterioration.
7. Troubleshooting
If you encounter any issues with your HOSOM Entry Door Handle, refer to the following common troubleshooting tips:
| Problem | Possible Cause | Solution |
|---|---|---|
| Handle is loose or wobbly. | Mounting screws are loose. | Tighten the assembly screws (C) that connect the interior and exterior handles. |
| Latch bolt does not retract smoothly. | Lack of lubrication or debris in the mechanism. | Apply graphite lubricant or silicone spray to the latch mechanism. Clean any visible debris. |
| Key is difficult to turn or stuck. | Key cylinder needs lubrication or is obstructed. | Apply graphite lubricant into the key cylinder. Ensure the key is fully inserted and not bent. |
| Door does not latch or lock properly. | Strike plate misalignment or incorrect backset setting. | Check the alignment of the strike plate on the door frame. Adjust the latch backset if necessary (2-3/8" or 2-3/4"). Ensure the door frame is not warped. |
| Handle does not return to horizontal position. | Internal spring issue or improper installation. | Recheck installation steps, ensuring all components are correctly aligned and screws are not overtightened. If the issue persists, contact customer support. |
8. Warranty and Support
HOSOM is committed to providing high-quality products. While specific warranty details are not provided in this manual, we recommend retaining your proof of purchase for any warranty claims.
For technical assistance, replacement parts, or any questions regarding your HOSOM Entry Door Handle, please contact HOSOM customer support through the retailer where the product was purchased or visit the official HOSOM brand store online.
HOSOM Brand Store: https://www.amazon.com/stores/HOSOM/page/775C3429-D2C4-4C1C-BE66-43D7C9721487


