1. Introduction
This manual provides detailed instructions for the installation, operation, and maintenance of your new 12.3-inch LCD Digital Virtual Cockpit Cluster. Designed for compatibility with BMW E65 and E66 7 Series models from 2004 to 2008, this advanced instrument panel offers enhanced display features and integration with your vehicle's systems. Please read this manual thoroughly before installation and use to ensure proper functionality and safety.
Key Features:
- 12.3-inch high-resolution (1920x720) LCD screen.
- Full compatibility with original car information and fault code display.
- Linux operating system for stable and fast performance.
- High contrast display for clear visibility in various lighting conditions.
- Multiple view models and customizable features.
- Plug-and-play installation, no coding required.
- Integration with vehicle interior design.
2. Setup and Installation
The 12.3-inch LCD Digital Virtual Cockpit Cluster is designed for easy installation, featuring a plug-and-play setup that typically requires no coding. However, professional installation is recommended to ensure correct wiring and integration with your vehicle's existing systems.
2.1 Pre-Installation Checklist
- Ensure your vehicle is a BMW E65 or E66 7 Series model manufactured between 2004 and 2008.
- Verify all components are present in the package.
- Disconnect the vehicle's battery before beginning installation to prevent electrical damage.
- Gather necessary tools (e.g., trim removal tools, screwdrivers).
2.2 Installation Steps (General Guide)
- Carefully remove the existing instrument cluster from your vehicle's dashboard. Refer to your vehicle's service manual for specific instructions on dashboard disassembly.
- Disconnect all wiring harnesses from the old instrument cluster.
- Connect the corresponding wiring harnesses from your vehicle to the new 12.3-inch LCD Digital Virtual Cockpit Cluster. Ensure all connections are secure.
- Carefully position the new cluster into the dashboard opening.
- Secure the cluster in place using the original mounting points or provided hardware.
- Reconnect the vehicle's battery.
- Turn on the ignition and verify the new cluster powers on and displays information correctly.
- Reassemble any removed dashboard trim pieces.
Note: This unit is designed to work with or without a Head-Up Display (HUD). If your vehicle has a HUD, the cluster will integrate seamlessly.

Figure 2.1: The 12.3-inch LCD Digital Virtual Cockpit Cluster installed in a vehicle dashboard, demonstrating its integration and display alongside the original infotainment screen.
3. Operation
Your new virtual cockpit cluster provides a dynamic and customizable display of essential vehicle information. The system operates on a stable Linux platform, ensuring quick response times and reliable performance.
3.1 Display Modes and Customization
The cluster supports various display modes, allowing you to personalize the information presented. These modes typically include:
- Standard View: Displays speedometer, tachometer, fuel level, and engine temperature, often with a central vehicle graphic.
- Sport View: May emphasize performance metrics like RPM and speed, with a more dynamic visual theme.
- Efficiency View: Focuses on fuel consumption, average speed, and trip data.
- Vehicle Information: Provides detailed data such as tire pressure, vehicle status, and maintenance alerts.
Navigation between these modes and customization of displayed elements are typically controlled via the vehicle's steering wheel buttons or iDrive controller. Refer to your BMW's original owner's manual for specific controls related to instrument cluster interaction.

Figure 3.1: Standard display mode showing speed, RPM, and a vehicle graphic.

Figure 3.2: Efficiency display mode with detailed trip and fuel economy data.

Figure 3.3: Customization screen for display settings and vehicle appearance.

Figure 3.4: Vehicle information display, including tire pressure and other alerts.
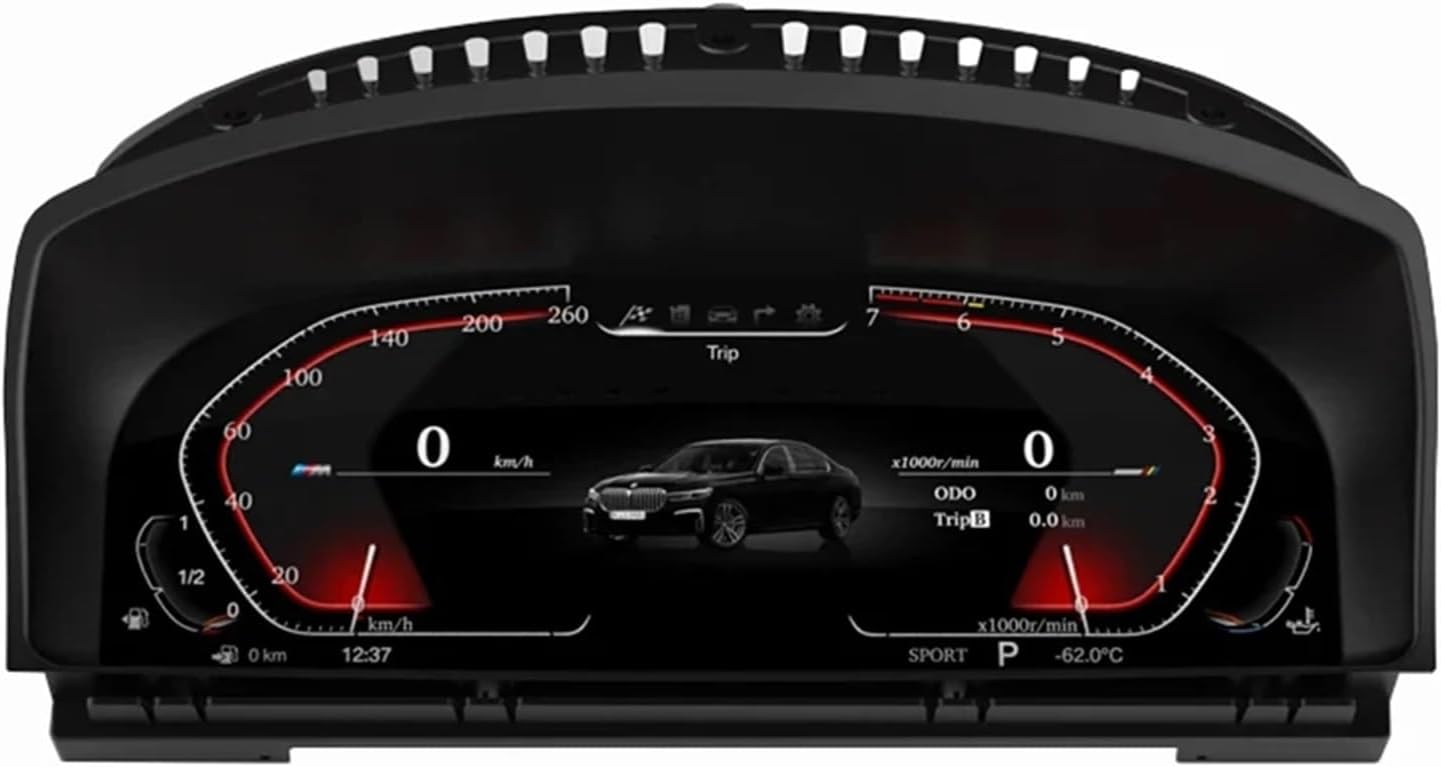
Figure 3.5: System information screen displaying software and protocol versions.
3.2 Safety Features
The cluster is designed to fully integrate with your vehicle's original safety systems, including fault code display. This ensures that critical warnings and diagnostic information are presented clearly and promptly.
4. Maintenance
To ensure the longevity and optimal performance of your LCD Digital Virtual Cockpit Cluster, follow these simple maintenance guidelines:
- Cleaning: Use a soft, lint-free cloth slightly dampened with water or a screen-specific cleaning solution. Avoid abrasive cleaners, solvents, or harsh chemicals that could damage the screen surface.
- Temperature: While designed for automotive environments, avoid exposing the unit to extreme temperatures for prolonged periods.
- Physical Damage: Protect the screen from impacts or sharp objects.
- Software Updates: Periodically check with the manufacturer or your installer for any available software updates to ensure the best performance and compatibility.
5. Troubleshooting
If you encounter issues with your virtual cockpit cluster, refer to the following common problems and solutions:
| Problem | Possible Cause | Solution |
|---|---|---|
| Display does not power on. | Loose power connection; Blown fuse; Incorrect installation. | Check all wiring connections. Inspect vehicle fuses related to the instrument cluster. Re-verify installation steps or consult a professional. |
| Incorrect information displayed (e.g., speed, fuel). | Improper vehicle coding (unlikely for plug-and-play); Software glitch; Sensor issue. | Restart the vehicle. Ensure the unit is fully compatible with your specific vehicle sub-model. If issues persist, contact technical support. |
| Screen flickering or distorted image. | Loose video cable connection; Software issue; Hardware defect. | Check video cable connections. Restart the vehicle. If the problem continues, contact customer support. |
| Vehicle fault codes not displayed. | Integration issue with vehicle's CAN bus. | Ensure all CAN bus connections are secure. Consult a professional for diagnosis. |
For issues not listed above or if troubleshooting steps do not resolve the problem, please contact customer support.
6. Specifications
| Feature | Detail |
|---|---|
| Screen Size | 12.3 inches |
| Screen Resolution | 1920 x 720 pixels |
| Operating System | Linux |
| Compatibility | BMW E65 E66 7 Series (2004-2008) |
| Material Type | LCD |
| Item Weight | 1.76 ounces |
| Package Dimensions | 1.18 x 0.79 x 0.39 inches |
| OEM NO. (Interchange Part Number) | 62109442851 |
| Special Features | Virtual Cockpit, Plug and Play |
7. Warranty and Support
For warranty information, please refer to the terms and conditions provided at the time of purchase or contact your retailer. Typically, electronic components come with a limited warranty covering manufacturing defects.
Customer Support: If you require technical assistance, have questions about installation, or need to report a defect, please contact the seller or manufacturer directly. Have your product model number and purchase details ready when contacting support.
Manufacturer: gugugyo shop
Brand: TKNSHYDW


