Introduction
This manual provides essential instructions for the setup, operation, and maintenance of your Generic GAMEBOX Plus G10 Retro Game Console. Please read this guide thoroughly before using the device to ensure proper functionality and a safe gaming experience. The GAMEBOX Plus G10 is designed to deliver a vast library of classic and 3D games, offering entertainment for all ages with its user-friendly interface and wireless controllers.
Package Contents
Verify that all items listed below are present in your package:
- GAMEBOX Plus G10 Console Unit
- 2 x Wireless Game Controllers
- HDMI Cable
- Power Adapter
- USB Receiver for Wireless Controllers
- User Manual (this document)
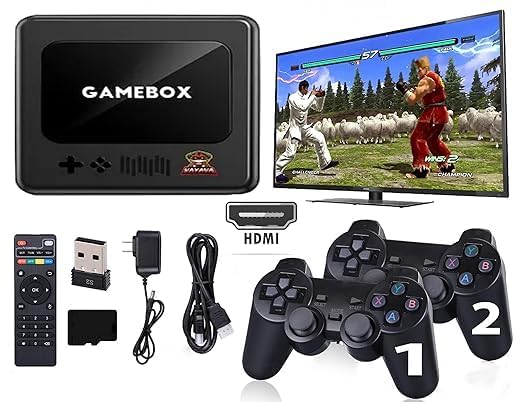
Image: The GAMEBOX Plus G10 console, two wireless controllers, and a TV screen displaying game selection, illustrating the complete gaming setup.
Product Overview
The GAMEBOX Plus G10 console is a compact device designed for retro gaming. It features multiple ports for connectivity and a simple interface for game selection.
Console Unit
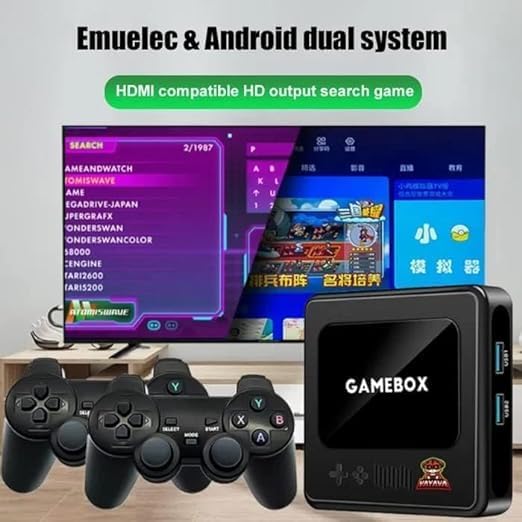
Image: Front view of the GAMEBOX Plus G10 console, showing the "GAMEBOX" logo and control pad icons.
- Front Panel: Power indicator, decorative elements.
- Side Panels: USB ports (USB1, USB2), HDMI output, DC power input.

Image: Side view of the GAMEBOX Plus G10 console, highlighting the USB1 and USB2 ports for connecting accessories like the wireless controller receiver.
Wireless Controllers
The console includes two wireless controllers for comfortable gameplay. Each controller features a D-pad, action buttons, and start/select buttons.
Setup Instructions
- Connect to TV: Insert one end of the HDMI cable into the HDMI OUT port on the GAMEBOX Plus G10 console and the other end into an available HDMI input on your television or monitor.
- Connect Power: Plug the power adapter into the DC IN port on the console, then plug the adapter into a standard electrical outlet.
- Insert USB Receiver: Plug the USB receiver for the wireless controllers into one of the USB ports (USB1 or USB2) on the side of the console.
- Power On Console: Press the power button on the console (if available) or ensure it powers on automatically when connected to power.
- Power On Controllers: Insert batteries (not included) into the wireless controllers. Press the HOME or START button on each controller to power them on and establish a connection with the console via the USB receiver. The indicator light on the controller should become solid once connected.
- Select Input: On your television, select the correct HDMI input source using your TV remote control.
- Start Gaming: The console's main menu should now appear on your screen.
Operating Instructions
Navigating the Menu
Use the D-pad on your wireless controller to navigate through the game categories and game lists. The 'A' button (or equivalent) typically selects an option, and the 'B' button (or equivalent) usually returns to the previous screen.
Selecting and Launching Games
From the main menu, select a game category (e.g., "Retro Games," "3D Games"). Browse the list of available games. Press the 'A' button to launch the selected game.
In-Game Controls
Controller button functions vary by game. Refer to the specific game's instructions or experiment with the buttons to understand their functions. Most retro games follow standard controller layouts.
Saving and Exiting Games
Many games offer in-game save features. Additionally, the console may provide a system-level save state function. To exit a game and return to the main menu, typically press a combination of buttons (e.g., START + SELECT simultaneously) or access an in-game menu option.
Maintenance
- Cleaning: Use a soft, dry cloth to clean the console and controllers. Do not use liquid cleaners or abrasive materials.
- Storage: Store the console and accessories in a cool, dry place away from direct sunlight and extreme temperatures.
- Controller Batteries: Remove batteries from wireless controllers if they will not be used for an extended period to prevent leakage.
- Ventilation: Ensure the console has adequate ventilation during operation to prevent overheating. Do not block any vents.
Troubleshooting
| Problem | Possible Solution |
|---|---|
| No power to console |
|
| No display on TV |
|
| Wireless controllers not responding |
|
| Game freezes or crashes |
|
Specifications
| Model Name | G10 |
| Brand | Generic |
| Material Type | PVC |
| Color | Black |
| Product Dimensions | 15 x 15 x 15 cm |
| Item Weight | 450 g |
| Storage | 64GB (Preloaded with 25,000+ games) |
| Input Device | Gamepad (Wireless) |
| Output | HDMI compatible HD output |
| Recommended Age | 18 months and up |
Warranty Information
Specific warranty terms and conditions for the GAMEBOX Plus G10 Retro Game Console are provided by the retailer or manufacturer at the time of purchase. Please refer to your purchase documentation or contact the seller directly for detailed warranty information, including coverage period and claim procedures.
Customer Support
For further assistance, technical support, or inquiries regarding your GAMEBOX Plus G10 console, please contact the retailer from whom you purchased the product. They can provide guidance and support specific to your region and purchase.


