
1. Introduction
This manual provides essential information for the safe and efficient operation of your FLASHFORGE AD5X 3D Printer. Please read it thoroughly before initial use and retain it for future reference.
The FLASHFORGE AD5X is a smart multi-color 3D printer designed for high-speed and precise printing. It features an Intelligent Filament System (IFS) for up to 4-color printing, fully automatic leveling, and a 300°C direct extruder, supporting various filament types including PLA-CF and PETG-CF.
2. What's in the Box
Carefully unpack all components and verify against the list below. If any items are missing or damaged, contact customer support.
- AD5X 3D Printer x1
- 10g HS PLA Filament x4
- Power cable x1
- IFS connection cable x1
- 4-in-1 guide tube x1
- Display Screen x1
- Spool Holder x4
- Mounting Plate x1
- IFS (Intelligent Filament System) x1
- Screw M3*6 x4
- Cable Clip x1
- Grease x1
- Screwdriver x1
- Allen Wrench Kits x1
- Diagonal Pliers x1
- Quick Start Guide x1

Figure 2.1: The FLASHFORGE AD5X 3D Printer with a multi-color print in progress.
3. Setup
3.1 Unboxing and Initial Placement
Remove the printer from its packaging. Place the printer on a stable, level surface in a well-ventilated area, away from direct sunlight and heat sources. Ensure adequate space around the printer for operation and maintenance.
3.2 Power Connection
Connect the provided power cable to the printer's power input and then to a suitable power outlet. Ensure the power switch is in the OFF position before connecting.
3.3 Intelligent Filament System (IFS) Setup
The AD5X features an Intelligent Filament System for multi-color printing and automatic filament management.
- Mount the spool holders onto the designated positions on the printer.
- Place filament spools onto the holders. The IFS supports up to 4 colors.
- Feed the filament into the IFS unit. The system supports auto filament loading/unloading and up to 4kg filament auto refill.
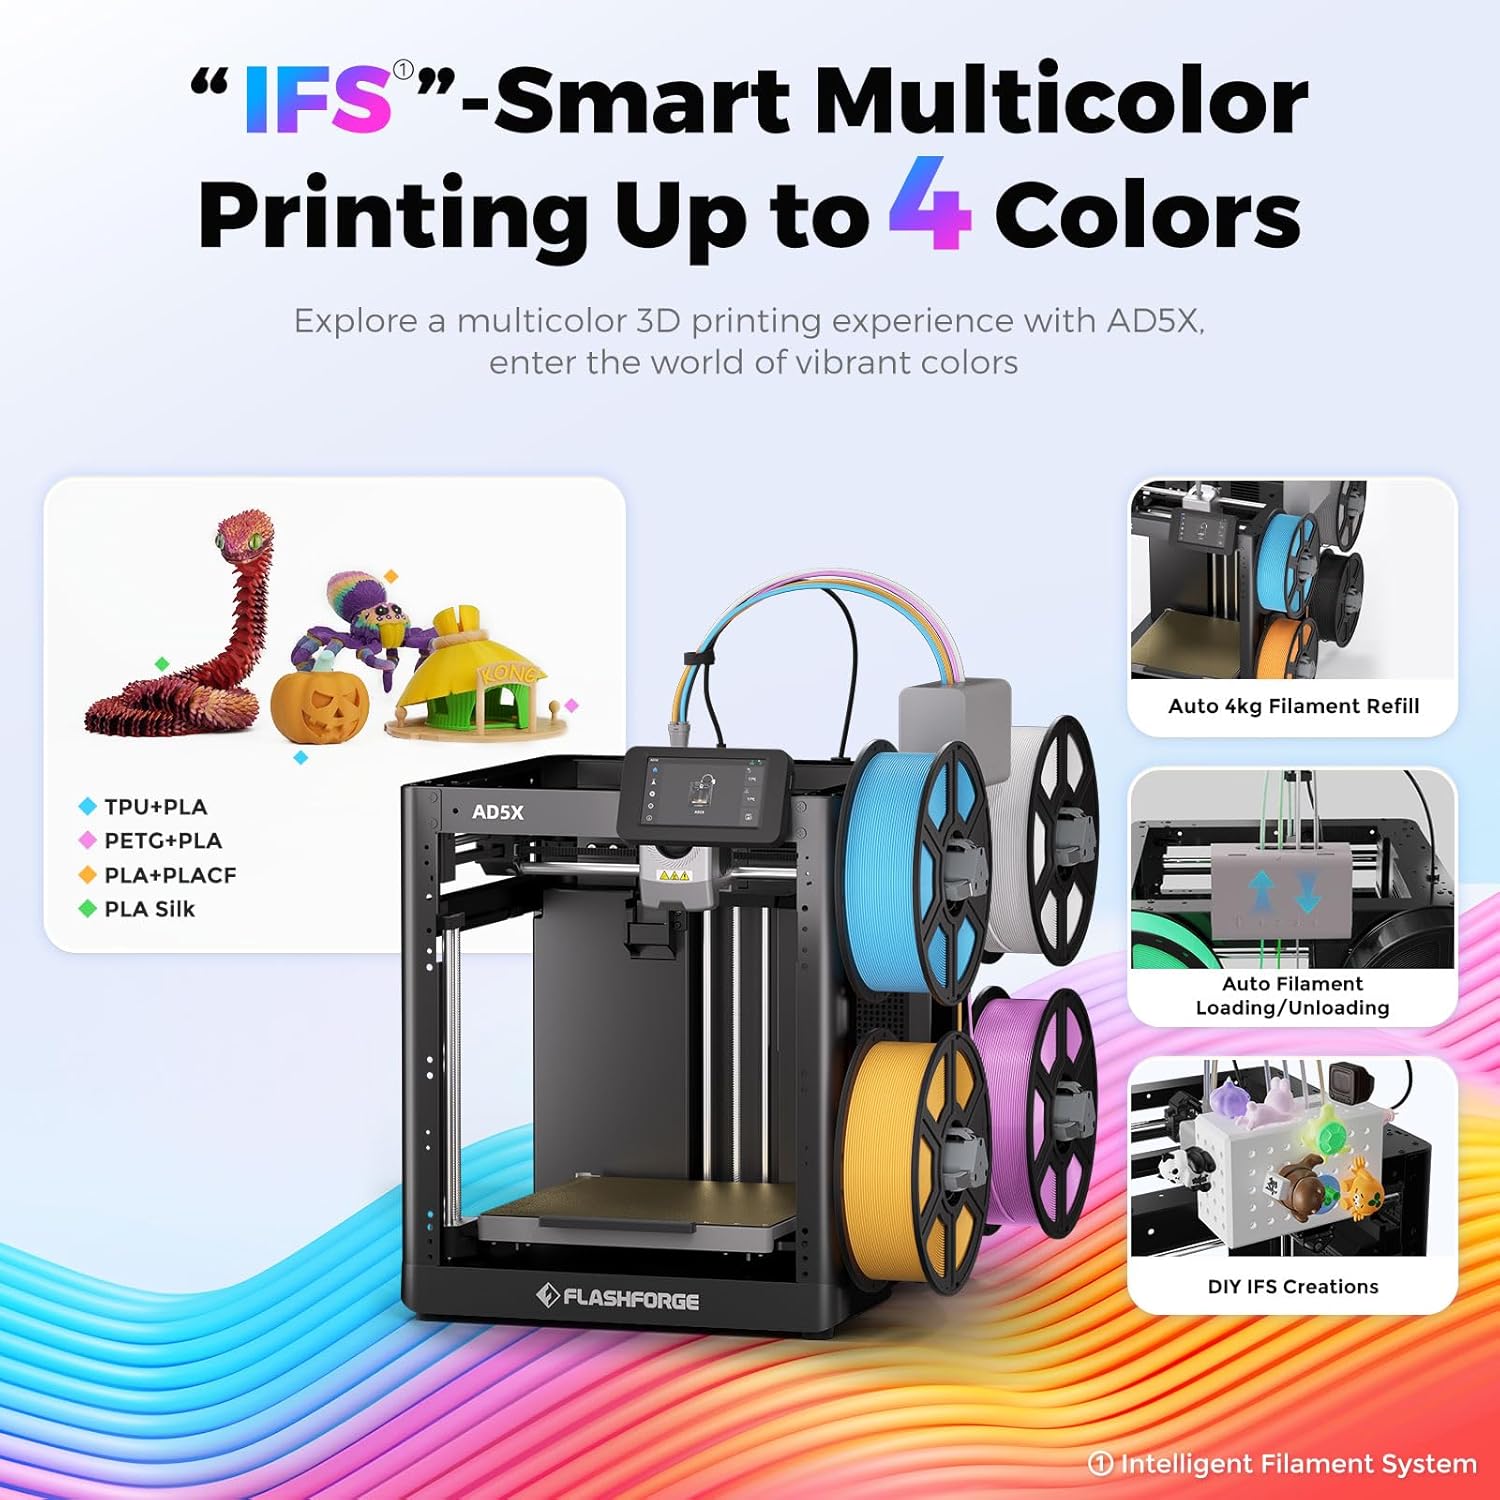
Figure 3.1: The Intelligent Filament System (IFS) for multi-color printing.
Video 3.1: Demonstration of the AD5X's various filament support and loading process.
3.4 Automatic Bed Leveling
The AD5X features one-click auto leveling to ensure a perfect first layer.
- Ensure the build plate is clear of any debris or foreign objects.
- On the 4.3-inch colorful touchscreen, navigate to the leveling function.
- Initiate the one-click auto leveling process. The printer will automatically calibrate the build plate.
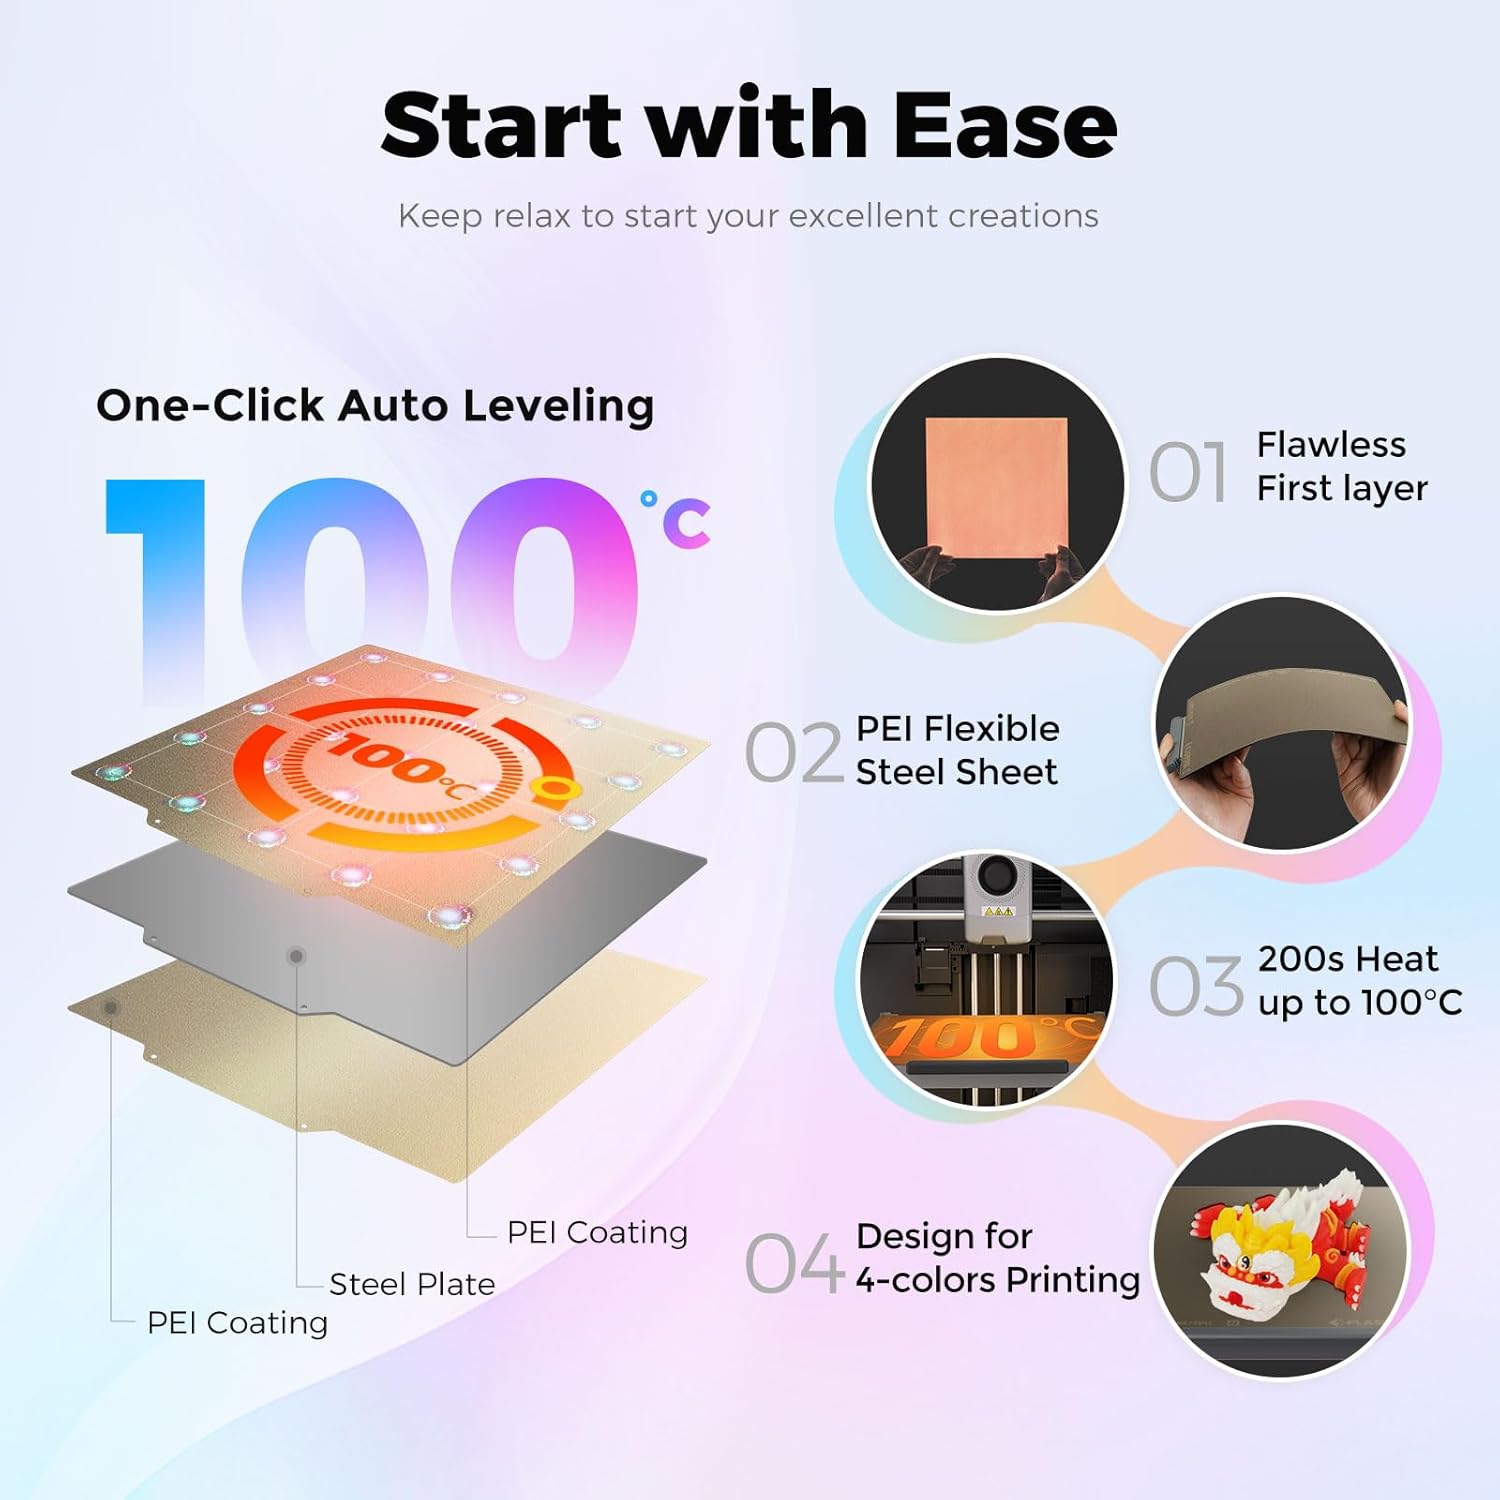
Figure 3.2: One-Click Auto Leveling ensures a flawless first layer.
Video 3.2: A note on the AD5X 3D Printer, showing the screen interface and leveling process.
4. Operating Instructions
4.1 Software Installation and Slicing
The FLASHFORGE AD5X is compatible with Flash Maker and Orca-Flashforge (or Orca Slicer) for preparing your 3D models for printing.
- Download and install the latest version of FlashPrint or Orca-Flashforge from the official FLASHFORGE website.
- Open your 3D model file (e.g., STL, OBJ) in the slicing software.
- Configure print settings such as layer height, infill density, print speed (up to 300mm/s), and travel speed (up to 600mm/s).
- For multi-color prints, ensure the color zones and filament types set in the software are consistent with the physical setup of the IFS. Inconsistent settings may lead to color errors in the model.
- Slice the model to generate the G-code file.
Video 4.1: Demonstration of the AD5X's capability for up to 4-color printing.
Video 4.2: Overview of the FLASHFORGE AD5X 3D Printer, including software interaction and printing.
4.2 Sending Files to the Printer
The AD5X offers multiple connectivity options:
- Wi-Fi: Connect the printer to your local Wi-Fi network for wireless file transfer and remote monitoring via Flash Maker app or Orca-Flashforge.
- USB: Transfer G-code files using a USB drive.
- Ethernet: Connect the printer to your network via an Ethernet cable for stable data transfer.
4.3 Starting a Print
- Select the desired G-code file from the printer's touchscreen interface.
- Confirm the print settings and material selection.
- Press 'Print' to begin. The printer will pre-heat the nozzle and build plate before starting the print.

Figure 4.1: Multi-device management allows remote control and monitoring of multiple printers.
5. Maintenance
5.1 Nozzle Maintenance
The AD5X features a 300°C high-temperature direct extruder with quick-swap nozzles.
- Regularly inspect the nozzle for clogs or wear.
- To swap the nozzle, ensure the extruder is cooled down. Follow the quick-swap procedure outlined in the detailed user manual. Available nozzle diameters include 0.25mm, 0.4mm, 0.6mm, and 0.8mm.

Figure 5.1: The 300°C High Temp Direct Extruder with quick-swap nozzle options.
5.2 Build Plate Care
The PEI flexible steel sheet build plate provides excellent adhesion and easy print removal.
- Clean the build plate with isopropyl alcohol (IPA) before each print to ensure optimal adhesion.
- Avoid using sharp objects to remove prints, as this can damage the PEI surface.
5.3 General Cleaning
Keep the printer clean from dust and filament debris. Regularly wipe down the exterior and internal components (when powered off) with a soft, dry cloth.
6. Troubleshooting
6.1 Common Printing Issues
- Poor First Layer Adhesion: Ensure the build plate is clean and properly leveled. Adjust Z-offset if necessary.
- Filament Not Extruding: Check for clogged nozzle, tangled filament, or incorrect filament loading. The printer features filament detection to alert you to issues.
- Layer Shifting: Verify that belts are properly tensioned and the printer is on a stable surface. The AD5X includes vibration compensation to minimize this issue.
6.2 Connectivity Problems
If you experience issues with Wi-Fi or Ethernet connectivity:
- Ensure the printer is within range of your Wi-Fi router.
- Verify network settings on the printer and your computer/app.
- Restart both the printer and your network router.
6.3 Power Loss Recovery
The AD5X features power loss recovery. In case of a power outage, the printer will resume printing from where it left off once power is restored.

Figure 6.1: Overview of additional functions including power loss recovery and filament detection.
7. Specifications
| Feature | Specification |
|---|---|
| Device Name | AD5X |
| Extruder Quantity | 1 |
| Printing Precision | ±0.1mm (based on 100mm cubes) |
| Positioning Accuracy | X/Y-axis: 0.0125mm, Z-axis: 0.0025mm |
| Layer Thickness | 0.1-0.4mm |
| Build Volume | 220x220x220mm |
| Nozzle Diameter | 0.4mm (default), 0.25/0.6/0.8mm (optional) |
| Printing Speed | 10-300mm/s |
| Max Acceleration | 20000mm/s² |
| Max Travel Speed | 600mm/s |
| Max Extruder Temp | 300°C |
| Power Supply | Input: AC 100-120V/200-240V, 50/60Hz, 650W |
| Device Dimensions | 363x356x413mm |
| Net Weight | 11.4kg |
| Connectivity | USB/Wi-Fi/Ethernet |
| Operating Temp | 15-30°C |
| Compatible Operating System | Windows 7/8/10/11, Mac OS: support version 10.9 or later |
| Slicing Software | Orca-Flashforge/Orca Slicer |
| Max Bed Temp | 110°C |
| Leveling Method | One-click auto leveling |
| Filament Run-out Reminder | Yes |
| Power Loss Recovery | Yes |
| Smart Touch Screen | 4.3-inch |
| Build Plate | PEI steel sheet |
8. Warranty and Support
For warranty information and technical support, please refer to the official FLASHFORGE website or contact your local distributor. Keep your purchase receipt as proof of purchase.


