Introduction
This manual provides comprehensive instructions for the safe and efficient operation of your Makeid L1 Label Maker Machine. Please read this manual thoroughly before using the device to ensure proper functionality and to prevent damage. Keep this manual for future reference.

Image: The Makeid L1 Label Maker Machine, a compact white device, shown with three rolls of white label tape. A label is partially extended from the machine, displaying "MakeID Label Printer".
What's in the Box
Your Makeid L1 Label Maker Machine package includes the following items:
- Makeid L1 Label Maker Machine (1 unit)
- Label Tapes (3 rolls - specific sizes/types may vary)
- USB Charging Cable (1 unit)
- User Manual (this document)
Setup
1. Charging the Device
The Makeid L1 Label Maker is rechargeable. Before first use, ensure the device is fully charged. Connect the provided USB charging cable to the charging port on the label maker and to a compatible USB power adapter (not included).
The charging indicator light will show the charging status. Refer to the device's LED indicator for full charge notification.
2. Installing Label Tape
- Open the tape compartment cover on the label maker.
- Insert a roll of Makeid compatible label tape into the compartment, ensuring the tape feeds correctly.
- Pull out the transparent guide piece from the exit of the machine before printing.
- Close the tape compartment cover securely.

Image: A hand inserting a roll of white label tape into the open compartment of the Makeid L1 Label Maker. An inset shows the instruction to pull out the transparent guide piece from the tape exit.
3. App Download and Bluetooth Connection
The Makeid L1 Label Maker operates via a dedicated mobile application. Follow these steps to connect:
- Download the "MakeID-Life" app from your device's app store.
- Ensure Bluetooth is enabled on your mobile device.
- Open the MakeID-Life app.
- Turn on the Makeid L1 Label Maker.
- Within the app, search for and select the "L1" model to establish a Bluetooth connection. Confirm the connection when prompted.
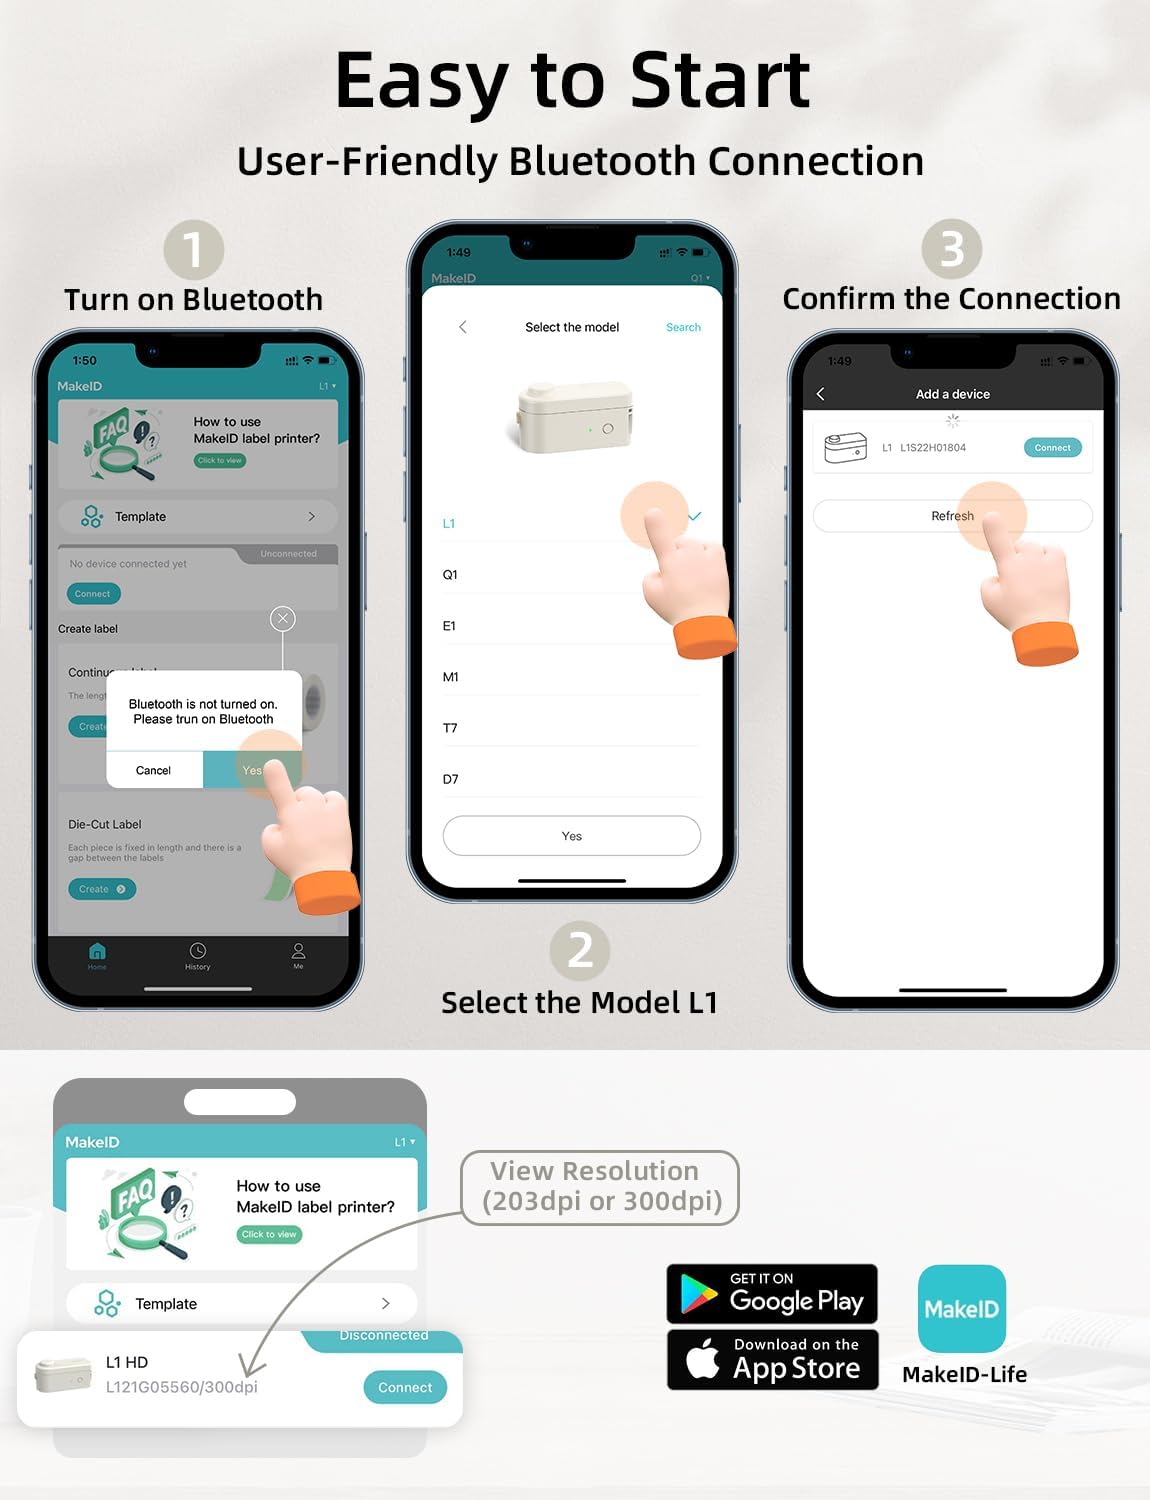
Image: A sequence of three smartphone screen images demonstrating how to connect the Makeid L1 label maker via Bluetooth. Steps include turning on Bluetooth, selecting the L1 model in the app, and confirming the connection. App store logos for Google Play and App Store are also visible.
Operating Instructions
1. Designing Your Labels
The MakeID-Life app provides extensive customization options for your labels:
- Multi-Font Selection: Choose from various font styles to personalize your text.
- Symbols & Emojis: Access a library of symbols, icons, and emojis to enhance your labels.
- Images & QR Codes: Integrate images or generate QR codes directly onto your labels.
- Templates: Utilize pre-designed templates for common labeling needs.

Image: A smartphone displaying the MakeID-Life app interface, showing options for multi-font selection and a wide array of icons and symbols for label customization. Examples of designed labels with text, QR codes, and images are also shown.
2. Printing Labels
Once your label design is complete in the app, ensure your label maker is connected and has sufficient battery. Press the "Print" button within the app to send the design to the label maker. The label will be printed using thermal technology.
3. Cutting Labels
The Makeid L1 features a built-in cutter for precise label separation. After printing, wait for the label to fully emerge from the printer, then press the designated cut button on the device to cleanly cut the tape.
4. Label Types: Continuous vs. Die-Cut
The Makeid L1 supports both continuous and die-cut label tapes, offering versatility for various applications:
- Continuous Labels: Ideal for custom lengths, such as file labels, document organization, or long descriptions. Available in various widths (e.g., 9mm, 12mm, 16mm).
- Die-Cut Labels: Pre-sized labels perfect for specific items like jar labels, product tags, or date stamps.

Image: A visual comparison of continuous labels (showing examples for client proposals, insurance policies, user manuals in 9mm, 12mm, 16mm widths) and die-cut labels (showing examples for opening dates and names). The image also shows practical applications like labeling file folders and food containers.
5. Applications
The Makeid L1 Label Maker is suitable for a wide range of labeling needs:
- Personal Organization: Labeling personal items, stationery, or storage boxes.
- Business Use: Creating price tags, product labels, or inventory management labels.
- Kitchen Organization: Labeling food containers, spices, or pantry items.
- Office & School: Organizing files, documents, books, and supplies.
- Crafts & Hobbies: Adding labels to craft projects or storage.

Image: A collage of images demonstrating the versatile use of Makeid L1 labels, including labeling personal items like laptops, business items like packaged utensils with prices, kitchen items like food jars, and cautionary labels for documents.

Image: A visual guide showing how Makeid L1 labels can be used to organize various aspects of life, including household management (labeling boxes), craft inspiration (decorative labels), file labeling (organizing documents), food storage (labeling jars), and creating name tags.
Maintenance
1. Cleaning the Device
To ensure optimal performance and longevity, regularly clean your label maker:
- Use a soft, dry cloth to wipe the exterior of the device.
- Gently clean the print head area with a cotton swab lightly dampened with rubbing alcohol if print quality degrades. Ensure the device is off and disconnected from power before cleaning.
- Do not use abrasive cleaners or solvents.
2. Storage
When not in use, store the Makeid L1 Label Maker in a cool, dry place, away from direct sunlight and extreme temperatures. Remove any installed label tape if storing for an extended period.
Troubleshooting
If you encounter issues with your Makeid L1 Label Maker, refer to the table below for common problems and solutions:
| Problem | Possible Cause | Solution |
|---|---|---|
| Device not turning on. | Low battery. | Charge the device using the provided USB cable. |
| Cannot connect via Bluetooth. | Bluetooth is off; incorrect model selected; app issue. | Ensure Bluetooth is on. Select "L1" in the app. Restart app/device. |
| Poor print quality. | Print head dirty; low battery; incorrect tape. | Clean the print head. Charge the device. Ensure you are using Makeid compatible tape. |
| Tape not feeding or cutting properly. | Tape jammed; transparent guide not pulled out; cutter obstruction. | Open compartment, clear any jams. Ensure transparent guide is pulled out. Check cutter for debris. |
| App not responding. | Software glitch. | Close and reopen the app. Restart your mobile device. Check for app updates. |
Specifications
Key technical specifications for the Makeid L1 Label Maker Machine:
- Model Name: L1 (thermal label printer)
- Brand: Makeid
- Connectivity: Bluetooth
- Printing Technology: Thermal
- DPI Resolution: 203 DPI / 300 DPI (depending on model variant)
- Compatible Tape Widths: 9mm, 12mm, 16mm
- Product Dimensions: Approximately 2 x 2 x 1 inches (5.08 x 5.08 x 2.54 cm)
- Weight: Approximately 125g
- Power Source: Rechargeable Battery
- Printer Output: Monochrome
- Max Print Speed: 20 Pages per second (Note: This is a general printer spec, for label makers it refers to speed of printing characters/lines)
- Special Feature: Portable, Built-in Cutter
- Tape Features: Waterproof, Fade-resistant, Scratch-resistant, Oil-proof, 6-layer laminated (for specific tape types)

Image: A visual comparison highlighting the "300DPI Crystal Clear Prints" of the Makeid HD 300DPI label maker against other brands, demonstrating superior print clarity on labels applied to pantry jars.

Image: A diagram showing the "6-LAYER LAMINATED TAPE" structure, emphasizing its waterproof, scratch-resistant, anti-fading, and oil-proof properties with corresponding visual examples of labeled items.
Warranty and Support
For warranty information, technical support, or service inquiries, please refer to the contact information provided on the product packaging or visit the official Makeid website. Keep your purchase receipt as proof of purchase for warranty claims.
Manufacturer: Makeid
Date First Available: November 14, 2024


