
AODK OKTB01081101001JP
AODK L-Shaped Gaming Computer Desk Instruction Manual
Model: OKTB01081101001JP | Brand: AODK
1. Introduction
Thank you for purchasing the AODK L-Shaped Gaming Computer Desk. This manual provides essential information for the safe assembly, operation, and maintenance of your new desk. Please read these instructions carefully before beginning assembly and retain them for future reference.
2. Safety Information
Important Safety Precautions:
- Always follow the assembly instructions precisely to ensure the desk's stability.
- Do not exceed the maximum load capacity of the desk. Overloading can cause instability and damage.
- Keep small parts and packaging materials away from children to prevent choking hazards.
- Ensure all screws and fasteners are tightened securely during assembly and periodically check for looseness.
- Place the desk on a level surface to prevent tipping.
3. Package Contents
Before assembly, verify that all components listed below are present and undamaged. If any parts are missing or damaged, please contact customer support.
- Desktop Panels (L-shaped sections)
- Steel Frame Components
- Adjustable Monitor Stand
- Fabric Drawers (2 units)
- Open Shelf Panels
- RGB LED Light Strip with Controller
- Integrated Power Outlet Strip (2 AC, 2 USB)
- Assembly Hardware (screws, bolts, nuts, Allen wrench)
- Instruction Manual
4. Assembly Instructions
Assembly typically requires two adults. Clear a spacious area for assembly and keep all tools and parts organized.
Step 1: Unpack and Identify Parts
Carefully unpack all components and lay them out on a soft, clean surface to prevent scratches. Refer to the parts list to identify each piece.

Image 1: Overview of the AODK L-Shaped Gaming Computer Desk.
Step 2: Assemble the Steel Frame
Connect the main steel frame components using the provided screws and Allen wrench. Ensure all connections are firm but do not overtighten until all parts are aligned.
Step 3: Attach Desktop Panels
Carefully place the L-shaped desktop panels onto the assembled frame. Secure them using the designated screws. Ensure the panels are flush and aligned.
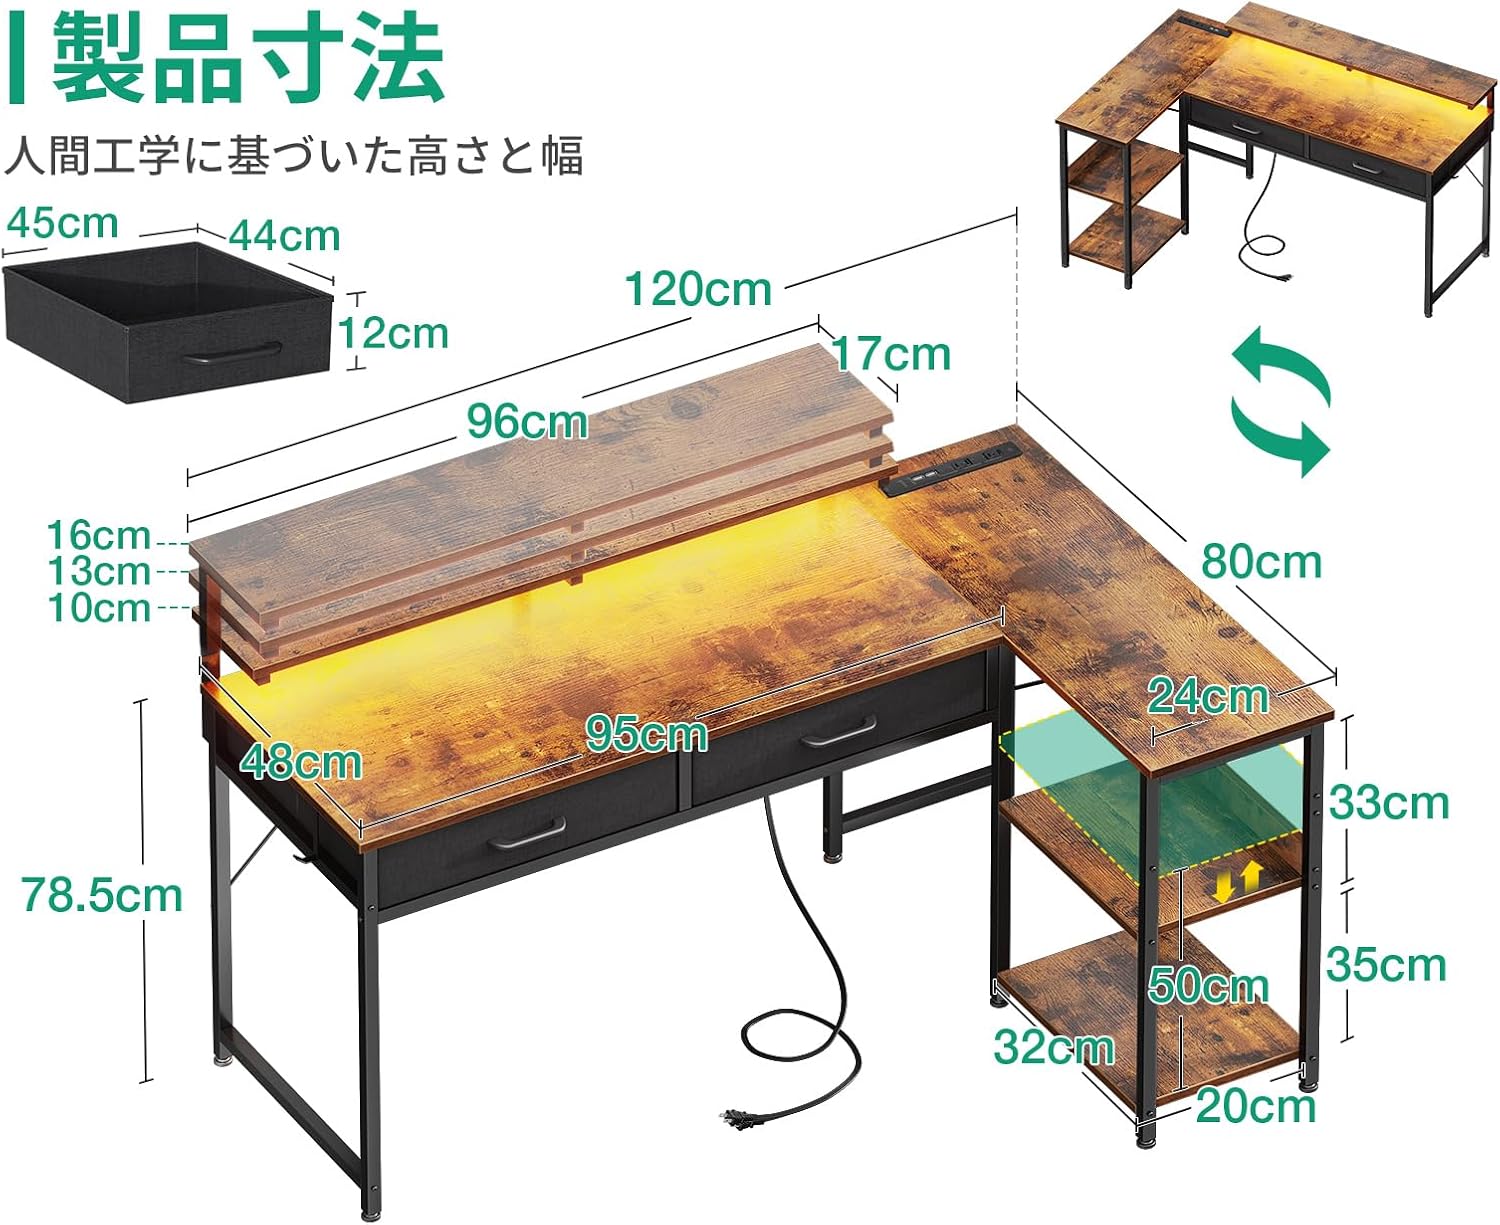
Image 2: Desk dimensions and L-shape configuration. The main desk section is 120cm wide, with a depth of 80cm on the L-extension. The monitor stand is 96cm wide.
Step 4: Install Monitor Stand and Shelves
Attach the monitor stand to the main desktop. Install the open shelf panels on the side frame. The height of the central shelf on the side unit is adjustable to accommodate different items, such as a PC tower.

Image 3: Detail of the adjustable shelf, which can be set at two different heights to fit various equipment like a computer tower.
Step 5: Insert Fabric Drawers
Slide the two fabric drawers into their designated slots beneath the main desktop. These drawers offer convenient storage for accessories.
Step 6: Install Power Outlet Strip
Mount the integrated power outlet strip into the pre-drilled slot on the desktop. Connect its power cord to a wall outlet. This strip provides 2 AC outlets and 2 USB ports.

Image 4: The integrated power strip features two AC outlets (120V/12A) and two USB ports (5V-2A) for convenient device charging and power.
Step 7: Attach RGB LED Light Strip
Adhere the RGB LED light strip to the underside of the monitor stand or desired location using its adhesive backing. Connect the light strip to its controller and then to a power source (e.g., one of the USB ports on the desk).

Image 5: The RGB LED light strip offers 6 levels of brightness and 10 color options, controlled via a simple remote.
Step 8: Final Tightening
Once all components are in place, go back and securely tighten all screws. Do not overtighten to avoid damaging the materials.
5. Features Overview
- RGB Lighting: High-quality RGB lights integrated into the desk offer a wide range of colors and lighting modes, adjustable from soft ambient light to vibrant illumination.
- Spacious L-Shaped Design: Provides ample space for multiple monitors, large gaming PCs, and allows for distinct work and gaming zones.
- Integrated Power Outlets: Features 2 AC outlets (120V/12A) and 2 USB ports (5V-2A) for convenient charging of smartphones, tablets, and other devices.
- Ample Storage: Includes two fabric drawers of varying depths and open shelves for organizing PC peripherals, books, accessories, and daily essentials.
- Adjustable Monitor Stand: The monitor stand can be adjusted to different heights (10cm, 13cm, 16cm) to optimize viewing angles and improve posture.
- Durable Construction: Built with a robust steel frame and a smooth, waterproof, and stain-resistant wooden desktop for long-lasting stability and easy maintenance.
- Reversible Configuration: The L-shaped design allows for the side shelf unit to be installed on either the right or left side, adapting to your room layout.
6. Operating Instructions
6.1. RGB Light Operation
The RGB light strip is controlled via a dedicated controller. Use the buttons on the controller to:
- Power On/Off: Press the power button to turn the lights on or off.
- Change Colors: Use the 'C' (Color) button to cycle through 10 different static colors.
- Change Modes: Use the 'M' (Mode) button to select from various dynamic lighting effects.
- Adjust Brightness/Speed: Use the up/down arrows to adjust the brightness for static colors or the speed for dynamic modes (6 levels).
6.2. Using Power Outlets and USB Ports
Plug your devices directly into the 2 AC outlets or 2 USB ports located on the integrated power strip. Ensure the desk's main power cord is connected to a functioning wall outlet.
6.3. Adjusting Shelf Height
The central shelf on the side unit can be adjusted to two different heights. To adjust, remove the shelf, reposition the support pins to the desired height, and then reinsert the shelf.
7. Maintenance
- Cleaning: Wipe the desk surface with a soft, damp cloth. For stubborn stains, use a mild detergent and dry immediately. Avoid abrasive cleaners or harsh chemicals.
- Dusting: Regularly dust the desk and RGB light strip to maintain appearance and functionality.
- Fasteners: Periodically check all screws and bolts to ensure they remain tight. Retighten if necessary to maintain stability.
- Liquid Spills: Immediately wipe up any liquid spills to prevent damage to the desktop surface.
8. Troubleshooting
- Desk is unstable: Ensure all screws are fully tightened. Check that the desk is placed on a level surface. Adjust the leveling feet if present.
- RGB lights not working: Check if the light strip is properly connected to the controller and power source. Ensure the power source is active. Try replacing the power source if possible.
- Power outlets/USB ports not working: Verify the desk's main power cord is securely plugged into a live wall outlet. Check the power switch on the strip itself.
- Drawers not sliding smoothly: Ensure the drawers are correctly inserted and not overloaded. Check for any obstructions in the drawer slots.
If you encounter issues not covered here, please contact AODK customer support for assistance.
9. Specifications
| Feature | Specification |
|---|---|
| Brand | AODK |
| Model Number | OKTB01081101001JP |
| Overall Dimensions (approx.) | Width 120cm x Depth 80cm x Height 88/91/94cm (adjustable) |
| Product Weight | 16.1 KG |
| Package Weight | 17.7 KG |
| Material | Steel frame, Wooden desktop |
| Finish Type | Varnish |
| Color | Vintage |
| Special Features | RGB lights, Height adjustment, USB power outlets, Built-in monitor stand |
| Power Outlet (AC) | 2 x 120V/12A |
| USB Ports | 2 x 5V-2A |
| Assembly Required | Yes |
10. Warranty and Support
AODK provides customer support for product inquiries and assistance. For warranty information, missing parts, or any issues with your product, please contact the seller or AODK customer service directly. Please have your purchase details and model number (OKTB01081101001JP) ready when contacting support.
Related documentsOKTB01081101001JP

Ask a question about this manual
Ask about setup, troubleshooting, compatibility, parts, safety, or missing instructions. Manuals+ will review the question and use this page’s manual context to help answer it.