
Cumbor CP7V1
Cumbor 34" Extra Tall No Bottom Bar Baby Gate Instruction Manual
Model: CP7V1
Product Overview
The Cumbor 34" Extra Tall No Bottom Bar Baby Gate is designed to provide a secure barrier for children and pets in various home environments. This hardware-mounted safety gate features a unique no-bottom-bar design for smooth passage, a double-lock safety system, and one-handed operation for convenience. It is suitable for doorways, stairways, and hallways, offering adjustable width to fit openings from 29.2 to 43 inches.

Image: The Cumbor 34" Extra Tall Baby Gate in white, installed at the base of a staircase, with a child and a golden retriever nearby, demonstrating its use for both children and pets.
Safety Information
- Secure Hardware-Mounted Installation: This gate requires secure hardware mounting (drilling) for maximum stability. It is ideal for the top of stairs. Not suitable for metal surfaces. When mounting to drywall, always anchor the screws into a stud for a secure and safe installation.
- Double-Lock Safety System: The gate includes a double-lock safety system to prevent toddlers from opening it easily. At 34" tall, it ensures maximum security for your little one and pets, making it ideal for stairs and high-risk areas.
- No Bottom Bar Design: The no bottom bar design offers easy movement and eliminates tripping hazards. The gate opens fully for a wide walk-through space, making it ideal for places like the top of stairs where convenience and safety are key.
- Adult Supervision: Always supervise children and pets around the gate.
- Regular Checks: Periodically check all hardware and mounting points to ensure the gate remains securely installed.

Image: Detailed view of the Cumbor gate's double-lock design and sturdy hinge, highlighting its safety features for children and pets.
Components and Parts List
Before beginning installation, ensure all components are present and undamaged. Refer to the diagram below for identification.

Image: An exploded view diagram of the Cumbor baby gate, detailing each part and its quantity, such as the main gate, gate accessory, positioning plates, various screws, wall anchors, and tools.
| Item | Description | Quantity |
|---|---|---|
| A | Main Gate | x1 |
| B | Gate Accessory | x1 |
| C | Positioning Plate | x2 |
| D | Short Screw | x12 |
| E | Long Screw | x12 |
| F | Wall Anchor | x12 |
| G | Hexagon Screw | x2 |
| H | Allen Key | x1 |
Setup and Installation
The Cumbor baby gate is designed for easy and quick installation, typically within 40 minutes. Follow these steps for a secure setup.
1. Measure Your Opening
Measure the width of the scene where you intend to install the gate. The gate fits openings between 29.2 and 43 inches. Ensure to measure both top and bottom mounting points, considering baseboards and bannister shapes.

Image: Step-by-step visual guide for measuring the installation area and marking drill points using the provided positioning plates.
2. Prepare Mounting Points
Tear off the sticker behind the positioning plates. Place two same positioning plates perpendicular to the floor and attach them to the wall at the desired height. Mark the drill spots through the holes in the positioning plates.

Image: Illustration emphasizing the use of a stud finder to locate studs for secure installation on drywall.
3. Select Tools and Drill
Select the appropriate tools based on your home's wall material. Drill into the marked spots created by the positioning plates.
- For Concrete and Brick Walls: Electric Drill, 5/16"(8mm) Drill Bit, Long Screws, Wall Anchors.
- For Drywall with Wood Stud Backing: Electric Drill, 5/64"(2mm) Drill Bit, Short Screws, Stud Finder. (Use a stud finder to locate a stud when installing the safety gate on drywall for a secure and stable installation.)
- For Wooden Walls: Electric Drill, 5/64"(2mm) Drill Bit, Short Screws.

Image: Visual guide for selecting the correct tools and hardware for concrete and brick wall installations.

Image: Visual guide for selecting the correct tools and hardware for drywall and wooden wall installations, emphasizing stud finding for drywall.
4. Install Main Gate and Secure Metal Pipe
Have someone assist in lifting the gate. Secure it to the wall using screws, drilling into the marked spots created by the two positioning plates. Align screws in the metal pipe's slots and drill securely. Adjust the gate height to match the pipe, ensuring both are level. Lock the upper and lower latches firmly in place.

Image: The main gate being mounted to a wall, illustrating the initial attachment process.

Image: Instructions for securing the metal pipe, showing how to align and adjust the gate height for a level and firm fit.
Installation Video Guide
Watch this official video for a comprehensive guide on installing your Cumbor Baby Gate.
Video: "A Fabulous Day with Cumbor No Bottom Bar Baby Safety Gate" - This video demonstrates the installation process and daily use of the Cumbor baby gate.
Operating Instructions
One-Handed Operation
The gate is designed for convenient one-handed operation, allowing you to easily open and close it while holding a child or carrying items. Simply slide the button and lift the gate to open.
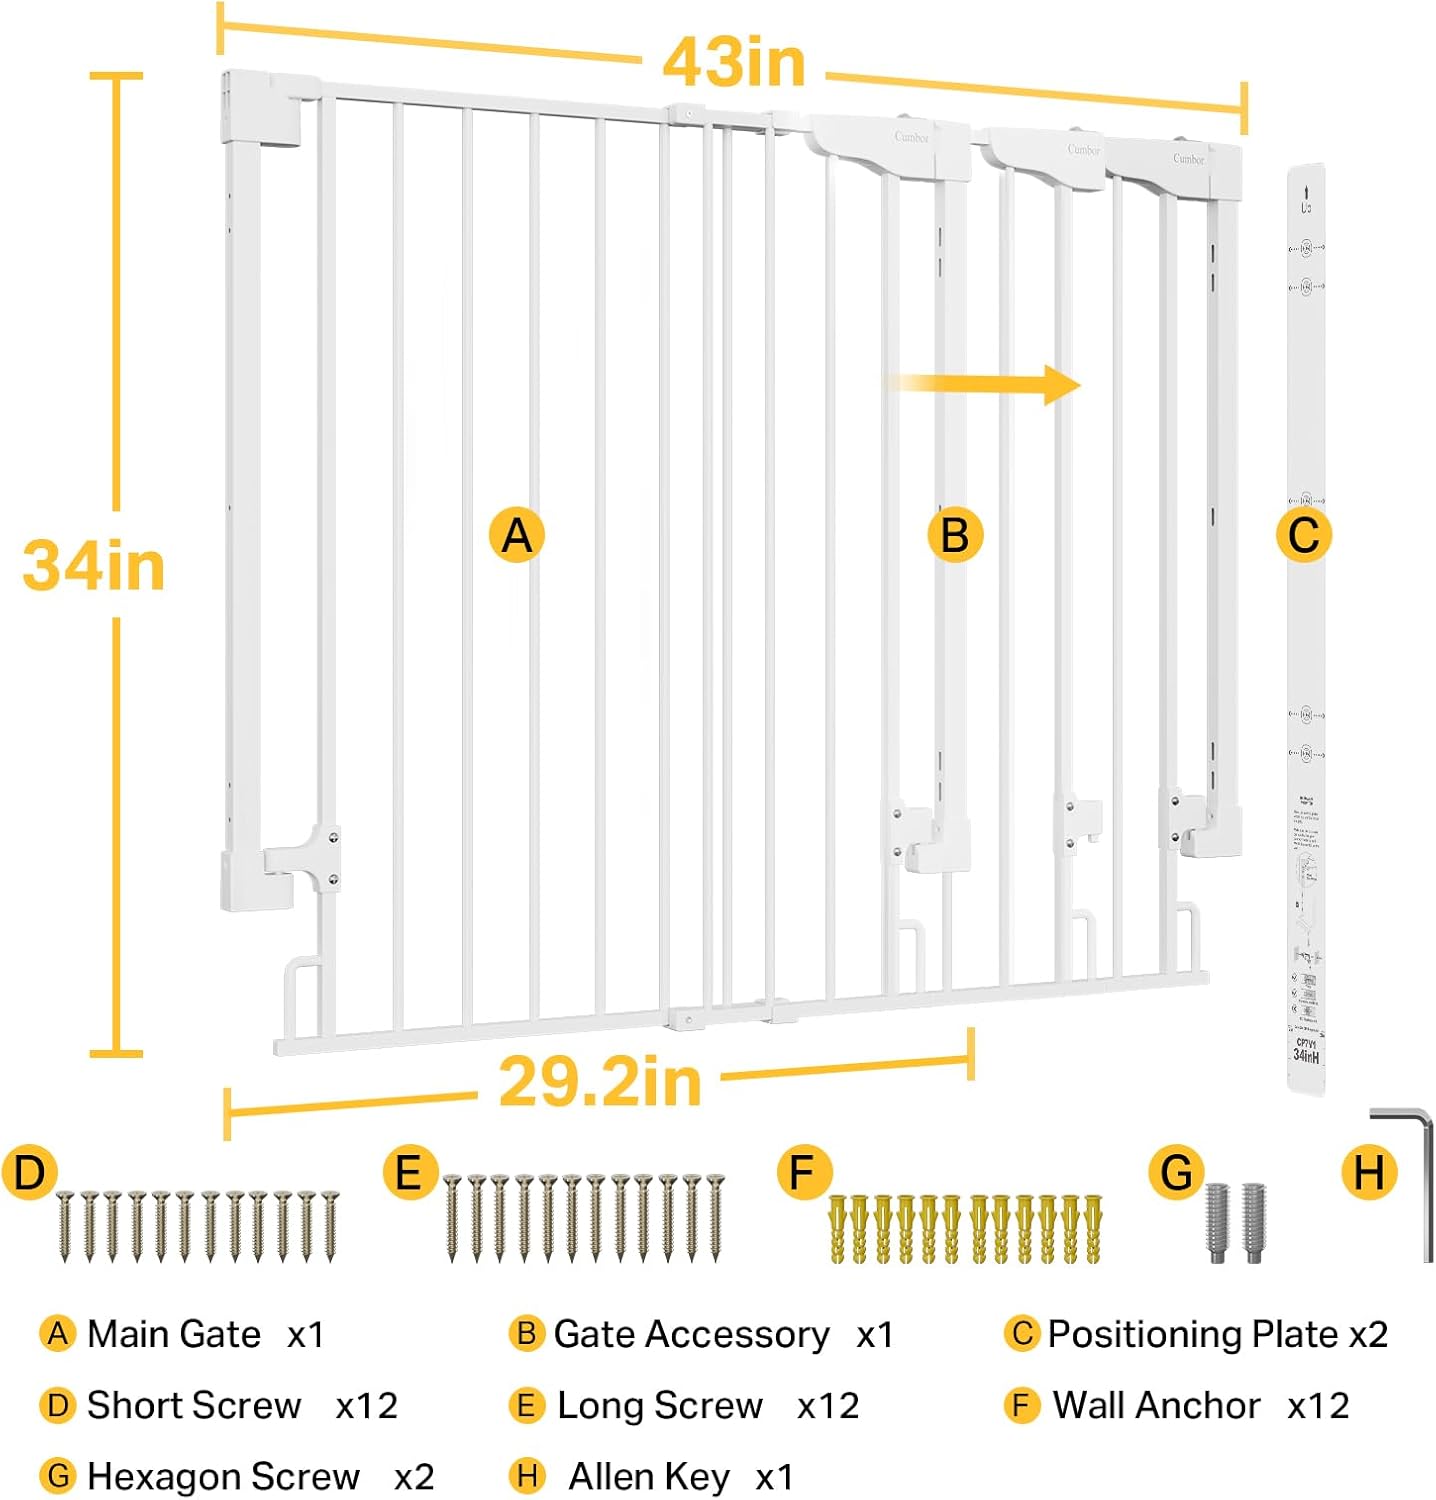
Image: A woman demonstrating the one-handed operation of the Cumbor gate while holding a child, highlighting its ease of use.
Auto-Close and Two-Way Door Opening
The gate features an auto-close mechanism, ensuring it securely closes behind you. It also allows for two-way door opening, providing flexibility for various traffic patterns.

Image: The Cumbor gate's no-bottom-bar design, illustrating how a robot vacuum can easily pass underneath, and showing the gate's maximum width of 43 inches.

Image: An annotated image highlighting key operational features of the gate, including adjustable width, sturdy materials, pet containment design, adjustable height mounting, and the double-lock safety release.
Maintenance
To ensure the longevity and safe operation of your Cumbor Baby Gate, regular maintenance is recommended:
- Cleaning: Wipe the gate with a soft, damp cloth and mild soap. Avoid abrasive cleaners or solvents that could damage the finish.
- Hardware Check: Periodically inspect all screws, bolts, and mounting points to ensure they are tight and secure. Re-tighten if necessary.
- Moving Parts: Ensure the gate door swings freely and the locking mechanism operates smoothly. Lubricate hinges if they become stiff.
- Damage Inspection: Regularly check for any signs of wear, damage, or loose parts. Discontinue use if the gate is damaged and contact customer support.
Troubleshooting
If you encounter any issues with your Cumbor Baby Gate, refer to the following common troubleshooting tips:
- Gate Does Not Close Properly:
- Ensure the gate is installed level and plumb.
- Check if any debris is obstructing the latch mechanism.
- Verify that all mounting screws are securely tightened.
- Gate Feels Loose or Wobbly:
- Re-tighten all mounting screws.
- Confirm that the gate is installed into studs if mounted on drywall.
- Ensure the positioning plates are firmly attached to the wall.
- Latching Mechanism is Stiff:
- Apply a small amount of silicone-based lubricant to the moving parts of the latch.
- Ensure no foreign objects are interfering with the mechanism.
If the issue persists, please contact Cumbor customer support for further assistance.
Specifications
| Attribute | Detail |
|---|---|
| Brand | Cumbor |
| Model Number | CP7V1 |
| Unit Count | 1.0 Count |
| Age Range (Description) | Baby |
| Closure Type | Latch |
| UPC | 850055912342 |
| Package Dimensions | 34.75 x 28.6 x 2 inches |
| Item Weight | 11.88 pounds |
| Material | Metal |
| Color | White |
| Mounting Type | Hardware Mounted |
| Target Species | Baby, Dogs, Pets, Cats, Child |
Warranty and Support
For detailed warranty information and customer support, please refer to the official Cumbor website or the user guide provided with your product.
- Official User Guide (PDF): Download PDF User Guide
- Protection Plans: Extended protection plans are available for purchase. Please check the product listing for details on 2-Year and 3-Year Protection Plans.
- Manufacturer: Cumbor
- Seller: Cumbor (via Amazon)
Related documentsCP7V1


Ask a question about this manual
Ask about setup, troubleshooting, compatibility, parts, safety, or missing instructions. Manuals+ will review the question and use this page’s manual context to help answer it.