1. Product Overview
The Thermalright Assassin X 120R Digital Black CPU Cooler is an air cooling solution designed for efficient heat dissipation in desktop systems. It features a digital screen top cover, four 6mm heat pipes, and a 2000 RPM PWM fan. The cooler incorporates AGHP (Anti-Gravity Heat Pipe) 4th generation technology to maintain consistent performance regardless of mounting orientation. Its optimized 71mm heatsink width ensures compatibility with various memory modules. The SS2 fastener system facilitates easy installation and removal across a wide range of CPU sockets.
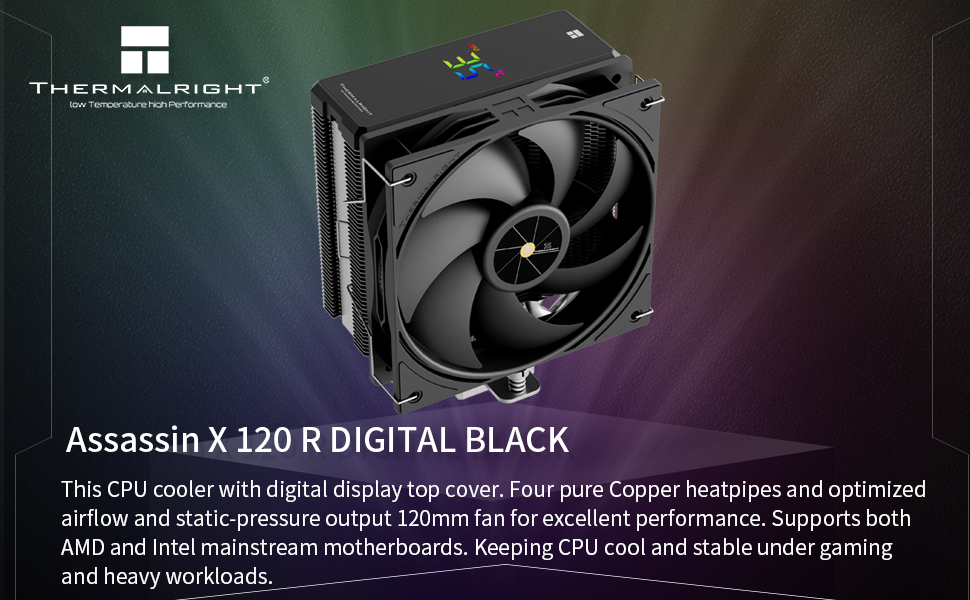
Image: Thermalright Assassin X 120R Digital Black CPU Cooler, showcasing its digital display and overall design.
2. What's in the Box
- CPU Cooler (Heatsink with Digital Display Top Cover)
- 120mm PWM Fan
- Intel LGA1700/1851 Backplate
- Intel LGA1700/1851 Spacers (Blue)
- Intel LGA1700/1851 Screws
- AMD AM4/AM5 Spacers (Red)
- AMD Brackets (Metal)
- Thermal Compound
- Fan Clips
- USB Cable (for digital display)
- ARGB Lighting Cable (for ARGB fan models)
3. Setup and Installation
This section provides detailed instructions for installing your Thermalright Assassin X 120R Digital Black CPU Cooler. Please follow the steps carefully for proper installation.
3.1 General Preparation
- Apply a small amount of thermal compound to the center of your CPU's Integrated Heat Spreader (IHS).
- Remove the protective sticker from the heatsink's contact surface before mounting.

Image: Close-up view of the CPU cooler's heat pipes, highlighting the AGHP technology for efficient heat transfer.
3.2 Intel LGA1700/1851 Installation
- Adjust the backplate mounting hole position to LGA1700/1851.
- Install the backplate from the backside of the motherboard.
- Place the four blue Intel LGA1700/1851 spacers onto the motherboard's CPU socket holes.
- Install the metal brackets onto the spacers using the Intel screws, ensuring the screws pass through the LGA1700/1851 holes on the brackets.
- Secure the metal brackets by tightening the four Intel screws evenly with a screwdriver.
3.3 AMD AM4/AM5 Installation
- Remove the existing motherboard spacers and brackets around the CPU socket.
- Install the four red AMD AM4/AM5 spacers onto the motherboard's CPU socket holes.
- Install the two metal brackets onto the spacers using the provided AMD screws.
- Secure the metal brackets by tightening the screws evenly with a screwdriver.
3.4 Heatsink and Fan Installation (Intel & AMD)
- Carefully place the heatsink onto the CPU, aligning the nuts on the heatsink with the screws on the installed brackets.
- Tighten both nuts evenly with a screwdriver until secure.
- Install the fan clips onto the 120mm PWM fan.
- Attach the fan to the heatsink using the fan clips.
3.5 Wiring
- Connect the fan's 4-pin wire to the motherboard's 4-pin CPU_FAN header.
- For ARGB fan models, connect the ARGB lighting cable to the motherboard's 3-pin +5V ARGB header for lighting control.
- For the digital display, connect the USB cable to an available USB 2.0 header on the motherboard.
Video: Installation guide for the Thermalright Assassin X 120R Digital CPU Cooler, demonstrating steps for both Intel and AMD platforms, including component identification, backplate and bracket installation, thermal paste application, heatsink mounting, fan attachment, and cable connections.
4. Operating Instructions
The Thermalright Assassin X 120R Digital Black CPU Cooler features a digital display for real-time system monitoring and a PWM fan for dynamic cooling performance.
4.1 Digital Display
The integrated LCD panel on the top cover displays critical system information such as CPU temperature, CPU usage, and graphics card temperature. This allows for immediate visual feedback on your system's performance and thermal status.
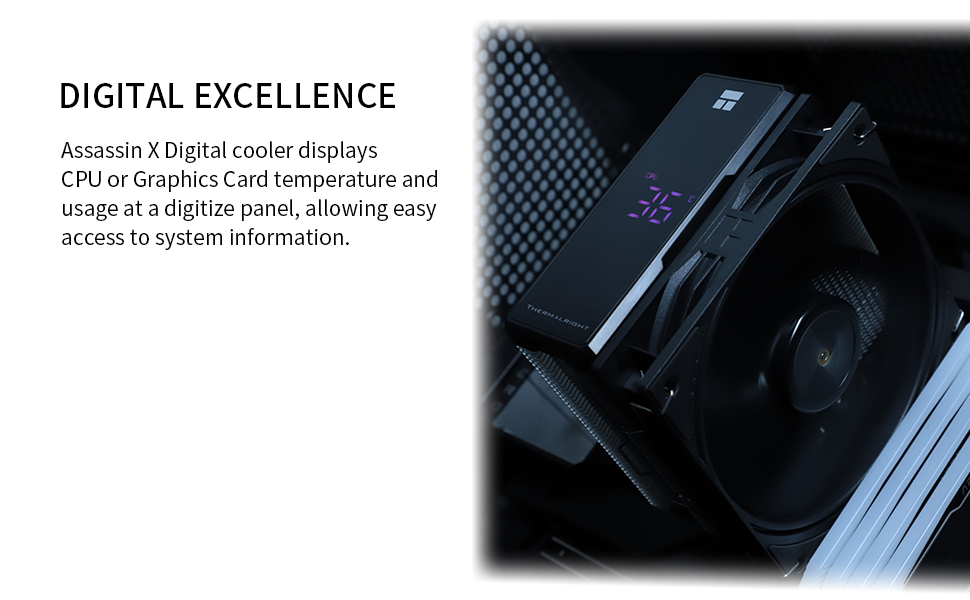
Image: A close-up of the CPU cooler's digital display, showing real-time CPU temperature and other system information.
4.2 PWM Fan Operation
The 2000 RPM PWM fan automatically adjusts its speed based on the motherboard's temperature readings. This ensures optimal cooling performance while minimizing noise levels during lighter workloads.
4.3 TRCC Software for Customization
To fully utilize the digital display's capabilities, install the TRCC software. This software allows for extensive customization of the display, including:
- Selecting default or online themes.
- Customizing text content, color, and font.
- Adjusting date and time display formats.
- Configuring system information display (cycle or list, interval time).
- Setting static images or videos as background.
- Streaming screen content to the LCD.
Video: A guide to downloading and using the TRCC software for customizing the digital display of your Thermalright CPU cooler, including theme selection, text customization, and background options.
5. Maintenance
Regular maintenance ensures optimal performance and longevity of your CPU cooler.
- Dust Cleaning: Periodically clean the heatsink fins and fan blades to prevent dust buildup, which can impede airflow and reduce cooling efficiency. Use compressed air or a soft brush.
- Thermal Paste: If the cooler is removed or after extended periods (e.g., every 2-3 years), consider reapplying fresh thermal paste to maintain good thermal contact between the CPU and heatsink.
- Fan Check: Ensure the fan is spinning freely and quietly. If you notice excessive noise or reduced fan speed, inspect for obstructions or consider replacing the fan if it's malfunctioning.
6. Troubleshooting
If you encounter issues with your CPU cooler, refer to the following common troubleshooting steps:
- High CPU Temperatures:
- Verify that the heatsink is securely mounted and making proper contact with the CPU.
- Check if thermal paste was applied correctly and evenly.
- Ensure the fan is spinning at an appropriate speed and is not obstructed by cables or dust.
- Clean any dust buildup from the heatsink fins.
- Digital Display Not Working:
- Confirm that the USB cable for the digital display is securely connected to both the cooler and an available USB 2.0 header on the motherboard.
- Ensure the TRCC software is installed, running, and up to date.
- Check the software settings to ensure the display is enabled and configured correctly.
- Fan Not Spinning or Making Unusual Noise:
- Verify the fan's 4-pin cable is correctly connected to the motherboard's CPU_FAN header.
- Check for any physical obstructions preventing the fan blades from spinning.
- Access your motherboard's BIOS/UEFI settings to ensure fan control is properly configured (e.g., not set to 0 RPM at low temperatures).
7. Specifications
| Feature | Specification |
|---|---|
| Product Dimensions | 4.72"L x 2.8"W x 5.94"H |
| Power Connector Type | 4-Pin |
| Voltage | 12 Volts |
| Cooling Method | Air |
| Compatible Devices | Desktop |
| Noise Level | 29.8 Decibels |
| Material | Aluminum, Plastic |
| Maximum Rotational Speed | 2000 RPM |
| Air Flow Capacity | 70.84 Cubic Feet Per Minute |
| Item Weight | 1.92 pounds |
| Model Number | AX120R D BLACK D6 |
| CPU Socket Compatibility | Intel LGA 1851/1700/1150/1151/1155/1156/1200; AMD AM4/AM5 |
8. Warranty and Support
Thermalright products are manufactured to the highest quality standards. For warranty information, technical support, or any inquiries regarding your product, please refer to the official Thermalright website or contact your retailer. Keep your proof of purchase for warranty claims.


