
1. Introduction
The VIHELM DY517 Digital Manifold Pressure Tester is a multi-functional instrument designed for HVAC/R system analysis. It accurately measures double pressure (gauge pressure) and dual temperature simultaneously. Equipped with an automatic multi-unit pressure conversion and temperature conversion (Celsius/Fahrenheit), it caters to diverse operational needs. The device features a built-in database of 93 refrigerants for pressure-evaporation temperature, enabling direct reading of subcooling and superheat. It also performs vacuum measurement, pressure leak measurement, and records leak time speed.
Key features include a large-size liquid crystal display (LCD) with backlight support for clear data display, convenient light operation, and a long-life valve switch. The 1/4-inch standard interface design ensures durability and versatility.
2. Package Contents
Please verify that all items listed below are included in your package:
- 1x DY517 Refrigerant Digital Manifold Gauge
- 1x User Manual (in English)
- Batteries (not included)
Note: The DY517 model does not include the test clip; it must be purchased separately. The DY517 PLUS model includes the test clip.
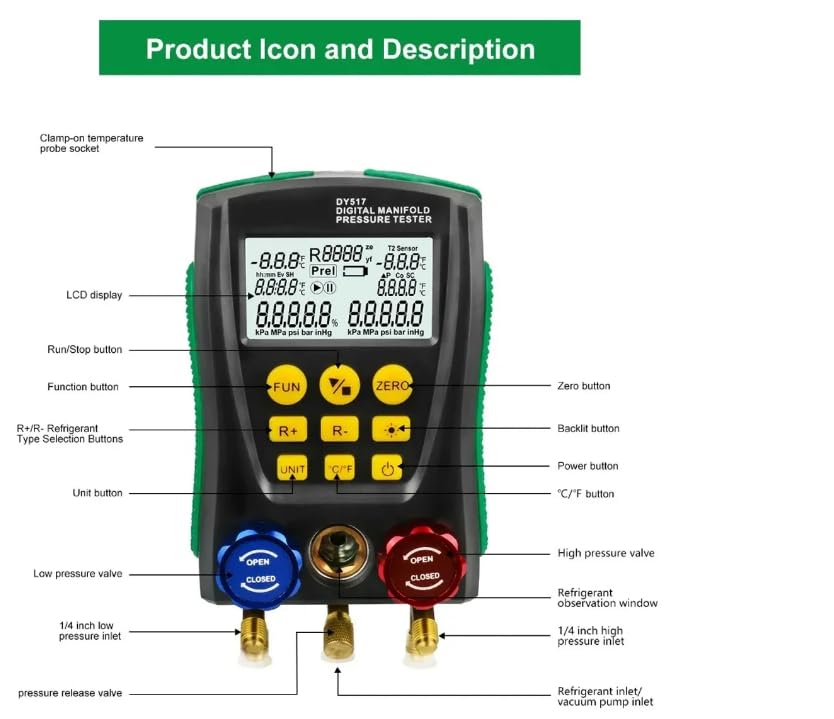
Image: Overview of product features and the standard packing list for the DY517 model.
3. Product Overview
The VIHELM DY517 is designed with high-strength engineering plastics, ensuring a solid and comfortable grip. It features a hook design for convenient testing and anti-slip design on both sides for secure handling.

Image: Front view of the DY517 Digital Manifold Pressure Tester highlighting its capabilities such as evaporation pressure & temp. test, condensing pressure & temp. test, pressure leakage test, vacuum measurement, supercooling/superheating test, HD backlight LED display, and support for 89 refrigerant fillings.
3.1 Component Identification
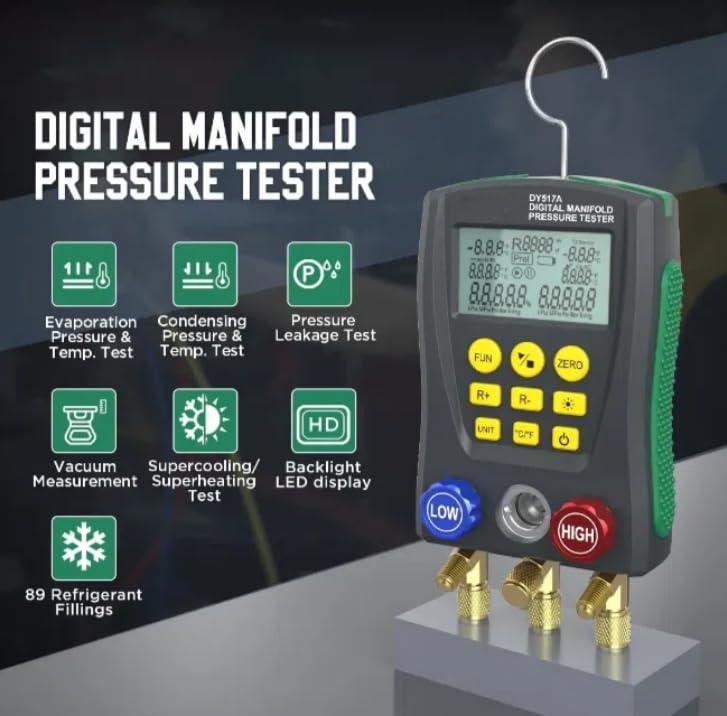
Image: A detailed diagram labeling the various components and controls of the DY517 Digital Manifold Pressure Tester, including the LCD display, clamp-on temperature probe socket, Run/Stop button, Function button, R+/R- Refrigerant Type Selection Buttons, Unit button, C/F button, Power button, Backlit button, Zero button, Low pressure valve, High pressure valve, 1/4 inch low pressure inlet, 1/4 inch high pressure inlet, pressure release valve, refrigerant inlet/vacuum pump inlet, and refrigerant observation window.
- LCD Display: Shows pressure, temperature, vacuum, and other test data.
- Clamp-on Temperature Probe Socket: For connecting temperature sensors.
- Run/Stop Button: Initiates or pauses measurement processes.
- Function Button (FUN): Cycles through different measurement modes.
- R+/R- Buttons: Selects refrigerant types.
- Unit Button (UNIT): Changes measurement units (e.g., kPa, psi, bar, inHg).
- C/F Button: Toggles between Celsius and Fahrenheit temperature units.
- Power Button: Turns the device on or off.
- Backlit Button: Activates or deactivates the LCD backlight.
- Zero Button (ZERO): Resets pressure readings to zero.
- Low Pressure Valve (Blue): Controls the low-pressure side.
- High Pressure Valve (Red): Controls the high-pressure side.
- 1/4 inch Low Pressure Inlet: Connection for low-pressure hose.
- 1/4 inch High Pressure Inlet: Connection for high-pressure hose.
- Pressure Release Valve: For safely releasing pressure.
- Refrigerant Inlet/Vacuum Pump Inlet: Central connection point.
- Refrigerant Observation Window: Allows visual inspection of refrigerant flow.
4. Setup
4.1 Battery Installation
The DY517 requires 4 x 1.5V AA (LR6) batteries for operation. To install or replace batteries:
- Locate the battery compartment cover on the back of the device.
- Open the cover by sliding or unlatching it.
- Insert four AA batteries, ensuring correct polarity (+/-) as indicated inside the compartment.
- Close the battery compartment cover securely.
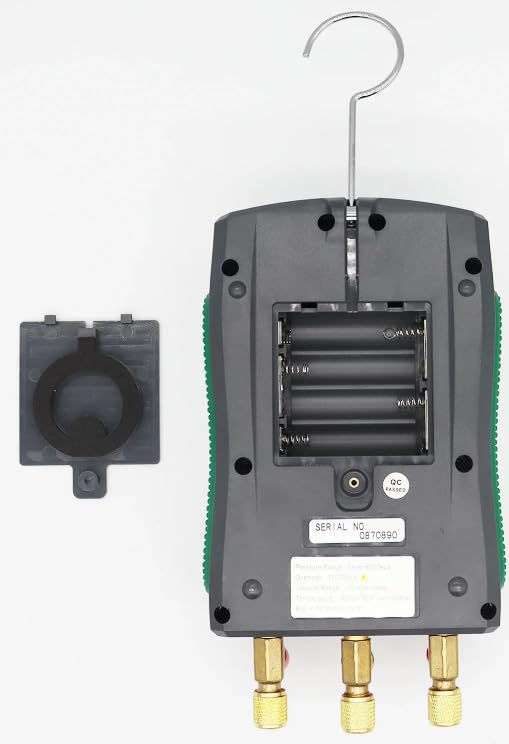
Image: The back of the DY517 Digital Manifold Pressure Tester with the battery compartment open, showing the slots for four AA batteries and the serial number label.
5. Operating Instructions
5.1 Power On/Off and Basic Display Functions
- Power On: Press the Power button (
 ) to turn on the instrument. If the LCD displays vacuum test status, press the Function button to switch it.
- Unit Selection: Press the UNIT button to adjust the reading unit (e.g., kPa, psi, bar, inHg).
- Zero Function: When the instrument is turned on, there may be 10 digits in the high and low pressure display area. Press the ZERO button long until it returns to zero.
- Backlight: Press the Backlit button to toggle the LCD backlight.
- Temperature Units: Press the C/F button to switch between Celsius (°C) and Fahrenheit (°F).

Image: Details of the DY517's design features (hook, anti-slip, 1/4 inch interface, refrigerant filling visual window) and a close-up of the LCD backlight display showing temperature and pressure readings.
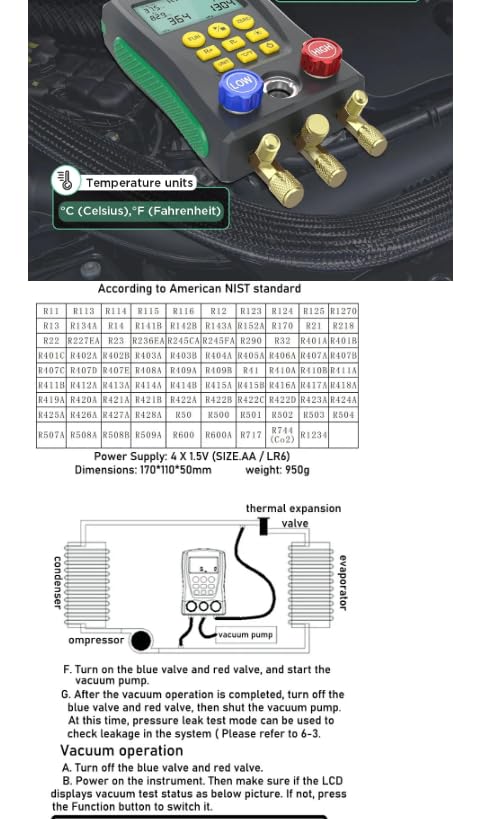
Image: Illustrates the temperature unit selection (°C/°F) and a comprehensive table of 93 refrigerants according to the American NIST standard, supported by the device.
5.2 Refrigerant Selection
The DY517 has a built-in database of 93 refrigerants according to the US NIST standard. Use the R+ and R- buttons to select the appropriate refrigerant type for your application.
5.3 Connecting to a Refrigeration System
Connect the instrument to the refrigeration system according to the provided diagram. Pay attention to the direction of the refrigerant flow. Connected clamp-on temperature probes will not affect the operation.
5.4 Vacuum Operation
To perform a vacuum operation:
- Turn off the blue valve and red valve.
- Power on the instrument. Then make sure if the LCD displays vacuum test status as below picture. If not, press the Function button to switch it.
- Turn on the blue valve and red valve, and start the vacuum pump.
- After the vacuum operation is completed, turn off the blue valve and red valve, then shut the vacuum pump. At this time, pressure leak test mode can be used to check leakage in the system (Please refer to section 5.5).
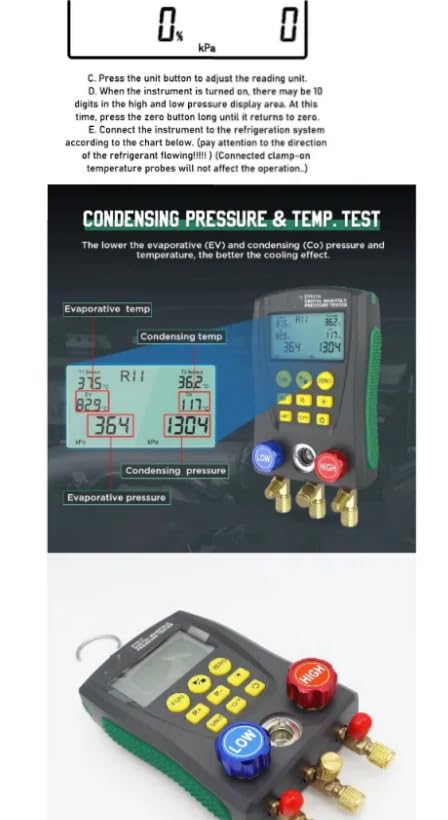
Image: Illustrates the Condensing Pressure & Temperature Test display and a diagram showing the setup for vacuum operation with the DY517 connected to a refrigeration system.
5.5 Pressure Leakage Test
The pressure leakage test calculates the pressure difference between the initial test pressure and the second test pressure. This allows you to observe any leakage in the refrigeration system pipeline and record the leakage time speed.
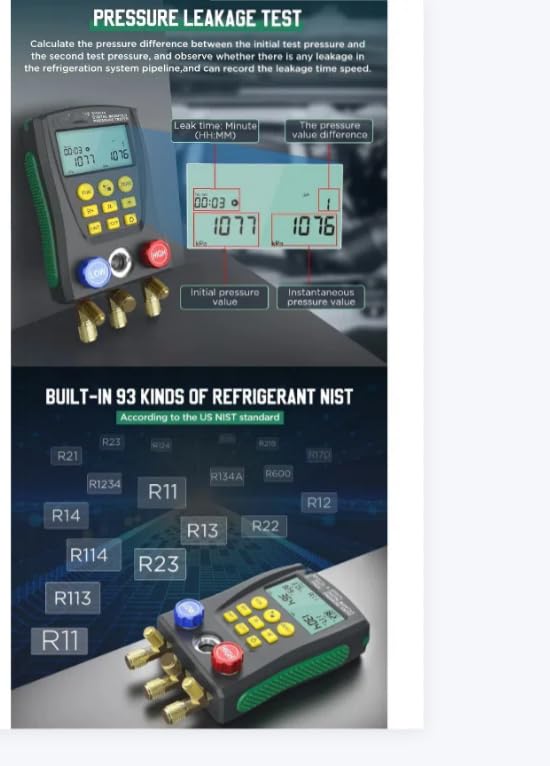
Image: A visual representation of the pressure leakage test, showing the leak time (HH:MM), initial pressure value, instantaneous pressure value, and the calculated pressure value difference.
5.6 Condensing Pressure & Temperature Test
The DY517 can perform condensing pressure and temperature tests. The lower the evaporative (EV) and condensing (CO) pressure and temperature, the better the cooling effect.
Image: A close-up of the DY517 display during a Condensing Pressure & Temperature Test, showing evaporative temp, condensing temp, evaporative pressure, and condensing pressure readings.
6. Maintenance
To ensure the longevity and accuracy of your VIHELM DY517 Digital Manifold Pressure Tester, follow these maintenance guidelines:
- Cleaning: Wipe the instrument with a soft, dry cloth. Do not use abrasive cleaners or solvents.
- Storage: Store the device in a cool, dry place away from direct sunlight and extreme temperatures. If storing for an extended period, remove the batteries to prevent leakage.
- Inspection: Regularly check hoses and connections for wear or damage. Replace any damaged components immediately.
7. Troubleshooting
If you encounter issues with your DY517, please refer to the following common troubleshooting steps:
- Device not powering on: Check battery installation and ensure batteries are not depleted. Replace with fresh AA batteries if necessary.
- Inaccurate readings: Ensure all connections are secure and free of leaks. Perform a zero calibration if pressure readings are off.
- Display issues: If the display is dim, check battery level. If the display is frozen, try restarting the device.
For persistent issues or technical support, please contact VIHELM customer service.
8. Specifications
| Feature | Specification |
|---|---|
| Model | DY517 |
| Power Supply | 4 x 1.5V (SIZE AA / LR6) |
| Dimensions | 170*110*50mm |
| Weight | 950g |
| Interface Design | 1/4-inch Standard |
| Display | Large-size Liquid Crystal Display (LCD) with Backlight |
| Refrigerant Database | Built-in 93 kinds (NIST standard) |
| Functions | Double Pressure Measurement, Dual Temperature Measurement, Vacuum Measurement, Pressure Leak Measurement, Subcooling/Superheat Calculation |
9. Warranty and Support
For warranty information, technical support, or service inquiries regarding your VIHELM DY517 Digital Manifold Pressure Tester, please refer to the warranty card included with your product or contact the manufacturer directly. Keep your purchase receipt as proof of purchase.