
1. Introduction
The OWON HDS271 is a versatile 3-in-1 handheld device, integrating a digital oscilloscope, a multimeter, and a waveform generator into a single compact unit. Designed for field service, education, and general electronics testing, this instrument offers a 70MHz bandwidth oscilloscope, a 24000-count digital multimeter, and a 100KHz signal generator. Its portable design, built-in rechargeable battery, and high-resolution color LCD make it an essential tool for various electrical measurement and analysis tasks.

Front view of the OWON HDS271, showcasing its compact design and color display.
2. Safety Information
To ensure safe operation and prevent damage to the device, please read and adhere to the following safety precautions:
- General Safety: Always operate the device within its specified voltage, current, and frequency limits. Do not use the device if it appears damaged or is not operating correctly.
- Electrical Shock Hazard: Avoid contact with live circuits. Use caution when working with voltages above 30V AC RMS, 42V peak, or 60V DC, as these pose a shock hazard. Ensure probes are properly insulated.
- Probe Connections: Connect the ground lead of the oscilloscope probe to earth ground before connecting the probe tip to the circuit under test. Disconnect the probe tip first when finished.
- Battery Safety: Use only the specified charging adapter. Do not expose the battery to extreme temperatures or disassemble it. Dispose of batteries according to local regulations.
- Environment: Operate the device in a dry environment, away from moisture, dust, and direct sunlight.
3. Product Overview
The OWON HDS271 features a clear 3.5-inch color LCD and an intuitive button layout for easy operation. Below is a diagram illustrating the main components and controls of the device.
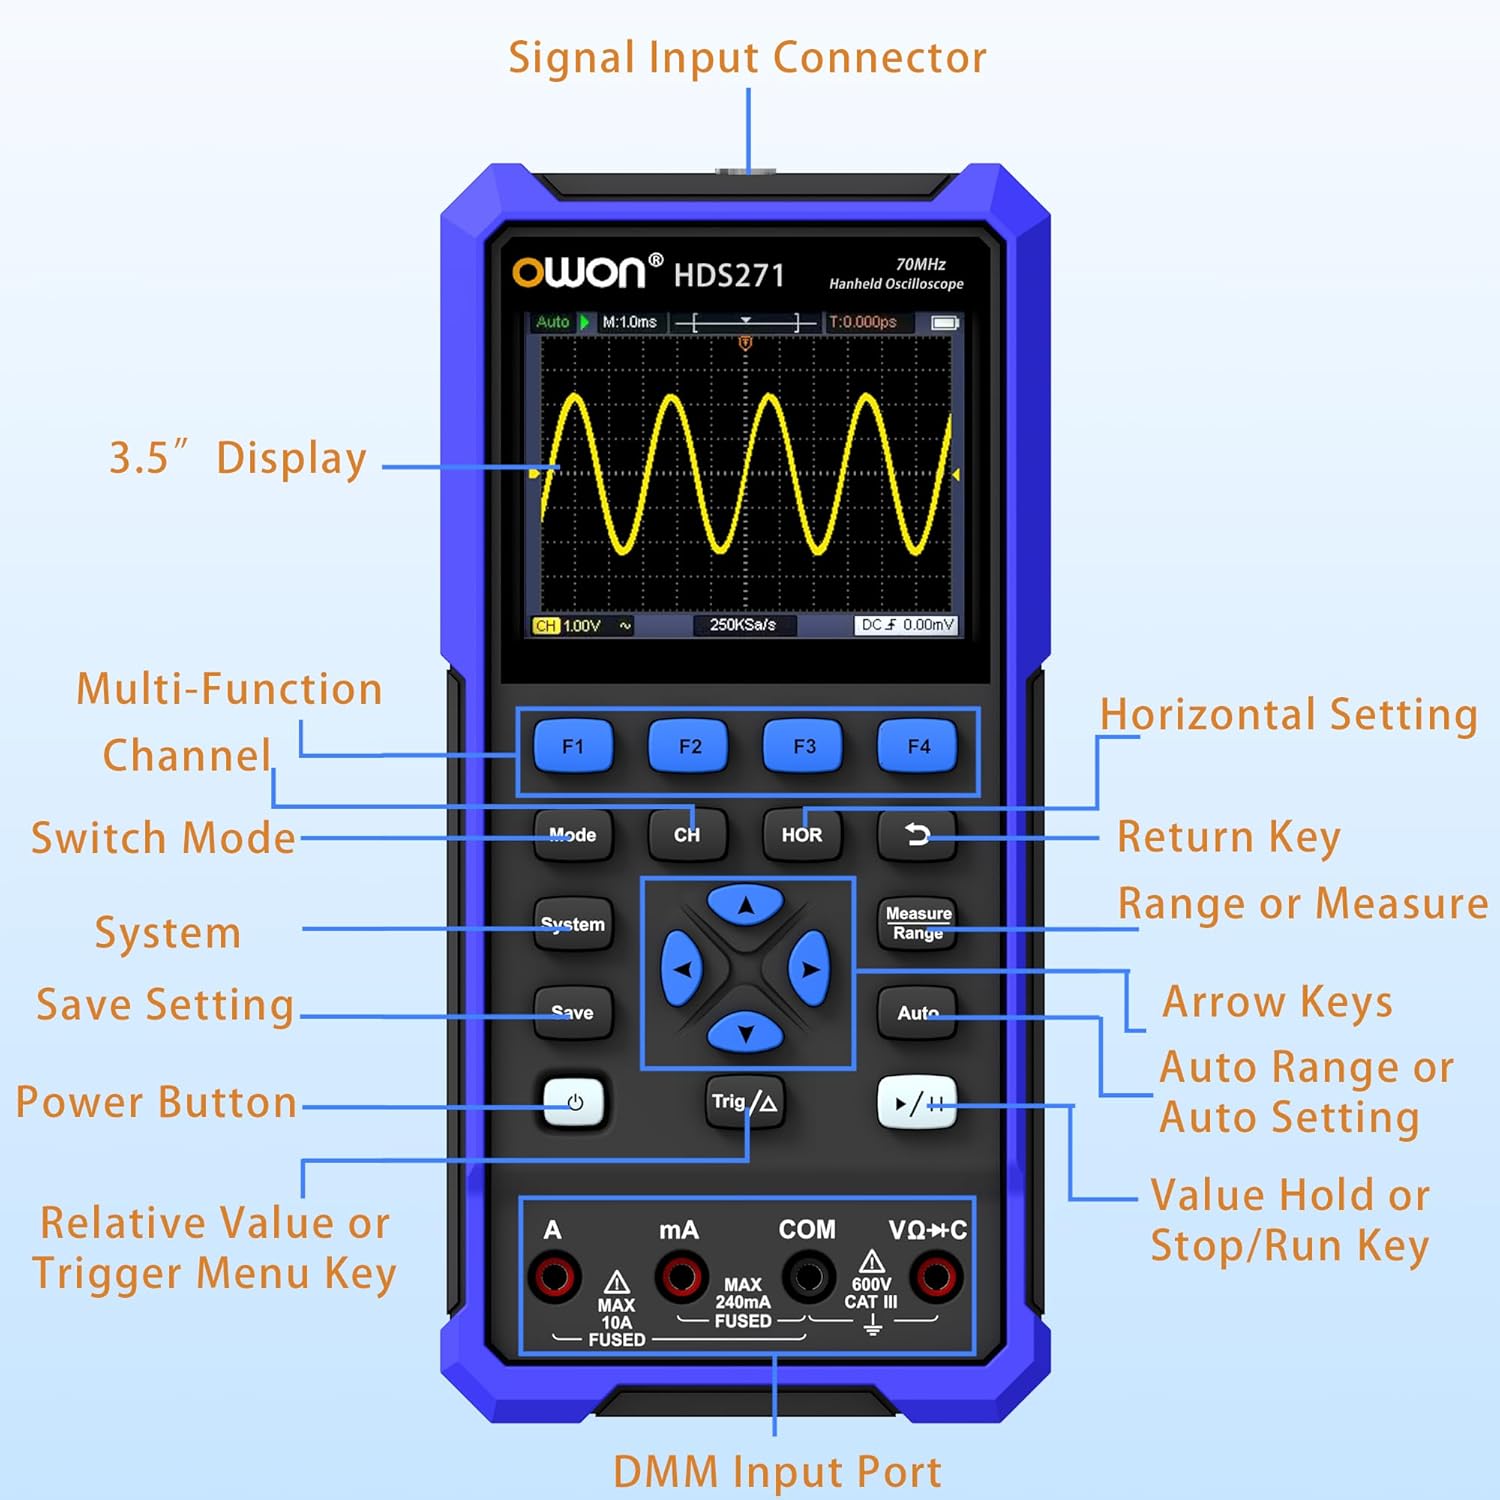
Detailed diagram of the OWON HDS271 front panel, indicating the function of each button, input port, and display area.
Key Components:
- 3.5" Display: High-resolution color LCD for waveform and measurement data.
- Function Buttons (F1-F4): Context-sensitive buttons for menu navigation and quick settings.
- Mode Button: Switches between Oscilloscope, Multimeter, and Signal Generator modes.
- CH/1/2 Button: Selects oscilloscope channel or other channel-related settings.
- HOR Button: Adjusts horizontal scale/time base in oscilloscope mode.
- System Button: Accesses system settings and configurations.
- Save Button: Saves waveforms or measurement data.
- Power Button: Turns the device on or off.
- Trig/Δ Button: Adjusts trigger settings or enables delta measurements.
- Arrow Keys: Navigates menus and adjusts parameters.
- Measure/Range Button: Initiates automatic measurements or adjusts measurement range.
- Auto Button: Performs auto-setup for oscilloscope or auto-ranging for multimeter.
- Run/Stop (▶/‖) Button: Starts or stops waveform acquisition.
- DMM Input Ports (A, mA, COM, VΩ+C): Connectors for multimeter probes.
- Signal Input Connector: BNC connector for oscilloscope probes and signal generator output.
4. Setup
4.1 Unpacking and Initial Inspection
Carefully remove the OWON HDS271 and all accessories from the packaging. Inspect the device for any signs of physical damage. If any damage is found, contact your supplier immediately.
4.2 Charging the Battery
The HDS271 is equipped with a built-in 2000mAh lithium battery. Before first use, it is recommended to fully charge the device.
- Connect the provided USB Type-C cable to the Type-C port on the device.
- Connect the other end of the USB cable to a compatible USB power adapter (not always included) or a computer's USB port.
- The charging indicator on the device will show the charging status. A full charge typically takes several hours.

A close-up view of the HDS271's bottom, highlighting the Type-C charging port and indicating the presence of a 2000mAh built-in lithium battery.
4.3 Connecting Probes
- Oscilloscope Probes: Connect the BNC connector of the oscilloscope probe to the Signal Input Connector on the top of the device. Ensure the probe is properly compensated before use.
- Multimeter Leads: Insert the red test lead into the VΩ+C or A/mA input jack and the black test lead into the COM input jack for multimeter measurements.
5. Operating Instructions
The HDS271 offers three primary functions: Oscilloscope, Multimeter, and Signal Generator. Use the Mode button to switch between these functions.

An illustration demonstrating the three primary functions of the HDS271: oscilloscope waveform display, multimeter voltage reading, and signal generator output.
5.1 Power On/Off
- To power on, press and hold the Power button until the screen illuminates.
- To power off, press and hold the Power button until the device shuts down.
5.2 Oscilloscope Mode
In Oscilloscope mode, the HDS271 displays real-time waveforms, allowing for detailed signal analysis.
- Press the Mode button to select Oscilloscope mode.
- Connect the oscilloscope probe to the signal input and the circuit under test.
- Press the Auto button for automatic setup of vertical, horizontal, and trigger settings.
- Use the CH/1/2 button to select the channel (HDS271 is 1-channel).
- Adjust vertical scale (Volts/Div) and horizontal time base (Sec/Div) using the arrow keys and corresponding menu options (accessed via F-buttons or dedicated buttons like HOR).
- Adjust trigger level and mode using the Trig/Δ button and arrow keys.
- Use the Measure button to access automatic measurement functions (e.g., Vpp, Vmax, Freq).
- The Run/Stop (▶/‖) button pauses or resumes waveform acquisition.

Four examples of waveforms displayed on the HDS271 screen, including mains waveform, TV signal wave, PLC pulse wave, and multi-audio frequency response signal.
5.3 Multimeter Mode
The multimeter function provides precise measurements of various electrical parameters.
- Press the Mode button to select Multimeter mode.
- Connect the test leads to the appropriate DMM input ports (VΩ+C for voltage/resistance/capacitance, A for high current, mA for low current, COM for common ground).
- Select the desired measurement function (e.g., DCV, ACV, Resistance, Capacitance, Diode, Continuity) using the F-buttons or dedicated menu options.
- The device typically features auto-ranging, but manual range selection may be available via the Measure/Range button.
- Read the measurement value displayed on the screen.
5.4 Signal Generator Mode
The built-in signal generator can output various waveforms for testing circuits.
- Press the Mode button to select Signal Generator mode.
- Connect the signal output (via the BNC connector) to the circuit or device you wish to test.
- Use the F-buttons and arrow keys to select the desired waveform type (Sine, Square, Sawtooth, Pulse).
- Adjust the frequency and amplitude of the output signal according to your requirements.
- Ensure the output is enabled before connecting to sensitive circuits.
5.5 PC Software Connectivity
The HDS271 supports PC software connectivity via USB for data logging, waveform analysis, and device control.
- Install the OWON PC software on your computer (software typically available from the manufacturer's website).
- Connect the HDS271 to your computer using the provided USB Type-C cable.
- Follow the instructions in the PC software to establish a connection and begin data transfer or remote control.
6. Maintenance
6.1 Cleaning
To maintain the device's appearance and functionality, clean it regularly.
- Wipe the exterior of the device with a soft, damp cloth. Do not use abrasive cleaners or solvents.
- Ensure no moisture enters the device through ports or openings.
6.2 Battery Care and Storage
Proper battery care extends the lifespan of the device.
- Recharge the battery when the low battery indicator appears.
- If storing the device for an extended period, charge the battery to approximately 50% to 70% capacity.
- Store the device in a cool, dry place, away from direct sunlight and extreme temperatures.
7. Troubleshooting
This section addresses common issues you might encounter with the OWON HDS271.
| Problem | Possible Cause | Solution |
|---|---|---|
| Device does not power on | Low battery; Power button not pressed correctly | Charge the battery; Press and hold the power button for a few seconds |
| No waveform displayed in OSC mode | Probe not connected; Incorrect vertical/horizontal settings; No signal input | Check probe connection; Use Auto button; Verify signal source |
| Incorrect multimeter readings | Leads connected incorrectly; Wrong measurement function selected; Out of range | Ensure leads are in correct ports; Select appropriate function; Use Auto-ranging or adjust range manually |
| PC software not connecting | USB cable issue; Driver not installed; Software not running | Check USB cable; Install necessary drivers; Ensure software is open and configured |
8. Specifications
The following table details the technical specifications of the OWON HDS271.

A summary graphic detailing the key specifications for the Digital Multimeter (DMM), Oscilloscope (OSC), and Signal Generator functions of the HDS271.
8.1 Oscilloscope (OSC) Specifications
- Channels: 1CH
- Bandwidth: 70MHz
- Sample Rate: 250MSa/s (real-time)
- Record Length: 8K
- Waveform Refresh Rate: Up to 10,000wfms/s
- Features: Auto Setup, Multiple Measurement Functions, Cursor Measurement, Slow Sweep Mode
8.2 Digital Multimeter (DMM) Specifications
- Display: 4 1/2 Digit, 24,000 Counts
- Measurement Functions: Voltage (AC/DC), Current (AC/DC), Resistance, Capacitance, Diode, Continuity
- Features: True RMS, Auto-Ranging, Data Hold
8.3 Signal Generator (WG) Specifications
- Frequency: 100KHz
- Waveform Output: Sine, Square, Sawtooth, Pulse
- Max Output Amplitude: 2.5Vpp
8.4 General Specifications
- Display: 3.5 inch High-Resolution Color LCD
- Battery: 2000mAh Lithium Ion (included)
- Charging Port: USB Type-C
- Connectivity: USB (for PC software)
- Product Dimensions: 7.8 x 1.5 x 3.78 inches
- Weight: 2.65 Pounds
- Manufacturer: OWON
9. Warranty and Support
OWON products are designed and manufactured to high-quality standards. For information regarding warranty coverage, please refer to the warranty card included with your product or visit the official OWON website.
For technical support, troubleshooting assistance, or service inquiries, please contact OWON customer support through their official channels. Contact details can typically be found on the OWON website or in the product packaging.


