
1. Introduction
This manual provides essential information for the safe and effective use of your PICO 4 Ultra Enterprise A9210 All-in-One 6DoF VR Headset. Please read this manual thoroughly before using the device and retain it for future reference.
2. Safety Information
- Clear Your Space: Ensure you have a clear, unobstructed area for use to prevent injury or damage to property.
- Take Breaks: Prolonged use may cause eye strain, fatigue, or motion sickness. Take regular breaks.
- Supervision: Not recommended for children without adult supervision.
- Health Considerations: If you experience discomfort, dizziness, or nausea, discontinue use immediately. Consult a doctor if symptoms persist.
- Environmental Conditions: Do not expose the device to extreme temperatures, humidity, or direct sunlight.
3. Package Contents
Verify that all items are present in your package:
- PICO 4 Ultra Enterprise A9210 VR Headset
- 6DoF Controllers (x2)
- Glasses Spacer
- USB Type-C Cable (for charging and data transfer)
- Power Adapter
4. Product Overview
4.1 Headset Components

Image: Front view of the PICO 4 Ultra Enterprise A9210 VR Headset, showing the integrated cameras and sensors.
- Front Cameras & Sensors: Used for inside-out tracking and environmental mapping.
- Lenses: High-resolution displays with pancake lenses for a wide field of view.
- Head Strap: Adjustable strap for secure and comfortable fit.
- IPD Adjustment Wheel: Located on the bottom of the headset for seamless interpupillary distance adjustment.
- USB Type-C Port: For charging and data transfer.
- Power Button: To turn the headset on or off.
- Volume Buttons: To adjust audio output.
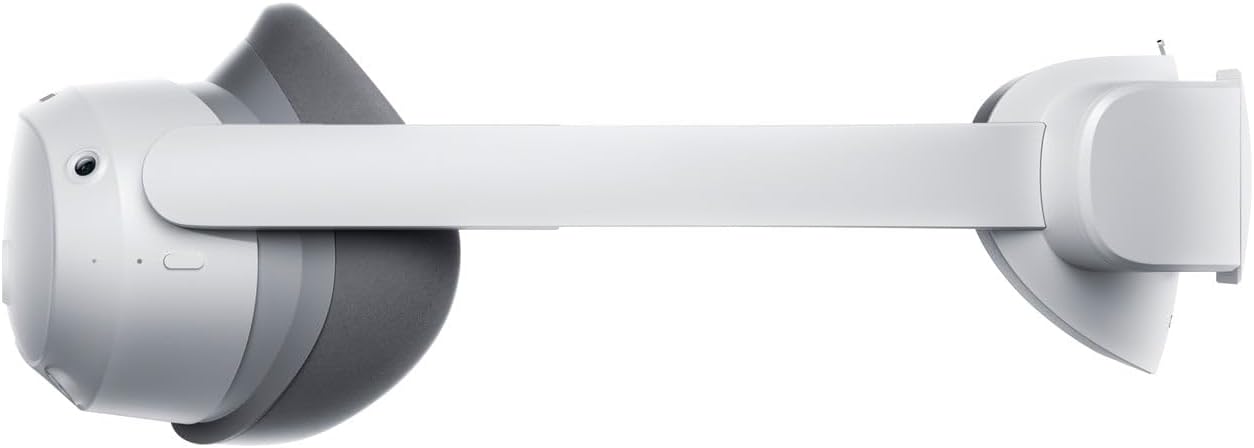
Image: Side view of the PICO 4 Ultra Enterprise A9210 VR Headset, illustrating the head strap and overall profile.
4.2 Controller Components
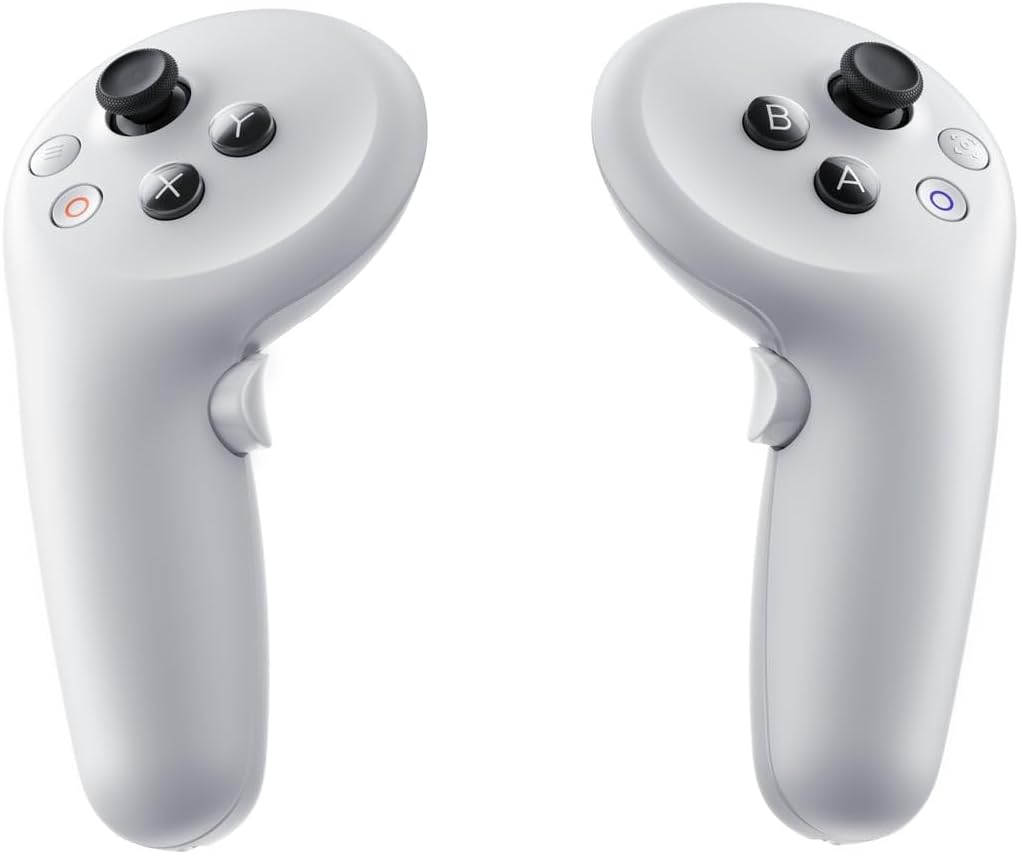
Image: Two PICO 4 Ultra Enterprise A9210 VR controllers, showing buttons and joysticks.
- Analog Stick: For movement and navigation.
- Action Buttons (A/B/X/Y): For in-app interactions.
- Trigger Button: For selection and interaction.
- Grip Button: For grabbing or holding objects in VR.
- System Button: For accessing system menus.
5. Setup
5.1 Charging the Headset and Controllers
- Connect the USB Type-C cable to the headset's charging port and the other end to the power adapter.
- Plug the power adapter into a wall outlet. The indicator light on the headset will show charging status.
- The controllers typically use AA batteries. Open the battery compartment and insert fresh batteries if needed.
5.2 Wearing the Headset

Image: Top view of the PICO 4 Ultra Enterprise A9210 VR Headset, showing the adjustable head strap.
- Loosen the head strap to its widest setting.
- Place the headset on your head, ensuring the display is centered over your eyes.
- Tighten the head strap until the headset feels secure and comfortable, without being too tight.
- Adjust the IPD (Interpupillary Distance) using the wheel on the bottom of the headset until the image appears clear and comfortable. The optimal range is 58-72mm.
- If you wear glasses, insert the included glasses spacer before wearing the headset to ensure proper fit and prevent lens scratching.
5.3 Initial Software Setup
- Power on the headset by pressing and holding the Power button.
- Follow the on-screen instructions to select your language, connect to a Wi-Fi network (supports Wi-Fi 7), and set up your user account.
- The controllers should automatically pair. If not, follow the on-screen prompts for manual pairing.
- Define your play space as instructed by the headset. This involves drawing a boundary in your physical environment.
6. Operating Instructions
6.1 Powering On/Off
- Power On: Press and hold the Power button on the headset until the PICO logo appears.
- Power Off: Press and hold the Power button until a power-off menu appears, then select 'Power Off'.
- Sleep Mode: Briefly press the Power button to put the headset into sleep mode. Press again to wake it up.
6.2 Navigation and Interaction
- Use the Analog Stick on the controller to move around in virtual environments.
- Point the controller at menu items or objects and use the Trigger Button to select them.
- The Action Buttons (A/B/X/Y) perform various functions depending on the application.
- Press the System Button to access the main menu or return to the home screen.
6.3 Wi-Fi Connection
To connect to a Wi-Fi network or change networks:
- From the home screen, access the Quick Settings menu (usually by pressing the System button or a specific gesture).
- Select the Wi-Fi icon.
- Choose your desired network from the list and enter the password if prompted.
7. Maintenance
7.1 Cleaning the Lenses
- Use a dry microfiber cloth specifically designed for optical lenses.
- Gently wipe the lenses in a circular motion from the center outwards.
- Do not use liquid cleaners, alcohol, or abrasive materials, as these can damage the lenses.
7.2 Cleaning the Headset and Controllers
- Use a soft, dry cloth to wipe the exterior surfaces of the headset and controllers.
- For stubborn dirt, slightly dampen the cloth with water. Avoid getting moisture into any openings.
- Do not use harsh chemicals or solvents.
7.3 Storage
- Store the headset in a cool, dry place away from direct sunlight.
- Protect the lenses from scratches by keeping the headset in its original packaging or a protective case when not in use.
- Remove batteries from controllers if storing for extended periods.
8. Troubleshooting
8.1 Headset Not Powering On
- Ensure the headset is fully charged. Connect it to the power adapter and wait for a few minutes before attempting to power on again.
- Try a different USB Type-C cable and power adapter.
- Perform a hard reset by holding the Power button for 10-15 seconds.
8.2 Controllers Not Responding
- Check the batteries in the controllers and replace them if necessary.
- Ensure the controllers are within the headset's tracking range.
- Try re-pairing the controllers through the headset's settings menu.
8.3 Blurry Image
- Adjust the IPD (Interpupillary Distance) using the wheel on the bottom of the headset.
- Ensure the headset is properly positioned on your head and the straps are adjusted correctly.
- Clean the lenses with a microfiber cloth.
- If you wear glasses, ensure the glasses spacer is correctly installed.
8.4 Wi-Fi Connection Issues
- Verify that your Wi-Fi router is working correctly and other devices can connect.
- Ensure you have entered the correct Wi-Fi password.
- Restart your Wi-Fi router and the PICO headset.
- Move closer to your Wi-Fi router to improve signal strength.
9. Specifications
| Processor | Qualcomm Snapdragon XR2 Gen 2 |
| Memory | 12GB LPDDR5 |
| Internal Storage | 256GB UFS 3.1 |
| Resolution | 4320 x 2160 (1200ppi) |
| Field of View (FOV) | 105 degrees |
| Refresh Rate | 90Hz |
| Tracking Method | Inside-out (6DoF), Environmental tracking cameras x4, iToF depth sensor camera x1 |
| IPD Adjustment | 58-72mm (Seamless) |
| Audio | Stereo speakers, Spatial audio compatible microphones x4 |
| Controllers | 6DoF Controllers (x2) |
| External Connectivity | Wi-Fi 7, Bluetooth 5.3 |
| Connection Port | USB Type-C |
| Headset Dimensions (W x H x D) | 165 x 84 x 62 mm |
| Model Number | A9210 |
| JAN Code | 6970214574083 |
| Included Components | Glasses spacer |
10. Warranty and Support
For warranty information and technical support, please refer to the official PICO website or contact your regional PICO customer service. Keep your proof of purchase for warranty claims.
This device includes a commercial use license and business support via PICO Business Suite for enterprise applications.


