
1. Introduction
This manual provides comprehensive instructions for the installation, operation, maintenance, and troubleshooting of your Coleman-Mach 9420A382 12VDC Digital Wall Thermostat. Designed for recreational vehicles and specialty applications, this thermostat offers precise climate control with an easy-to-read digital display and multiple operating modes. Please read this manual thoroughly before installation and use to ensure proper function and longevity of your device.
2. Product Overview
The Coleman-Mach 9420A382 Digital Wall Thermostat is engineered to manage your RV's climate system efficiently. Key features include:
- Controls Coleman-Mach Air Conditioner, Heat Pump, and gas heating appliances.
- Includes a dedicated Dry Mode to reduce humidity and enhance interior comfort.
- Configurable via dip switches for various system setups: A/C cool only, A/C with heat pump, A/C with electric heat element, and additional heating systems.
- Operating modes: Auto, Fan Only, Cool, Heat, and Dry.
- Features an easy-to-read digital display for simple programming and operation.

Figure 2.1: Full view of the Coleman-Mach 9420A382 Digital Wall Thermostat.
3. Setup and Installation
3.1 Safety Precautions
- Always disconnect power to the HVAC system before beginning installation to prevent electrical shock.
- Ensure all wiring connections are secure and conform to local electrical codes.
- If you are unsure about any part of the installation process, consult a qualified technician.
3.2 What's Included
- Coleman-Mach 9420A382 Digital Wall Thermostat
- Mounting Plate
- Mounting Screws
3.3 Wiring and Mounting
The thermostat is designed for 12VDC wired connectivity. Installation typically involves connecting six wires. Refer to your RV's specific wiring diagram and the thermostat's included wiring instructions for detailed steps. The thermostat is designed for wall mount installation.
3.4 Dip Switch Configuration
Located on the back of the thermostat, dip switches allow for configuration to match your specific HVAC system. These settings determine whether the thermostat manages A/C cool only, A/C with heat pump, A/C with electric heat element, or an additional heating system. Consult the detailed wiring diagram and configuration guide provided with your thermostat for correct dip switch settings.
4. Operating Instructions
4.1 Display Overview
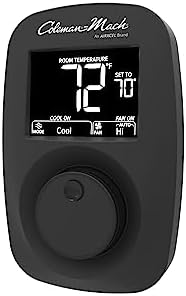
Figure 4.1: Close-up view of the digital display showing room temperature and set temperature.
The digital display shows the current room temperature and the set temperature. Indicators for the active mode (Cool, Heat, Dry, Fan Only) and fan speed (Auto, Low, High) are also visible.
4.2 Mode Selection
Press the MODE button to cycle through the available operating modes:
- Cool: Activates the air conditioning system to lower the room temperature.
- Heat: Activates the heating system (furnace or heat pump) to raise the room temperature.
- Dry: Operates the air conditioning system to reduce humidity without significant temperature reduction.
- Fan Only: Circulates air without heating or cooling.
- Auto: Automatically switches between heating and cooling to maintain the set temperature (if configured).
4.3 Temperature Adjustment
Use the rotary dial or push buttons (depending on model variant) to increase or decrease the desired set temperature. The display will show the set temperature as you adjust it.
4.4 Fan Speed Control
Press the FAN button to cycle through fan speed settings: Low, High, or Auto. In Auto mode, the fan speed adjusts automatically based on the system's needs.
5. Maintenance
Regular maintenance ensures optimal performance and extends the lifespan of your thermostat.
- Cleaning: Gently wipe the thermostat's exterior with a soft, damp cloth. Avoid abrasive cleaners or solvents.
- Sensor Clearance: Ensure the temperature sensor (small opening on the thermostat) is free from dust and obstructions for accurate readings.
- Power Check: Periodically verify the 12VDC power supply to the thermostat is stable.
6. Troubleshooting
If you encounter issues with your thermostat, refer to the following common problems and solutions:
| Problem | Possible Cause | Solution |
|---|---|---|
| Thermostat display is blank. | No power or loose wiring. | Check 12VDC power supply and all wiring connections. Ensure fuses are intact. |
| System not heating/cooling. | Incorrect mode selected, set temperature not reached, or system fault. | Verify correct mode (Cool/Heat) and set temperature. Check if HVAC unit is receiving power and functioning. Review dip switch settings. |
| Inaccurate temperature reading. | Obstructed sensor or thermostat location. | Ensure the thermostat's sensor is clear of dust and not exposed to direct sunlight or drafts. |
| Furnace not turning on (specific to some RVs). | Voltage spikes from furnace control board. | An isolation relay may be required in line with the furnace control board. Consult an RV technician. |
7. Specifications
| Feature | Detail |
|---|---|
| Brand | MACH (Coleman-Mach) |
| Model Name | 9420A382 |
| Controller Type | Push Button / Touch |
| Special Features | Easy to read digital display, Multi-system compatibility, Dry Mode |
| Color | Black |
| Specific Uses | RV Furnace, Air Conditioner, Heat Pump |
| Temperature Control Type | Heat/Cool |
| Connectivity Technology | Wired |
| Power Source | 12VDC |
| Display Type | Digital |
| Mounting Type | Wall Mount |
| Included Components | Thermostat with mounting plate, screws |
| Manufacturer Part Number | 9420A382 |
| UPC | 755790009244, 755790005598 |
8. Warranty Information
The Coleman-Mach 9420A382 Digital Wall Thermostat comes with a 1-year limited warranty from the manufacturer. This warranty covers defects in materials and workmanship under normal use. Please retain your proof of purchase for warranty claims. For full details regarding warranty terms and conditions, refer to the documentation included with your product or contact Coleman-Mach customer support.
9. Support
For technical assistance, troubleshooting beyond this manual, or warranty inquiries, please contact Coleman-Mach customer support. Visit the official Coleman-Mach website for the most current contact information and additional resources.


