1. Introduction
The DiO Connected Home Wireless Two-Way Switch Kit provides a convenient solution for controlling your lights wirelessly. This kit allows you to add a two-way switching function to an existing lighting circuit without extensive wiring. It operates on the DiO 1.0 433MHz protocol, ensuring compatibility with other DiO 1.0 devices.
2. Safety Information
- Always disconnect the main power supply before performing any electrical installation or maintenance.
- Installation should be performed by a qualified electrician or a person with sufficient knowledge of electrical systems.
- Do not expose the devices to moisture, extreme temperatures, or direct sunlight.
- Ensure all connections are secure and properly insulated.
- Only use the specified battery type (CR2032) for the wireless switch.
3. Package Contents
The DiO Connected Home Wireless Two-Way Switch Kit (REV-KIT-01-LOTX2) typically includes:
- 2 x DiO 1.0 Wireless Switches (with CR2032 battery pre-installed)
- 2 x DiO 1.0 Receiver Modules
- 2 x LED Compensators (for compatibility with LED bulbs)

Figure 3.1: Packaging of the DiO Connected Home Wireless Two-Way Switch Kit, showing two kits.
4. Setup and Installation
This kit is designed for quick installation and adapts to most existing electrical installations. The wireless switch is powered by a CR2032 battery (included).
4.1 Components Overview
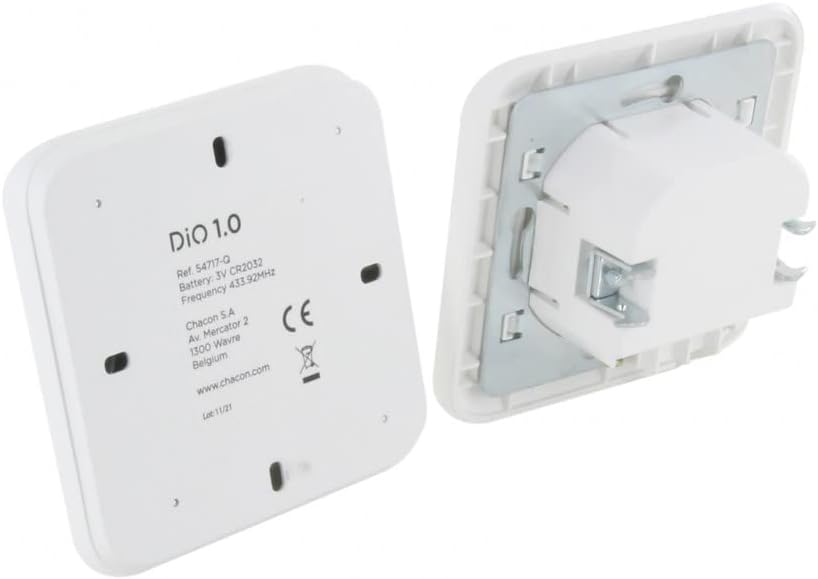
Figure 4.1: Front view of the DiO 1.0 wireless switch.

Figure 4.2: Back view of the DiO 1.0 wireless switch, showing the battery compartment and the receiver module.

Figure 4.3: Side profile of the DiO 1.0 wireless switch and receiver module, illustrating their slim design.
4.2 Receiver Module Installation
- Disconnect Power: Before starting, ensure the main power supply to the lighting circuit is turned off at the circuit breaker.
- Access Wiring: Open the existing light switch or light fixture to access the electrical wiring.
- Connect Receiver Module: Wire the DiO receiver module into the lighting circuit according to the provided wiring diagram (refer to the specific diagram in your product packaging for detailed instructions). The module typically connects between the power supply and the light fixture.
- Install Compensator (for LED bulbs): If you are using LED bulbs, connect the included compensator in parallel with the LED bulb. This prevents flickering or residual glow.
- Secure Module: Place the receiver module securely within the electrical box or light fixture housing.
4.3 Wireless Switch Pairing
- Restore Power: Once the receiver module is installed and secured, restore power to the circuit.
- Initiate Pairing on Receiver: Press the pairing button on the receiver module (refer to the module for exact button location). The indicator light on the module will typically start flashing.
- Activate Wireless Switch: Within a few seconds of the receiver's pairing mode, press the ON button on your DiO wireless switch.
- Confirmation: The indicator light on the receiver module should stop flashing and/or the connected light will turn on/off, confirming successful pairing.
- Mount Wireless Switch: The wireless switch can be mounted on any flat surface using adhesive or screws (not included).
You can add up to 6 transmitters (wireless switches or other DiO 1.0 controllers) to a single receiver module.
5. Operating Instructions
Once installed and paired, operating the DiO Wireless Two-Way Switch is straightforward:
- Turn On: Press the upper part of the wireless switch button to turn the connected light ON.
- Turn Off: Press the lower part of the wireless switch button to turn the connected light OFF.
6. Maintenance
6.1 Battery Replacement
The wireless switch is powered by a CR2032 lithium coin cell battery. When the switch's response becomes inconsistent or stops working, it's time to replace the battery.
- Carefully open the back cover of the wireless switch.
- Remove the old CR2032 battery.
- Insert a new CR2032 battery, ensuring the correct polarity (+ side up).
- Close the back cover securely.
6.2 Cleaning
Clean the surface of the wireless switch with a soft, dry cloth. Do not use abrasive cleaners or solvents, as these can damage the finish.
7. Troubleshooting
- Light not responding:
- Check if the receiver module has power.
- Ensure the wireless switch battery is not depleted (replace if necessary).
- Re-pair the wireless switch with the receiver module.
- Verify that the receiver module is within the operational range of the wireless switch.
- LED bulbs flickering or glowing faintly when off:
- Ensure the LED compensator is correctly installed in parallel with the LED bulb.
- Difficulty pairing:
- Ensure no other DiO 1.0 devices are in pairing mode nearby.
- Repeat the pairing process carefully, following the steps in Section 4.3.
8. Specifications
| Brand | DiO Connected Home |
| Model Number | REV-KIT-01-LOTX2 |
| Color | White |
| Product Dimensions (Kit) | 19 x 11 x 12 cm |
| Weight (Kit) | 710 grams |
| Wireless Protocol | DiO 1.0 (433MHz) |
| Wireless Switch Battery | CR2032 (included) |
| Compatibility | DiO 1.0 range |
| Max Transmitters per Receiver | 6 |
| Operating Mode | ON-ON-ON |
| Circuit Type | 2-way |
| Mounting Type | Surface mount (for wireless switch) |
8.1 Dimensions

Figure 8.1: Dimensions of the DiO wireless switch (right) and receiver module (left).
9. Warranty Information
Warranty information for this product is not available in the provided data. Please refer to the product packaging or the manufacturer's official website for details regarding warranty terms and conditions.
10. Support
Specific support contact information is not available in the provided data. For technical assistance or customer service, please visit the DiO Connected Home official website or contact your retailer.


