
Graigar DT-2268
DT-2268 Photo Tachometer Contact Tachometer User Manual
Model: DT-2268 | Brand: Graigar
1. Introduction
The Graigar DT-2268 is a high-performance, multi-function digital tachometer that combines both Photo (non-contact) and Contact measurement capabilities. It is designed for accurate measurement of rotational speed (RPM), surface speed (m/min, ft/min), and length (m, ft). Its wide measuring range and high resolution make it an ideal tool for various industrial, automotive, and scientific applications.
2. Safety Information
WARNING: Laser Radiation
This device uses a Class II laser. Do not stare into the laser beam. Avoid direct eye exposure. Use of controls or adjustments or performance of procedures other than those specified herein may result in hazardous radiation exposure.
- Always wear appropriate personal protective equipment (PPE) when operating the device.
- Ensure the device is clean and free from damage before each use.
- Do not attempt to disassemble or modify the device. Refer all servicing to qualified personnel.
- Keep the device away from water, high temperatures, and strong magnetic fields.
- Remove batteries if the device will not be used for an extended period.
3. Package Contents
Verify that all items listed below are present and in good condition upon opening the package:
- DT-2268 Photo/Contact Tachometer Unit
- Instruction Manual
- Calibration Certificate
- Carrying Case
- Contact Adapters (Cone, Funnel, Wheel)
- Reflective Tape (for Photo Tachometer mode)

Image: DT-2268 Tachometer with included manual and calibration certificate.
4. Product Overview
Familiarize yourself with the main components of the DT-2268 Tachometer:

Image: Front view of the DT-2268 Tachometer.
- LCD Display: Shows measurement readings, units, and indicators.
- Memory Button: Recalls stored Max, Min, and Last values.
- Function Switch: Selects between Photo (non-contact) and Contact measurement modes.
- Unit Switch: Selects measurement units (RPM, m/min, ft/min).
- Measurement Trigger: Activates the measurement.
- Photo Sensor/Laser Emitter: Used for non-contact RPM measurements.
- Contact Adapter Shaft: For attaching contact measurement accessories.
- Battery Compartment: Located on the rear of the device.
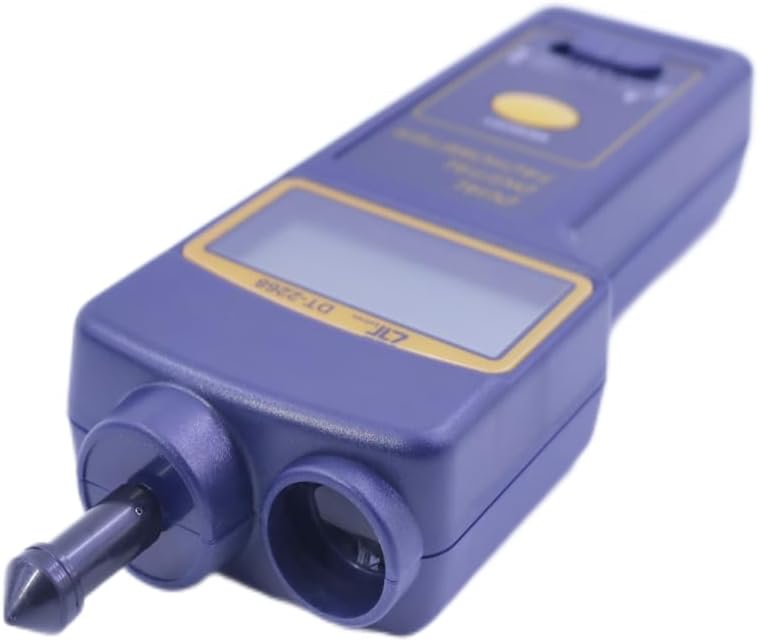
Image: Close-up of the Photo and Contact sensors.
5. Setup
5.1 Battery Installation
The DT-2268 requires 4 x 1.5V 'AA' batteries (not included).
- Locate the battery compartment cover on the rear of the device.
- Slide the cover downwards to open the compartment.
- Insert four 'AA' batteries, ensuring correct polarity (+/-) as indicated inside the compartment.
- Replace the battery compartment cover by sliding it upwards until it clicks into place.

Image: Battery compartment of the DT-2268 Tachometer.
6. Operating Instructions
6.1 Power On/Off
The device powers on automatically when the Measurement Trigger is pressed and held. Release the trigger to power off the device.
6.2 Selecting Measurement Mode (Photo/Contact)
Use the Function Switch located on the front panel to select between 'PHOTO' (non-contact) and 'CONTACT' measurement modes.
6.3 Photo Tachometer (Non-Contact) Measurement
- Ensure the Function Switch is set to 'PHOTO'.
- Attach a piece of reflective tape (included) to the rotating object whose RPM you wish to measure.
- Hold the tachometer approximately 50 to 500 mm (2 to 20 inches) from the target object.
- Press and hold the Measurement Trigger. Aim the laser beam at the reflective tape.
- The RPM reading will be displayed on the LCD. Adjust the distance until a stable reading is obtained.
- Release the Measurement Trigger to stop measuring.
6.4 Contact Tachometer Measurement
- Ensure the Function Switch is set to 'CONTACT'.
- Select the appropriate contact adapter (cone, funnel, or wheel) and firmly attach it to the contact adapter shaft at the top of the device.
- For RPM measurement: Press the cone or funnel adapter firmly against the center of the rotating shaft.
- For surface speed (m/min, ft/min) or length (m, ft) measurement: Use the wheel adapter and press it firmly against the surface to be measured. Use the Unit Switch to select the desired unit.
- Press and hold the Measurement Trigger. The reading will be displayed on the LCD.
- Release the Measurement Trigger to stop measuring.
6.5 Memory Function
The DT-2268 automatically stores the last, maximum, and minimum measured values during a measurement session.
- After completing a measurement, press the 'MEMORY' button.
- Each press of the 'MEMORY' button will cycle through the stored values: LAST, MAX, MIN.
- The corresponding indicator (LAST, MAX, MIN) will appear on the display.
Video: Official product video demonstrating the unboxing and basic operation of the Graigar DT-2268 Photo Contact Tachometer.
7. Maintenance
7.1 Cleaning
- Wipe the device with a soft, dry cloth.
- For stubborn dirt, use a slightly damp cloth with mild detergent, then wipe dry.
- Do not use abrasive cleaners, solvents, or strong chemicals.
- Keep the laser emitter and photo sensor clean and free of dust or debris for accurate readings.
7.2 Storage
- Store the device in its carrying case when not in use.
- Store in a cool, dry place, away from direct sunlight and extreme temperatures.
- Remove batteries if storing for extended periods to prevent leakage.
8. Troubleshooting
| Problem | Possible Cause | Solution |
|---|---|---|
| Device does not power on. | Dead or incorrectly installed batteries. | Check battery polarity or replace with new batteries. |
| Unstable or inaccurate readings (Photo mode). | Incorrect distance to target; insufficient reflective tape; dirty sensor/laser. | Adjust distance (50-500mm); ensure sufficient reflective tape; clean sensor/laser. |
| Unstable or inaccurate readings (Contact mode). | Loose contact adapter; insufficient pressure; worn adapter. | Ensure adapter is firmly attached; apply firm, consistent pressure; replace worn adapter. |
| Display shows 'OVER' or 'UNDER'. | Measurement is outside the device's specified range. | Ensure the measured RPM is within 0.5 to 100,000 RPM. |
9. Specifications
| Parameter | Detail |
|---|---|
| Model | DT-2268 |
| Measurement Range (Photo) | 2.5 to 99,999 RPM |
| Measurement Range (Contact) | 0.5 to 19,999 RPM (Rotational) 0.05 to 1,999.9 m/min (Surface Speed) 0.2 to 6,560 ft/min (Surface Speed) |
| Resolution | 0.1 RPM (0.5 to 999.9 RPM) 1 RPM (over 1000 RPM) |
| Accuracy | ±(0.05% + 1 digit) |
| Display | 5-digit, 18mm (0.7") LCD |
| Sampling Time | 0.8 seconds (over 60 RPM) |
| Memory | Last Value, Max. Value, Min. Value |
| Detection Distance (Photo) | 50 to 500 mm (2 to 20 inches) |
| Power Source | 4 x 1.5V AA batteries |
| Dimensions | Approx. 2.6 x 1.5 x 8.5 inches (66 x 38 x 216 mm) |
| Weight | Approx. 8.3 ounces (235g) (excluding batteries) |
| Operating Temperature | 0 to 50°C (32 to 122°F) |
| Operating Humidity | Less than 80% RH |
| Included Components | Meter, Manual, Case, Contact Adapters, Reflective Tape |
| Country of Origin | Taiwan |
10. Warranty and Support
10.1 Warranty Information
Graigar products are manufactured to high quality standards. This product is covered by a limited warranty against defects in materials and workmanship. Please refer to the warranty card included in your package for specific terms and conditions, including the warranty period and coverage details.
10.2 Customer Support
For technical assistance, troubleshooting, or warranty claims, please contact Graigar customer support. Contact information can typically be found on the product packaging, the official Graigar website, or the included warranty card.
Please have your product model number (DT-2268) and purchase information ready when contacting support.
Ask a question about this manual
Ask about setup, troubleshooting, compatibility, parts, safety, or missing instructions. Manuals+ will review the question and use this page’s manual context to help answer it.