1. Introduction
Thank you for choosing the Outerman 84LED RGB Par Stage Light. This manual provides essential information for the safe and efficient operation of your new stage lighting system. Please read this manual thoroughly before use and retain it for future reference.
The Outerman 84LED RGB Par Light is designed for various applications, including DJ performances, KTVs, discos, bars, weddings, parties, and festive events. It features 84 high-quality LED beads, offering super bright and saturated colors with stable, flicker-free illumination. Multiple control modes, including DMX and infrared remote, provide versatile lighting effects.
2. Safety Information
- Always connect the unit to a grounded power outlet.
- Ensure the voltage of the power supply matches the voltage specified on the unit.
- Do not operate the unit if the power cord is damaged.
- Avoid direct eye exposure to the light source.
- Keep the unit away from rain or moisture to prevent electric shock.
- Ensure proper ventilation around the unit to prevent overheating.
- Do not attempt to repair the unit yourself. Refer all servicing to qualified personnel.
- Disconnect from power before cleaning or maintenance.
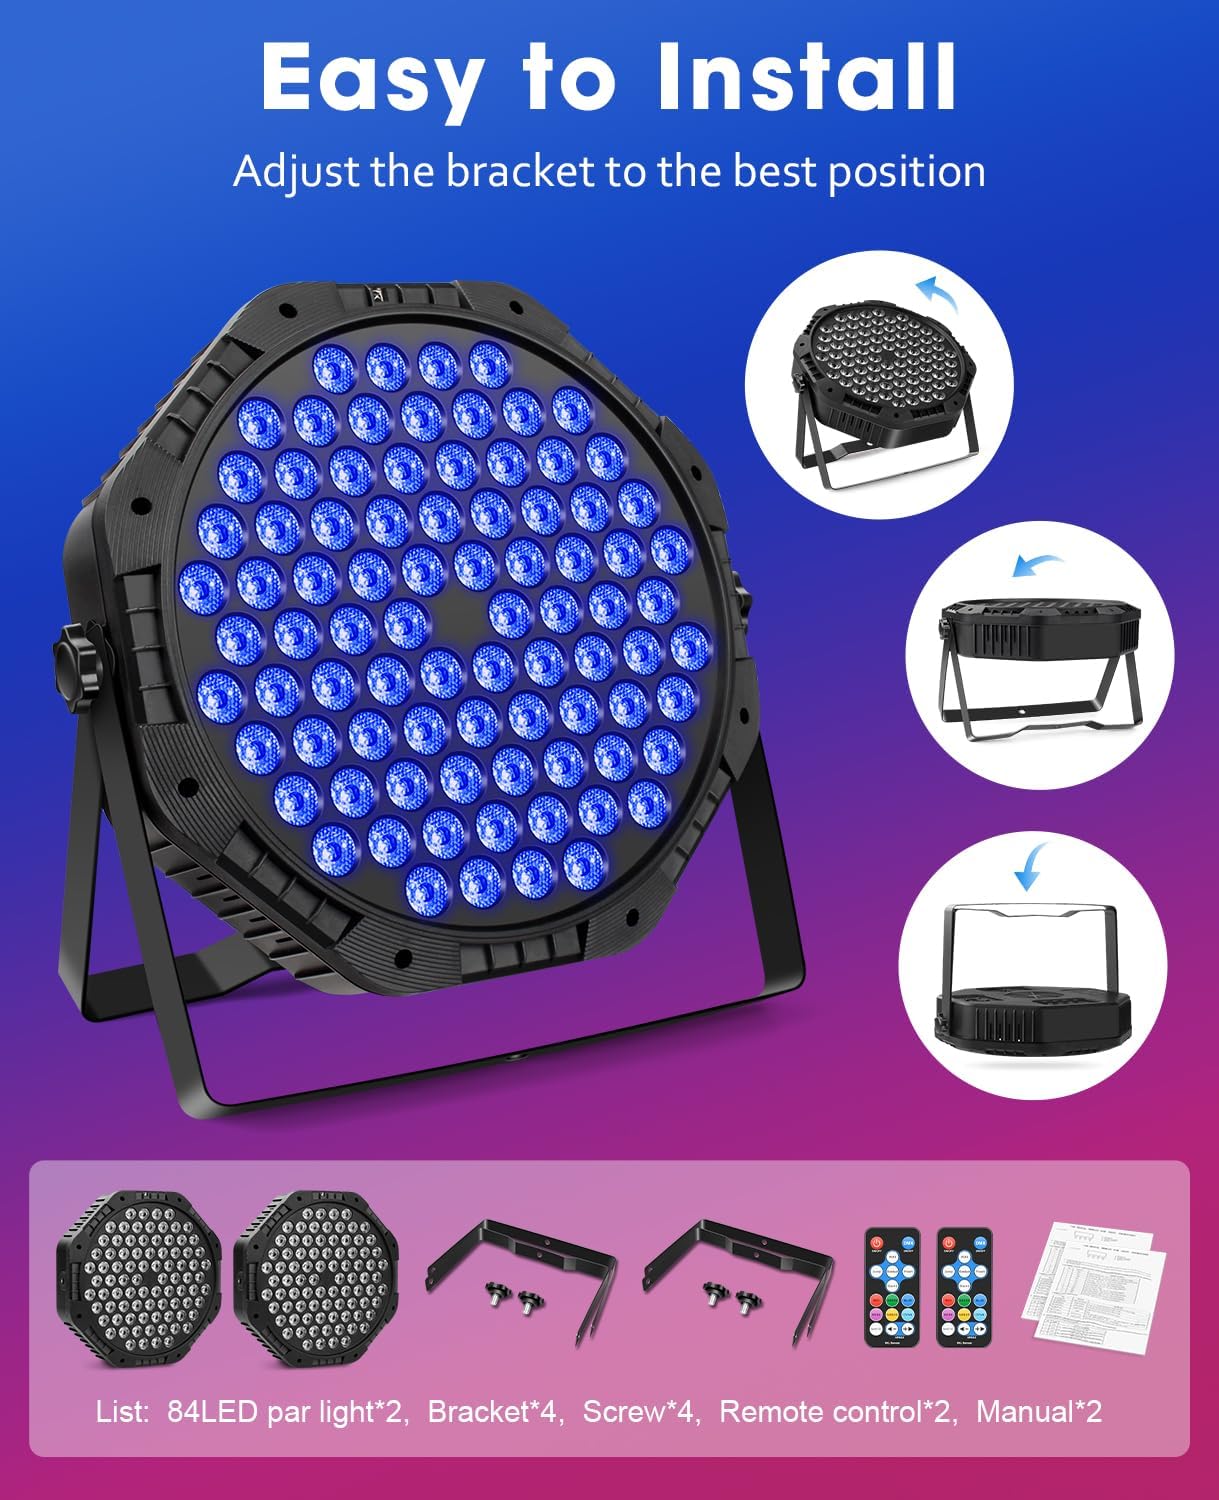
3. What's Included
The package for your Outerman 84LED RGB Par Stage Light (2 Pack) includes the following components:
- 84LED Par Light x 2
- Mounting Bracket x 4
- Mounting Screw x 4
- Infrared Remote Control x 2
- User Manual x 2

4. Product Overview
The Outerman 84LED RGB Par Light is a robust and versatile lighting fixture. Below are key components and their functions:

- 84 LED Beads: High-quality, bright RGB LEDs for vibrant color mixing.
- Digital Display: Shows current mode, DMX address, and other settings.
- DMX In/Out Ports: Standard 3-pin XLR connectors for DMX control.
- Cooling Vent: Ensures efficient heat dissipation for stable operation.
- Dual Mounting Brackets: Allows for flexible positioning on floors, trusses, or ceilings.
- Infrared Receiver: For remote control operation.
5. Setup
5.1 Mounting the Light
The Outerman 84LED RGB Par Light features dual mounting brackets for versatile installation. You can position the light on a flat surface, hang it from a truss, or mount it to a ceiling rod.
- Attach the mounting brackets to the sides of the light using the provided screws.
- Adjust the angle of the light by loosening the bracket screws, setting the desired angle, and then tightening the screws securely.
- Ensure the light is securely fastened to prevent accidental falls, especially when hanging overhead.
5.2 Power Connection
Connect the integrated power cord to a standard grounded electrical outlet (AC 100-240V, 50/60Hz). Ensure the power source meets the light's requirements.
6. Operating Instructions
The Outerman 84LED RGB Par Light offers multiple operating modes, controllable via the onboard digital display or the included infrared remote control.
6.1 Digital Display Operation
Use the MENU, UP, DOWN, and ENTER buttons on the back of the unit to navigate and select modes.
- MENU: Cycles through main menu options (e.g., DMX address, operating modes).
- UP/DOWN: Adjusts values or navigates through sub-menus.
- ENTER: Confirms selection or saves settings.
6.2 Remote Control Operation
The infrared remote control provides convenient access to all lighting modes and color selections. Point the remote directly at the light's infrared receiver.

- ON/OFF: Powers the light on or off.
- DMX: Activates DMX control mode.
- Auto Mode: Cycles through pre-programmed automatic lighting sequences.
- Jump Mode: Changes colors abruptly.
- Gradual Mode: Fades colors smoothly.
- Flash Mode: Creates a strobe effect.
- Sound Activated: Lights react to sound/music.
- Static Colors: Buttons for Red, Green, Blue, Rose, Amber, Cyan, White to select a single static color.
- Speed +/-: Adjusts the speed of dynamic modes.
6.3 DMX Control
For advanced control, connect the light to a DMX controller using standard 3-pin XLR cables. Set the DMX address via the digital display (refer to the "LED84 PAR" manual for specific DMX channel assignments).
To set the DMX address:
- Press the MENU button until "ADDR" appears on the display.
- Use the UP/DOWN buttons to select the desired DMX address (001-512).
- Press ENTER to confirm and save the address.
The remote control can also be used to set the DMX address by pressing the DMX button and then using the number buttons or arrow keys to adjust.
6.4 Master-Slave Mode
To synchronize multiple lights, connect them using DMX cables. Set one light as the "Master" and the others as "Slave" units. The Master unit will control the lighting effects of all connected Slave units.
- Connect the DMX OUT of the Master unit to the DMX IN of the first Slave unit.
- Connect the DMX OUT of the first Slave unit to the DMX IN of the next Slave unit, and so on.
- Set the Master unit to any desired operating mode (e.g., Auto, Sound Activated).
- Set all Slave units to "Slave" mode via their digital displays.
6.5 Demonstration of Lighting Modes
7. Maintenance
Regular maintenance ensures optimal performance and extends the lifespan of your Outerman 84LED RGB Par Light.
- Cleaning: Periodically clean the lens and housing with a soft, lint-free cloth. Do not use abrasive cleaners or solvents. Ensure the unit is unplugged before cleaning.
- Ventilation: Keep the cooling vents clear of dust and debris to prevent overheating.
- Inspection: Regularly inspect the power cord and DMX cables for any signs of damage. Replace damaged cables immediately.
- Storage: When not in use for extended periods, store the light in a dry, dust-free environment.
8. Troubleshooting
| Problem | Possible Cause | Solution |
|---|---|---|
| Light does not turn on. | No power supply; damaged power cord; unit malfunction. | Check power connection and outlet. Inspect power cord for damage. If problem persists, contact customer support. |
| Remote control not working. | Remote battery depleted; remote not pointed at IR receiver; obstruction. | Replace remote battery. Ensure direct line of sight to the IR receiver. Remove any obstructions. |
| Lights not synchronizing in Master-Slave mode. | Incorrect DMX cable connection; Slave units not set to Slave mode. | Verify DMX cable connections. Ensure all Slave units are correctly set to Slave mode. |
| Light overheats and shuts off. | Poor ventilation; blocked cooling vents. | Ensure adequate airflow around the unit. Clean any dust or debris from the cooling vents. |
9. Specifications
| Model Number | XKL-A4 |
| Brand | Outerman |
| Light Source | 84 x 1.75W RGB LEDs (168 total for 2-pack) |
| Power Source | Corded Electric |
| Wattage | 150 Watts |
| Input Voltage | AC 100-240V, 50/60Hz |
| Control Modes | Static Color, Color Change, Color Fade, Auto Play, Sound Activated, Master-Slave, DMX Control |
| Control Interface | Digital Display, Infrared Remote Control, 3-pin DMX In/Out |
| Material | Acrylonitrile Butadiene Styrene (ABS) |
| Product Dimensions (each) | 11"L x 11"W x 6"H (25.5cm L x 25.5cm W x 6.5cm H) |
| Item Weight (each) | Approximately 2.93 lbs (5.85 lbs for 2-pack) |
| Batteries (for remote) | 1 Lithium Ion battery (included) |
10. Warranty and Support
Outerman products are designed for reliability and performance. For warranty information, technical support, or service inquiries, please refer to the contact information provided with your purchase or visit the official Outerman website.
Please retain your proof of purchase for any warranty claims.


