
1. Introduction
This manual provides detailed instructions for the assembly, installation, and proper use of your CHOEZON Hanging Pot Rack, Model TPR12BCC1. Please read all instructions carefully before beginning installation to ensure safe and correct setup. This pot rack is designed to provide versatile storage for cookware, maximizing kitchen space.
Video 1.1: Product Overview of the CHOEZON Hanging Pot Rack. This video demonstrates the general appearance and function of the pot rack.
2. Safety Information
- Always ensure the mounting surface (ceiling joists) is structurally sound and capable of supporting the weight of the pot rack and its contents.
- Use appropriate expansion screws for your specific wall/ceiling material. Consult a professional if unsure.
- Do not exceed the maximum load-bearing capacity of 44 lbs (20 kg).
- Distribute weight evenly across the rack to prevent imbalance.
- Keep small parts away from children during assembly.
- Regularly check all connections and mounting hardware for tightness and stability.
3. Package Contents
Verify that all components are present before beginning assembly:
- Pot Rack Frame (Particleboard and Metal)
- Mesh Shelf
- 4 x Metal Chains (19.7 inches each)
- 18 x S-shaped Hooks
- Assembly Hardware (screws, anchors)
- Instruction Manual
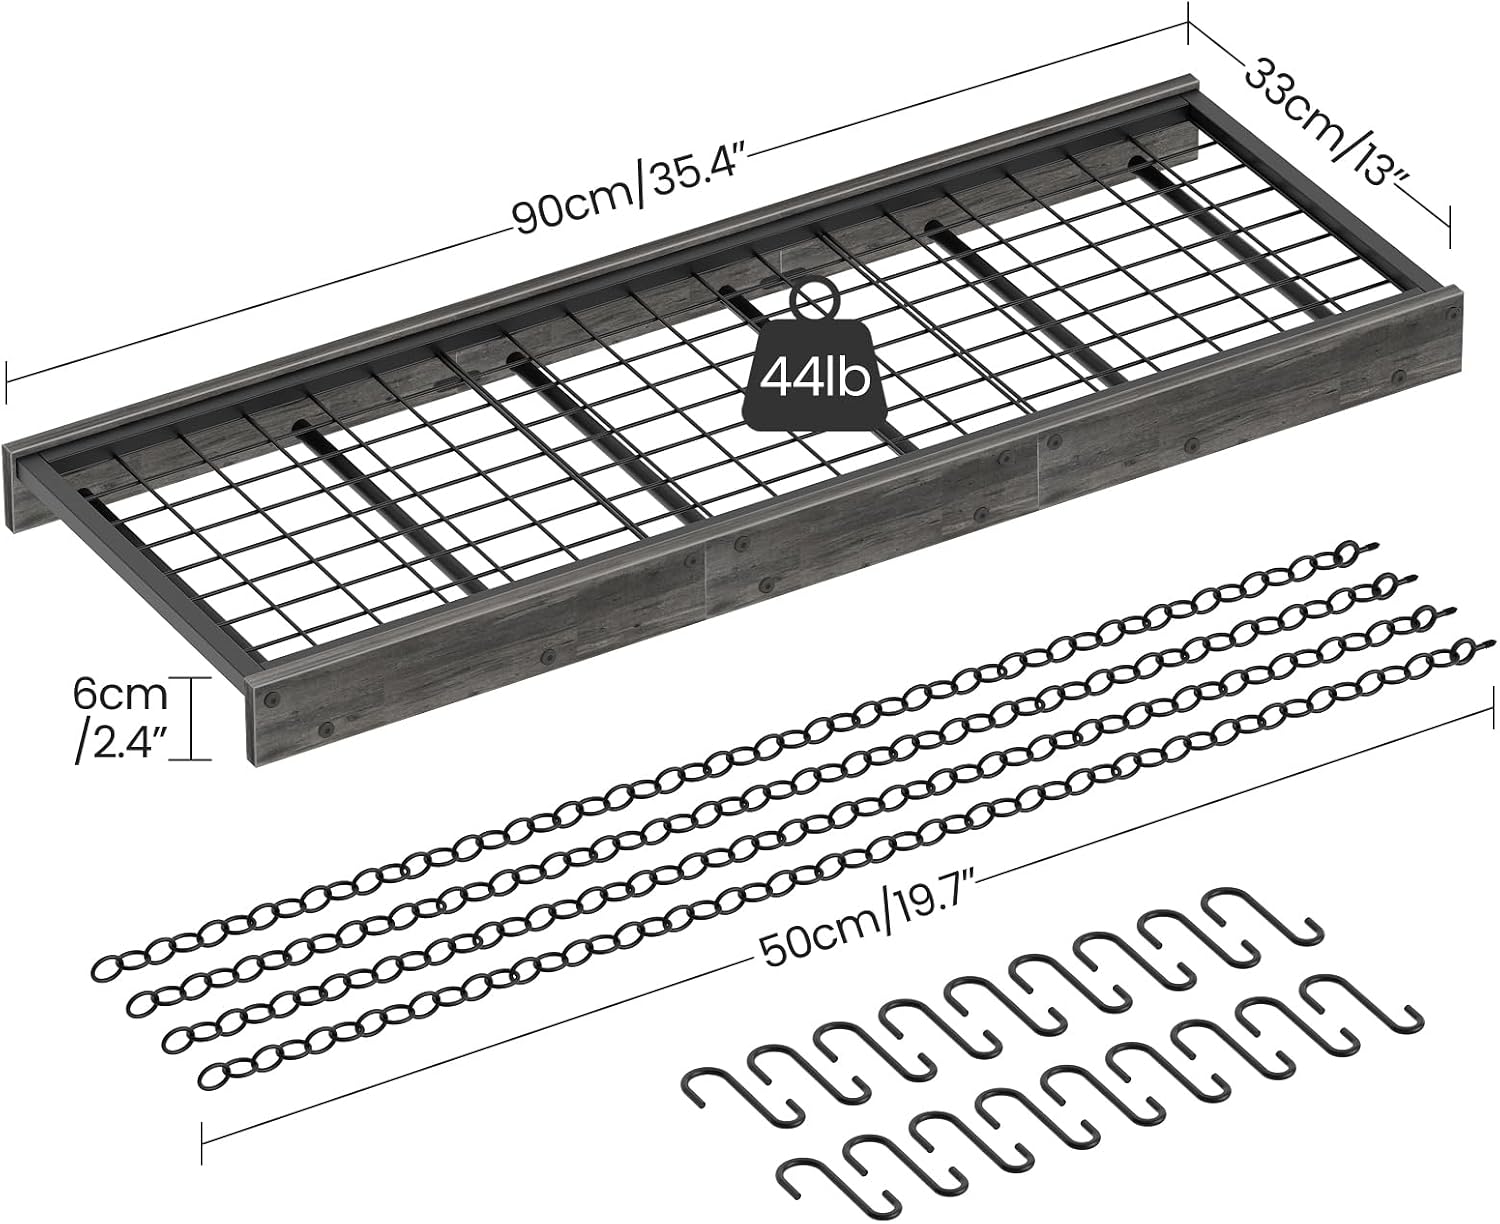
Figure 3.1: Included components and dimensions. The rack measures 35.4 inches long by 13 inches wide by 2.4 inches high. Chains are 19.7 inches long.
4. Assembly Instructions
Follow these steps to assemble your pot rack:
- Unpack Components: Carefully remove all parts from the packaging and lay them out on a clean, flat surface. Compare with the package contents list to ensure everything is present.
- Assemble the Frame: Attach the metal mesh shelf to the particleboard frame using the provided screws. Ensure all connections are secure but do not overtighten.
- Attach Chains: Connect the four metal chains to the designated attachment points on the pot rack frame. Ensure the chains are securely fastened.
- Prepare Hooks: Place the S-shaped hooks onto the lower bars of the pot rack frame. These hooks are removable and can be repositioned as needed.

Figure 4.1: Detail of chain attachment to the pot rack frame.

Figure 4.2: Detail of removable S-hooks on the pot rack.
5. Installation Guide (Ceiling Mount)
Proper installation is crucial for the stability and safety of your pot rack. This rack can be mounted to ceiling joists.
- Identify Mounting Location: Choose a location in your kitchen where the pot rack will not obstruct movement and is easily accessible. Ensure the chosen area has solid ceiling joists for secure mounting.
- Mark Drilling Points: Hold the assembled pot rack against the ceiling in the desired position. Use a pencil to mark the four points where the chains will attach to the ceiling. Ensure these points align with ceiling joists.
- Drill Pilot Holes: Using an appropriate drill bit for your ceiling material and screws, drill pilot holes at the marked locations.
- Install Ceiling Hooks/Anchors: Insert the appropriate expansion screws or ceiling hooks into the pilot holes. Tighten them securely.
- Hang the Pot Rack: Carefully lift the pot rack and attach the four metal chains to the installed ceiling hooks/anchors. Ensure all chains are securely connected and the rack is level.
- Test Stability: Before loading with cookware, gently pull down on the rack to confirm it is stable and securely mounted.
Note: The actual load-bearing capacity may vary with wall/ceiling materials. Choose the appropriate screws based on specific conditions. If you are unsure about installation, consult a qualified professional.

Figure 5.1: Example of a ceiling-mounted pot rack in a kitchen setting.
6. Usage Guidelines
The CHOEZON Hanging Pot Rack is designed for efficient kitchen organization.
- Hanging Cookware: Use the provided S-hooks to hang pots, pans, and other utensils. The 18 hooks allow for organized storage.
- Top Shelf Storage: The mesh shelf on top provides additional space for placing lids, smaller pots, or other kitchen essentials.
- Weight Distribution: Distribute the weight of your cookware evenly across the rack to maintain balance and prevent strain on the mounting points.
- Space Maximization: This hanging design helps free up valuable countertop and cabinet space.

Figure 6.1: Pot rack in use, maximizing space above a kitchen island.

Figure 6.2: Illustrates the types of cookware suitable for the rack and its 44 lb capacity.
7. Care and Maintenance
- Cleaning: Wipe the pot rack with a soft, damp cloth. Avoid abrasive cleaners or harsh chemicals that could damage the finish.
- Regular Inspection: Periodically check all screws, chain connections, and mounting points to ensure they remain tight and secure.
- Load Management: Do not overload the rack. Adhere to the maximum weight capacity to prevent damage or accidents.
8. Troubleshooting
- Rack is Wobbly: Ensure all assembly screws are tightened. Verify that the ceiling mounting points are secure and properly anchored into solid joists. Uneven weight distribution can also cause wobbling; redistribute cookware.
- Hooks Fall Off: Ensure S-hooks are fully engaged on the rack's bars. If hooks are too loose, consider using hooks with a tighter curve or clips.
- Difficulty Assembling: Double-check the instruction manual and ensure all parts are correctly oriented. Do not force components together. If a part seems incorrect, verify against the package contents diagram.
9. Product Specifications
| Feature | Specification |
|---|---|
| Model Number | TPR12BCC1 |
| Dimensions (L x W x H) | 35.4" L x 13" W x 2.4" H |
| Material | Engineered Wood, Metal |
| Color | Charcoal Black |
| Mounting Type | Ceiling Mount |
| Number of Hooks | 18 |
| Maximum Load Capacity | 44 lbs (20 kg) |
| Assembly Required | Yes |
10. Warranty and Support
CHOEZON products are manufactured to high-quality standards. For any questions, concerns, or warranty claims, please contact CHOEZON customer support through the retailer where the product was purchased. Please retain your proof of purchase for warranty purposes.