
LEOBOG AU75
LEOBOG x AULA AU75 Mechanical Keyboard User Manual
Model: AU75 | Brand: LEOBOG
1. Introduction
This manual provides detailed instructions for the setup, operation, maintenance, and troubleshooting of your LEOBOG x AULA AU75 75% Mechanical Keyboard. Please read this manual thoroughly before using the product to ensure optimal performance and longevity.
1.1. What's in the Box
- LEOBOG x AULA AU75 Mechanical Keyboard
- USB-C Cable
- Keycap Puller
- User Manual (this document)
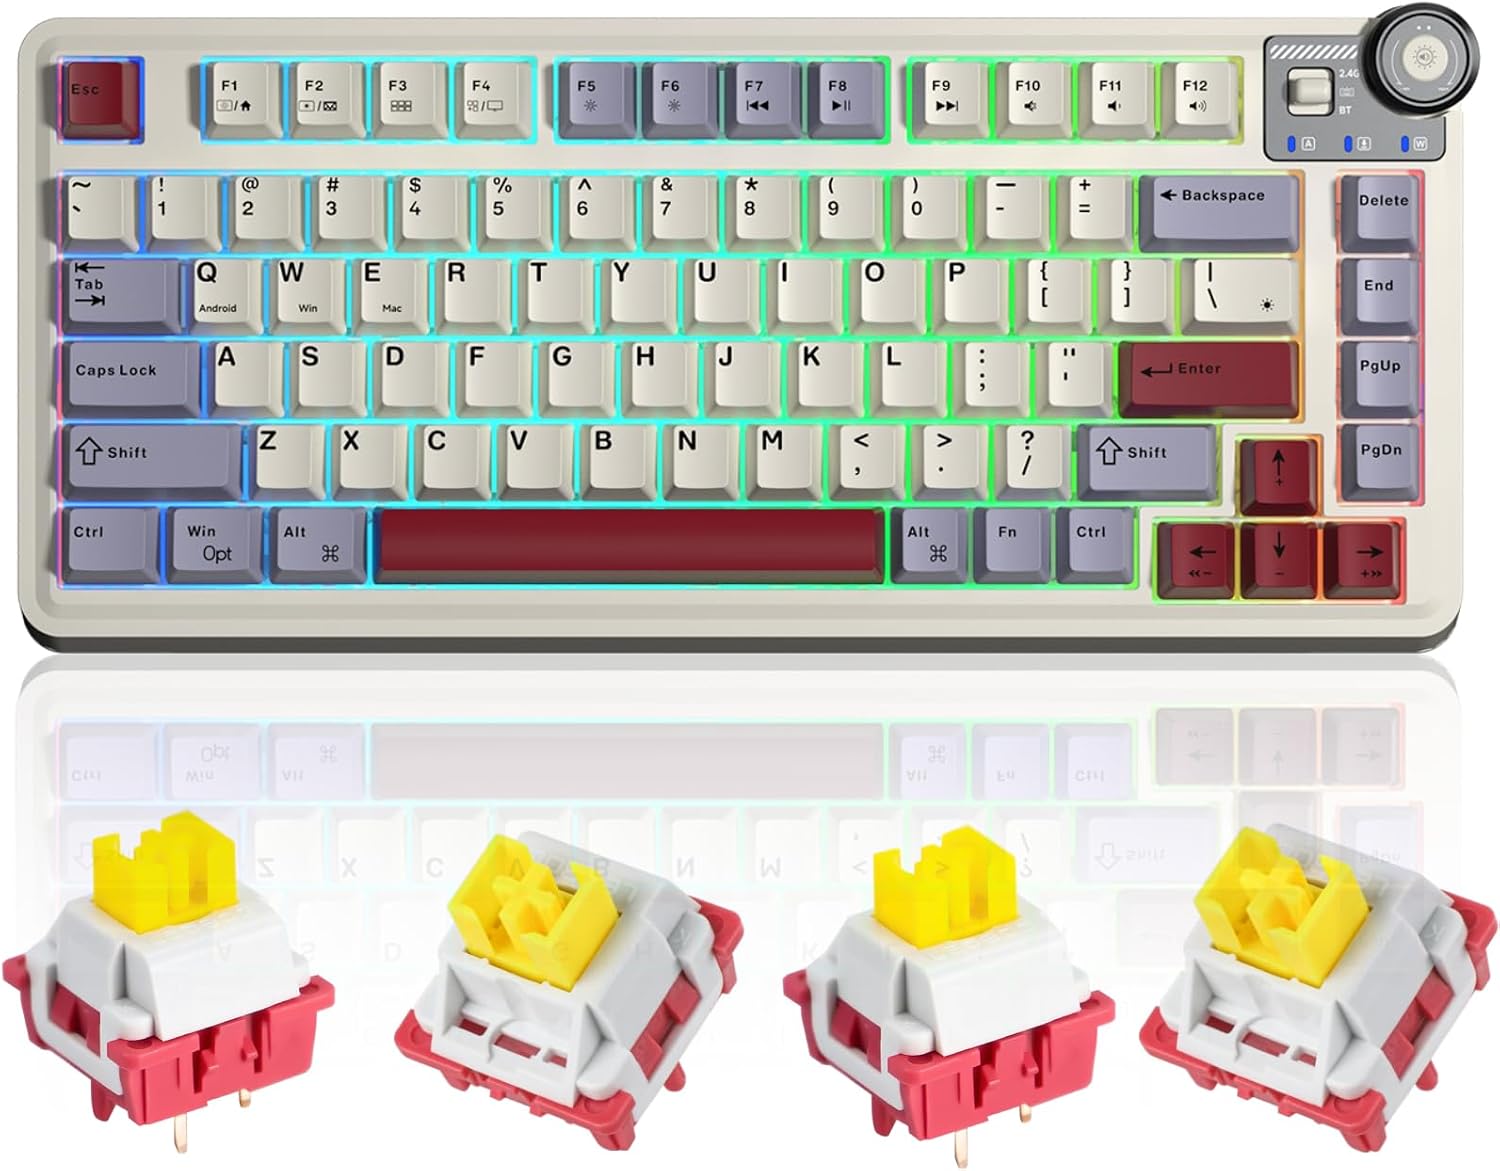
Figure 1.1: The LEOBOG x AULA AU75 75% Mechanical Keyboard, showcasing its compact layout and included Nimbus switches.
2. Setup
The AU75 keyboard supports three connection modes: Bluetooth 5.0, 2.4GHz Wireless, and Wired (USB-C). You can seamlessly switch between up to 5 devices.
2.1. Connecting Your Keyboard
2.1.1. Wired Connection (USB-C)
- Locate the USB-C port on the keyboard.
- Connect one end of the provided USB-C cable to the keyboard and the other end to an available USB port on your computer.
- The keyboard will be automatically recognized and ready for use.
2.1.2. 2.4GHz Wireless Connection
- Locate the 2.4GHz USB receiver (usually stored in a compartment on the keyboard).
- Plug the USB receiver into an available USB port on your computer.
- Ensure the keyboard's mode switch is set to 2.4G.
- The keyboard should connect automatically. If not, press Fn + 4 to initiate pairing.
2.1.3. Bluetooth Connection
- Ensure the keyboard's mode switch is set to BT.
- Press and hold Fn + 1, Fn + 2, or Fn + 3 for 3-5 seconds until the indicator light flashes rapidly, indicating pairing mode.
- On your device (PC, tablet, smartphone), go to Bluetooth settings and search for new devices.
- Select "AULA AU75" or similar from the list to connect.
- Once connected, the indicator light will stop flashing.

Figure 2.1: The AU75 keyboard demonstrating its multi-device connectivity options, including 2.4G wireless, Bluetooth, and wired USB-C, allowing seamless switching between a desktop PC, tablet, and laptop.
3. Operating Instructions
3.1. Multi-function Knob
The AU75 features an upgraded multi-function knob for quick adjustments. Long press the knob to switch between modes (e.g., Lighting Adjustment Mode and Music Adjustment Mode).
- Lighting Adjustment (Game Mode): Rotate clockwise to increase brightness, counter-clockwise to decrease brightness.
- Music Adjustment (Office Mode): Rotate clockwise to increase volume, counter-clockwise to decrease volume. Press the knob down to mute/unmute.

Figure 3.1: Detailed view of the multi-function knob, illustrating its dual functionality for adjusting RGB lighting brightness in Game Mode and controlling audio volume in Office Mode.
3.2. RGB Backlighting
The keyboard features 16.8 million RGB light colors with 16 pre-set lighting effects. Lighting brightness and speed can be adjusted via the knob or specific FN+key combinations. Macro software allows for custom lighting setups.
3.3. Hot-Swappable Switches
The AU75 keyboard is equipped with LEOBOG Star Vector Switches and supports hot-swapping, allowing you to change any 3-pin or 5-pin switch without soldering. This feature enables customization of typing feel and sound.

Figure 3.2: An overview of the AU75 Custom Keyboard's key features, highlighting its 75% layout, versatile connectivity (BT/2.4G/USB-C), hot-swappable design, 16+ million RGB lighting, and gasket structure.
3.4. LEOBOG Nimbus Switch V3
The keyboard comes with LEOBOG Nimbus Switch V3, known for their smooth operation and distinct sound profile. These switches feature an all-POM construction, which contributes to a deep sound signature and self-lubricating properties for increasing smoothness over time.

Figure 3.3: A pair of LEOBOG Nimbus Switches V3, illustrating their unique color scheme and design.

Figure 3.4: Force travel diagram for the LEOBOG Nimbus Switch V3, detailing its actuation force (28gf Min), total travel (3.7±0.3mm), conduction point (1.3±0.3mm), and bottom-out force (45±3gf).
3.5. Gasket Structure and Sound Padding
The AU75 features a flexible gasket structure that improves response, dampens key vibration, and reduces noise. It incorporates five layers of sound padding for a purer knocking sound, including IXPE under-switch pad, PET spacer, PO Bottom Cotton, PO sound deadening foam, and Silicone bottom pad.

Figure 3.5: An exploded view diagram illustrating the five layers of sound padding within the keyboard, designed to enhance acoustic performance and reduce unwanted noise.
4. Maintenance
4.1. Cleaning Your Keyboard
To maintain the keyboard's appearance and functionality, regularly clean it using a soft, lint-free cloth. For deeper cleaning, you may use compressed air to remove dust and debris from between keycaps. For stubborn stains, a slightly damp cloth with mild soap can be used, ensuring no liquid enters the keyboard.
4.2. Replacing Keycaps and Switches
The AU75 keyboard's hot-swappable design allows for easy replacement of keycaps and switches.
- Keycap Removal: Use the provided keycap puller to gently pull keycaps straight up.
- Switch Removal: Use a switch puller (not included, but commonly available) to carefully unclip and pull out the switch. Ensure the switch is pulled straight to avoid bending pins.
- Switch Installation: Align the new 3-pin or 5-pin switch with the holes on the PCB. Gently press down until it clicks into place. Ensure pins are not bent.
- Keycap Installation: Align the new keycap with the switch stem and press down firmly until it is seated.

Figure 4.1: Top view of two 5-pin mechanical switches, illustrating their structure for easy identification during replacement.

Figure 4.2: Bottom view of two 5-pin mechanical switches, showing the pins that connect to the keyboard's PCB for hot-swapping.
5. Troubleshooting
If you encounter issues with your LEOBOG x AULA AU75 keyboard, please refer to the following common solutions:
- Keyboard not responding: Ensure the USB cable is securely connected or the wireless receiver is properly inserted. Check the keyboard's mode switch (Wired, 2.4G, BT) matches your connection method.
- Wireless connection issues: For 2.4GHz, try replugging the receiver. For Bluetooth, ensure the keyboard is in pairing mode (Fn + 1/2/3 for 3-5 seconds) and your device's Bluetooth is enabled. Try removing the keyboard from your device's Bluetooth list and re-pairing.
- Keys not registering: If specific keys are not working, ensure the switches are fully seated. If hot-swapped, try reseating or replacing the switch.
- RGB lighting not working/incorrect: Check the knob settings for brightness. Ensure the keyboard is not in a low-power state. Use the macro software to reset or customize lighting.
- Input lag: Ensure the keyboard is fully charged. For wireless connections, try moving closer to the receiver/device or switching to a wired connection.
- Battery not charging: Ensure the USB-C cable is connected correctly to a working USB port.
If the issue persists, please contact customer support for further assistance.
6. Specifications
| Feature | Detail |
|---|---|
| Brand | LEOBOG |
| Model | AU75 |
| Keyboard Layout | 75% |
| Connectivity Technology | Bluetooth 5.0, 2.4GHz Wireless, USB-C Wired |
| Switch Type | Mechanical (LEOBOG Nimbus Switch V3) |
| Hot-Swappable | Yes (3-pin/5-pin) |
| Backlighting | RGB (16.8 million colors, 16 pre-set effects) |
| Number of Keys | 82 (approx. for 75% layout) |
| Power Source | Battery Powered (4000mAh) |
| Keycap Material | PBT |
| Compatible Devices | PC, Smart TV, Gaming Console, Tablet, Smartphone |
7. Warranty and Support
7.1. Warranty Information
Your LEOBOG x AULA AU75 Mechanical Keyboard comes with a standard manufacturer's warranty. Please refer to the product packaging or the official LEOBOG website for specific warranty terms and conditions, including coverage period and limitations.
7.2. Customer Support
For technical assistance, troubleshooting beyond this manual, or warranty claims, please contact LEOBOG customer support through their official website or the retailer from whom you purchased the product. Please have your product model (AU75) and purchase details ready when contacting support.
Ask a question about this manual
Ask about setup, troubleshooting, compatibility, parts, safety, or missing instructions. Manuals+ will review the question and use this page’s manual context to help answer it.