Introduction
The LIORQUE 60 Minute Visual Timer is designed to help individuals, both children and adults, manage time effectively. Its clear visual display and quiet operation make it ideal for various settings, including classrooms, offices, and homes. This manual provides detailed instructions for setting up, operating, and maintaining your visual timer.

Image: The LIORQUE 60 Minute Visual Timer in dark blue, showing the white dial with black numbers and a blue visual disk indicating remaining time.
Safety Information
- Keep out of reach of small children to prevent choking hazards from small parts.
- Do not expose the timer to extreme temperatures or direct sunlight.
- Avoid dropping the timer or subjecting it to strong impacts.
- Do not attempt to disassemble or repair the timer yourself. Refer to qualified personnel for service.
- Dispose of batteries according to local regulations.
Package Contents
Please check the package to ensure all items are present:
- 1 x LIORQUE 60 Minute Visual Timer (Model TM027)
- 2 x AA Batteries (included)
- 1 x User Manual (this document)
Setup
Battery Installation
- Locate the battery compartment on the back of the timer.
- Open the battery compartment cover.
- Insert two AA batteries, ensuring correct polarity (+/-).
- Close the battery compartment cover securely.

Image: The LIORQUE visual timer on a table with two AA batteries next to it, illustrating that batteries are included and the timer is battery-operated.
Placement Options
The LIORQUE visual timer offers flexible placement options:
- Magnetic Backing: Attach the timer to any magnetic surface, such as a whiteboard or refrigerator.
- Foldable Bracket: Use the integrated foldable stand to place the timer on a desk, table, or shelf.
- Wall Mounting Hole: Hang the timer on a wall using a suitable hook or nail.
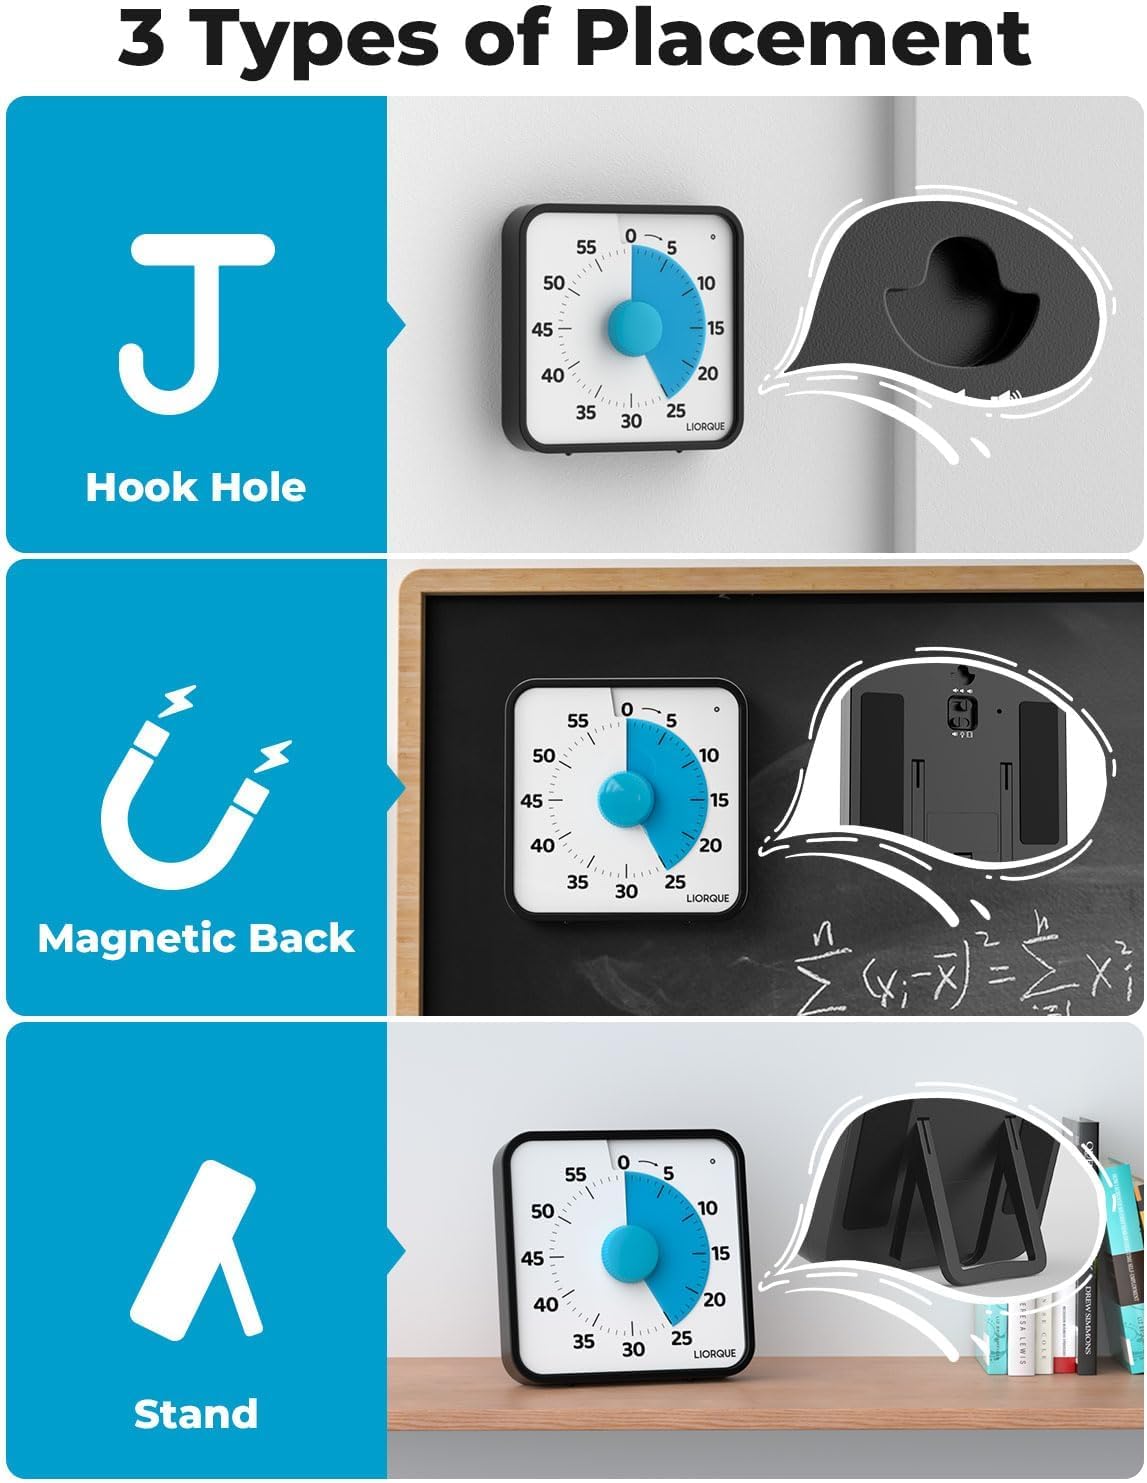
Image: A collage showing the three placement options: hanging via a hook hole, magnetic attachment to a blackboard, and standing on a tabletop using the foldable bracket.
Operating Instructions
Setting the Timer
To set the countdown time:
- Turn the central dial clockwise to increase the time. The blue visual disk will expand to indicate the set duration.
- Turn the central dial counter-clockwise to decrease the time.
- The timer will begin counting down immediately once the dial is set.
- Note: If the desired countdown time is less than 3 minutes, first turn the dial to 5 minutes, then turn it back to your desired shorter time.

Image: The visual timer with text overlay indicating to turn clockwise to increase time and counter-clockwise to decrease time. A child is visible in the background, suggesting its use for learning.
Adjusting Alarm Modes
The LIORQUE visual timer features three alarm modes: Sound, Light, and Vibration. You can select the mode that best suits your needs.
- Sound Mode: Offers three volume levels: Mute, Low, and High. Adjust the volume using the switch on the side/back of the timer.
- Light Mode: The timer will flash a light when the time expires.
- Vibration Mode: The timer will vibrate when the time expires.
All alarm types will last for 1 minute. To end the alarm early, refer to the 'Turning Off the Alarm' section.

Image: A collage illustrating the three alarm modes: Light Alarm (red light flashing), Vibration Alarm (vibration icon), and Audible Alarm (sound icon with Mute-Low-High options).
Turning Off the Alarm
If you wish to stop the alarm before its 1-minute duration, gently rotate the dial clockwise a little, then reset it to zero. This action will disengage the alarm.
Features
- Extra Large Visual Display: The 7.5-inch screen provides a clear, at-a-glance view of remaining time, making it easy to understand for all ages.
- Non-Ticking Operation: Battery-powered design ensures silent operation, preventing distractions during focused tasks.
- Multiple Alarm Options: Choose between sound, light, or vibration alerts to suit different environments and personal preferences.
- Flexible Placement: Equipped with magnetic backing, a foldable stand, and a wall-mounting hole for versatile use.

Image: A graphic summarizing key features: Time Visible, 7.5" Large Screen, Easy to Operate, Battery-powered, No Ticking Sound, and Multiple Alarm Modes.

Image: The LIORQUE visual timer displayed with its dimensions, highlighting the 7.5-inch screen size for clear visibility from a distance.
Usage Scenarios
The LIORQUE visual timer is a versatile tool for various time management needs:
- Classroom: Helps students understand time limits for assignments, tests, or group activities.
- Kitchen: Perfect for cooking, baking, or any timed kitchen tasks.
- Meetings: Keeps discussions on track and ensures efficient use of time.
- Yoga/Meditation: Provides a visual cue for timed sessions without audible distractions.
- Homework/Study: Assists in focused work periods and breaks.
- Chores/Tasks: Motivates completion of household tasks within a set timeframe.

Image: A graphic showing the visual timer in different settings: cooking, classroom, meeting, and yoga, demonstrating its versatility.

Image: A comparison showing children with improved focus and time management skills, illustrating the positive impact of using the visual timer.
Maintenance
- Clean the timer with a soft, dry cloth. Do not use abrasive cleaners or solvents.
- Avoid exposing the timer to water or excessive moisture.
- If the timer will not be used for an extended period, remove the batteries to prevent leakage.
Troubleshooting
| Problem | Possible Cause | Solution |
|---|---|---|
| Timer not starting/working | Batteries are dead or incorrectly inserted. | Replace batteries with new AA batteries, ensuring correct polarity. |
| Alarm not sounding/vibrating/lighting | Alarm mode is set to Mute or incorrect mode. | Check the alarm mode switch and volume settings. |
| Visual disk not moving smoothly | Internal mechanism obstruction or damage. | Ensure the timer is on a flat, stable surface. If problem persists, contact customer support. |
Specifications
- Brand: LIORQUE
- Model Number: TM027
- Color: Dark Blue
- Product Dimensions: 7.64"D x 7.8"W x 2"H
- Screen Size: 7.5 Inches
- Item Weight: 1.23 pounds
- Batteries: 2 AA batteries (included)
- Maximum Time Setting: 60 minutes
Warranty and Support
LIORQUE products are manufactured with high-quality standards. For any questions, technical support, or warranty claims, please refer to the contact information provided with your purchase or visit the official LIORQUE website. Please retain your proof of purchase for warranty purposes.


