
iHealth AG-607
iHealth Acacia Blood Glucose Monitor Kit (Model AG-607) User Manual
Your Guide to Accurate Blood Glucose Monitoring
1. Introduction
The iHealth Acacia Blood Glucose Monitoring System is designed for the quantitative measurement of glucose in fresh capillary whole blood samples. This system is intended for self-testing by people with diabetes at home and by healthcare professionals in clinical settings as an aid in managing diabetes.
The iHealth Acacia system provides quick, precise, and gentle testing with a user-friendly design that requires no coding. It helps optimize blood glucose management by storing up to 500 memory readings and providing averages for various periods. The system complies with ISO 15197:2013 international standards for accuracy.

Image 1.1: Key features of the iHealth Acacia Blood Glucose Monitoring System, including its display, memory, and quick results.
2. Package Contents
Your iHealth Acacia Blood Glucose Monitor Kit includes the following components:
- 1 x iHealth Acacia Blood Glucose Meter
- 1 x Lancing Device
- 1 x Carrying Bag
- 2 x AAA Batteries
- 1 x Quick Start Guide
- 1 x Instruction Manual (this document)
- 100 x Blood Glucose Test Strips
- 100 x Lancets

Image 2.1: All components included in the iHealth Acacia Blood Glucose Monitor Kit.
3. Important Safety Information
Please read this manual thoroughly before using the iHealth Acacia Blood Glucose Monitoring System. Failure to follow instructions may lead to inaccurate results or injury.
- This device is for in vitro diagnostic use only. Do not use for diagnosis of diabetes or for screening newborns.
- Consult your healthcare professional before making any changes to your medication, diet, or exercise program based on your test results.
- Keep the device and all components out of reach of children.
- Dispose of used lancets and test strips properly in a sharps container to prevent injury and infection.
- Do not use the system if it appears damaged or is not functioning correctly.
- Store test strips and lancets in a cool, dry place, away from direct sunlight and heat.
4. Getting Started (Setup)
4.1 Meter Setup (Batteries, Time/Date)
Before first use, insert the two AAA batteries into the meter. The meter will prompt you to set the date and time. Follow the on-screen instructions to adjust these settings using the navigation buttons. Correct date and time settings are crucial for accurate record-keeping.
4.2 Lancing Device Preparation
The lancing device is used to obtain a blood sample. It features an adjustable depth setting for comfort.
- Remove the cap from the lancing device.
- Insert a new, sterile lancet firmly into the lancet holder.
- Twist off the protective cover from the lancet. Do not discard the lancet cap.
- Replace the lancing device cap.
- Adjust the puncture depth by rotating the cap. A setting of 4 is recommended for initial use.
- Pull the handle until a red indicator appears, signifying it is ready to use.

Image 4.1: Detailed steps for preparing the lancing device for use.
4.3 Control Solution Test (Optional)
The control solution verifies that your meter and test strips are working correctly. Perform a control test when:
- You suspect the meter or strips are not working correctly.
- Your test results do not match your symptoms.
- You have cleaned or repaired the meter.
- Test strips have been exposed to extreme conditions.
- The meter has been dropped or may be damaged.
To perform a control test:
- Insert a test strip into the blood glucose meter.
- Press the "Set" button to access the control solution (CTL) mode.
- Place the test strip in contact with the control solution.
- Ensure the reading is within the Level II range indicated on the control solution bottle.
Note: Control solution is sold separately.
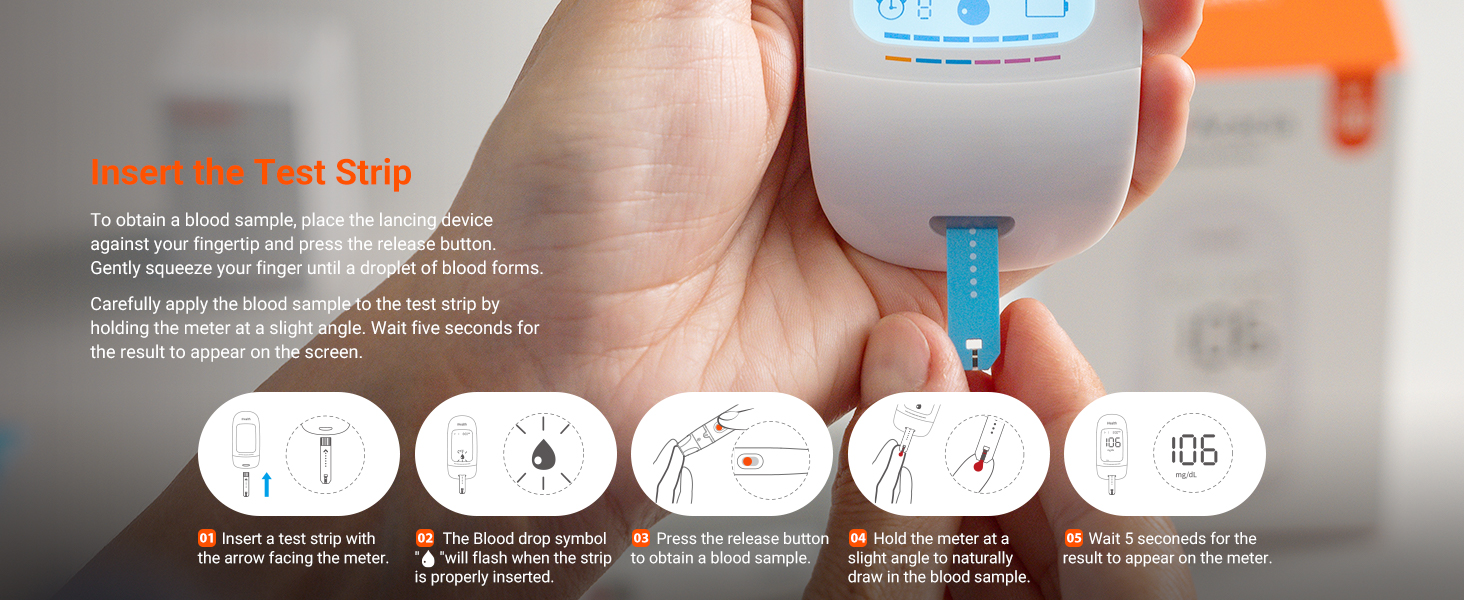
Image 4.2: Instructions for using the control solution to verify meter accuracy.
5. Performing a Blood Glucose Test
5.1 Preparation
Before testing, ensure your hands are clean and dry. This helps prevent contamination and ensures accurate results.
- Wash your hands thoroughly with warm, soapy water.
- Dry your hands completely.
- If desired, shake your hands or rub them together to encourage blood flow to your fingertips.
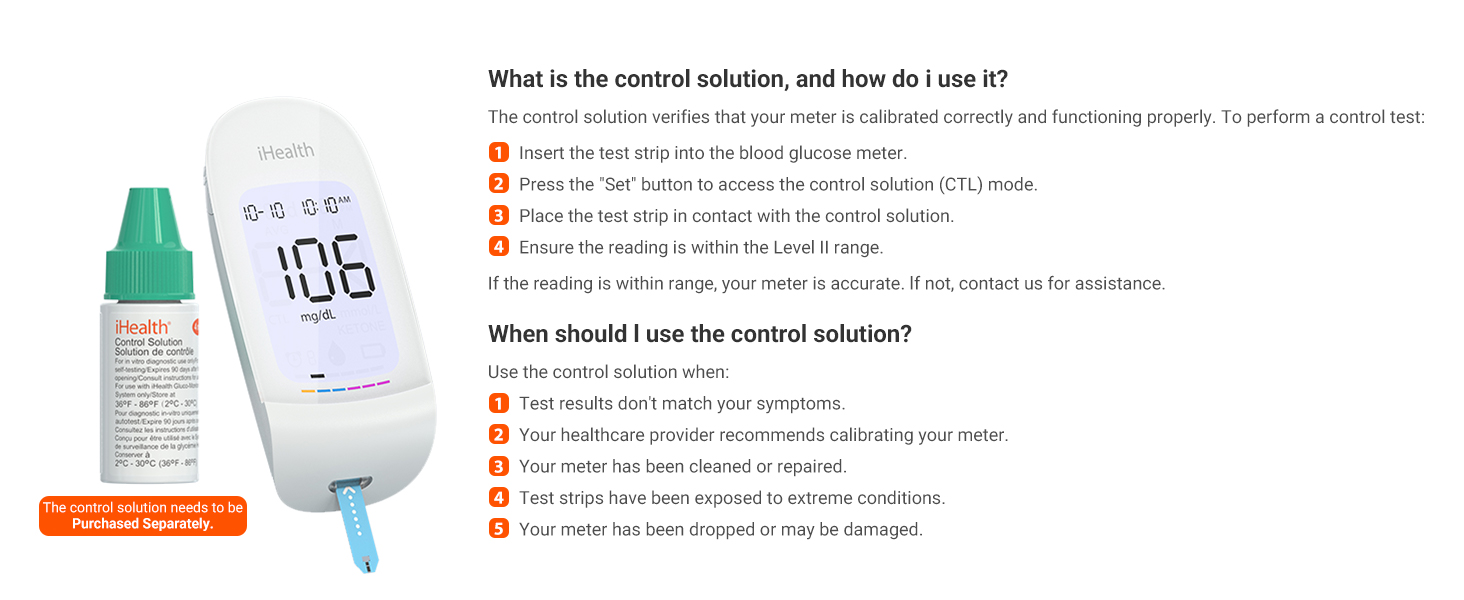
Image 5.1: Proper hand preparation before performing a blood glucose test.
5.2 Obtaining a Blood Sample
- Insert a fresh test strip into the meter with the arrow facing the meter. The meter will turn on automatically.
- Place the prepared lancing device against the side of your fingertip.
- Press the release button on the lancing device to prick your finger.
- Gently squeeze your finger until a small droplet of blood forms. Do not smear the blood.
5.3 Applying Blood to Test Strip and Reading Results
- When the blood drop symbol flashes on the meter, carefully apply the blood sample to the absorbent tip of the test strip. The blood will be drawn into the strip automatically.
- Hold the meter at a slight angle to ensure proper blood application.
- Wait 5 seconds for the result to appear on the meter's display.
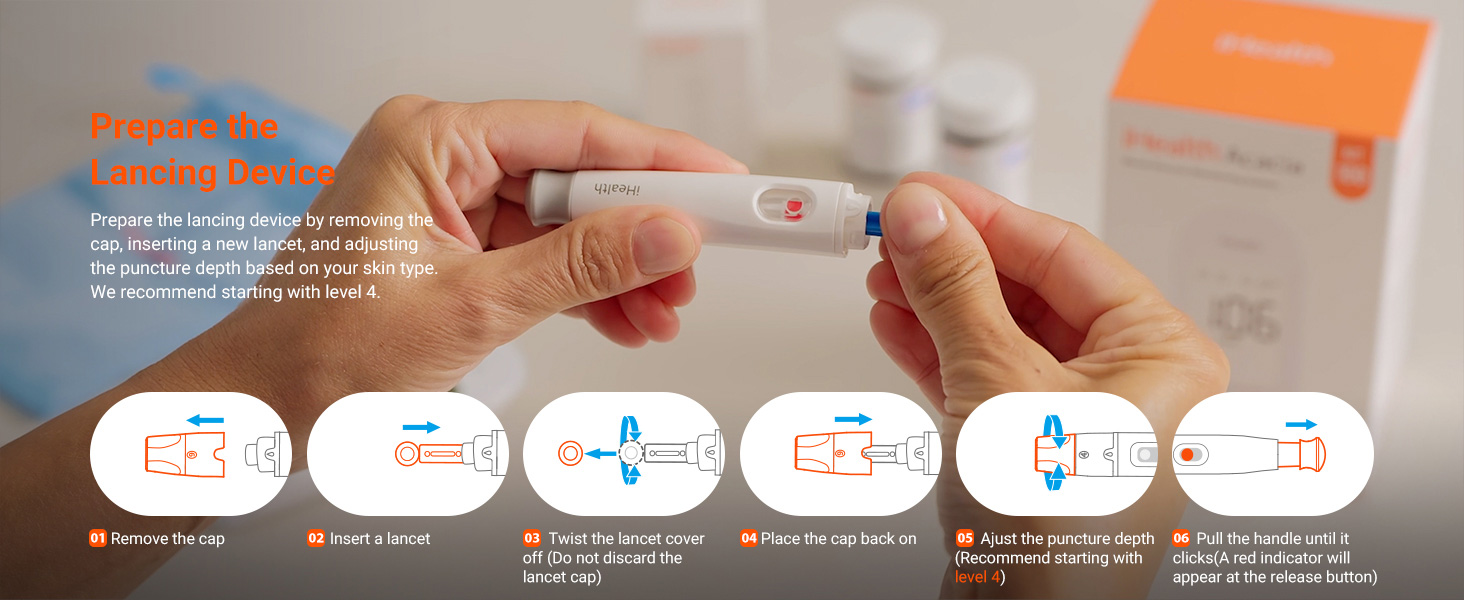
Image 5.2: Instructions for inserting the test strip and applying the blood sample.
5.4 Disposing of Used Materials
After each test, it is crucial to dispose of used test strips and lancets safely.
- Push the strip eject button on the back of the meter to remove the used test strip.
- Carefully remove the lancing device cap.
- Insert the used lancet into its protective cap or a suitable sharps container.
- Push the eject button on the lancing device slightly to discard the lancet into a sharps container.
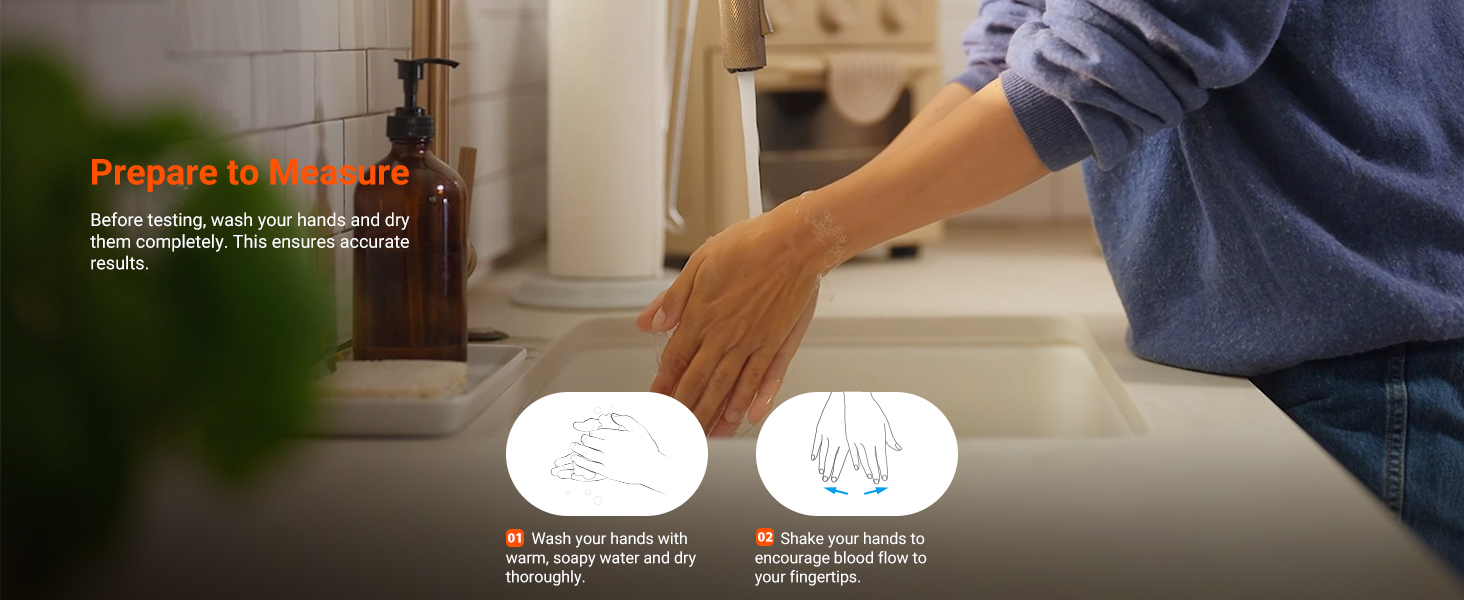
Image 5.3: Safe disposal of used test strips and lancets.
6. Understanding Your Results
The iHealth Acacia meter stores up to 500 blood glucose readings. It also calculates blood glucose averages for 7, 14, 21, 28, 60, and 90 days. This feature allows you to track trends and manage your blood glucose levels more effectively over time. Refer to your healthcare professional for guidance on interpreting your results and setting personal target ranges.
7. Care and Maintenance
7.1 Cleaning the Meter
Clean the meter regularly to ensure proper function. Use a soft, damp cloth with mild detergent or a 70% isopropyl alcohol wipe. Do not immerse the meter in water or use harsh cleaning agents.
7.2 Storage
Store the iHealth Acacia meter and test strips in a cool, dry place, between 50°F (10°C) and 104°F (40°C). Avoid direct sunlight, extreme temperatures, and high humidity. Keep all components in their original containers to protect them from damage and contamination.
8. Troubleshooting
If you encounter any issues with your iHealth Acacia Blood Glucose Monitor, refer to the table below for common error messages and their solutions.
| Message | What It Means | What To Do? |
|---|---|---|
| Lo | Blood glucose level is lower than 20 mg/dL (1.1 mmol/L). | The message indicates very low blood glucose. Consult your health care professional immediately. |
| Hi | Blood glucose level is higher than 600 mg/dL (33.3 mmol/L). | The message indicates severe hyperglycemia (high blood glucose). Seek immediate medical assistance. |
| EE1 | The batteries in your meter are low on power. | Please change the batteries. |
| EE2 | Problem with the meter. | Retest using a new test strip. |
| EE3 | Problems have occurred that are related to test strip use, such as:
| Retest using a new test strip. |
| EE4 | Problem with the meter. | Retest using a new test strip. |
| EE5 | The environmental temperature is lower than 50°F (10°C). | The operating temperature is 50°F~104°F (10°C~40°C). Move to a suitable environment. |
| EE6 | The environmental temperature is higher than 104°F (40°C). | The operating temperature is 50°F~104°F (10°C~40°C). Move to a suitable environment. |
| EEA | Problem with the meter. | Retest with a new test strip. If the problem persists, contact customer service. |
| EEb | Problem with the meter. | Retest with a new test strip. If the problem persists, contact customer service. |
If the problem persists after following these steps, please contact iHealth Customer Service.
9. Product Specifications
- Model Name: AG-607 Acacia
- Brand: iHealth
- Manufacturer: Andon Health Co., LTD.
- ASIN: B0DKN25SRZ
- UPC: 850044118809
- Blood Sample Volume: 0.7 µL
- Test Time: 5 seconds
- Memory Storage: Up to 500 readings
- Battery Type: 2 x AAA Alkaline Batteries
- Operating Temperature: 50°F - 104°F (10°C - 40°C)
- Package Dimensions: 5.16 x 3.39 x 2.83 inches
- Package Weight: 9.59 ounces
- Compliance: ISO 15197:2013 International Standards
10. Warranty and Customer Support
10.1 Warranty Information
The iHealth Acacia Blood Glucose Monitor Kit comes with a 1-Year limited warranty. Please retain your proof of purchase for warranty claims.
10.2 Customer Support
iHealth provides a dedicated customer service team based in California to assist you with any questions or concerns regarding your blood glucose monitor. For assistance, please refer to the contact information provided in your Quick Start Guide or visit the official iHealth website.
Related documentsAG-607


Ask a question about this manual
Ask about setup, troubleshooting, compatibility, parts, safety, or missing instructions. Manuals+ will review the question and use this page’s manual context to help answer it.