
Introduction
Thank you for purchasing the Urageuxy Wireless Digital Rain Gauge. This device is designed to provide accurate measurements of rainfall, along with indoor and outdoor temperature and humidity. It features a self-emptying rain collector, customizable alerts, and a clear display for easy monitoring. Please read this manual thoroughly before use to ensure proper setup and operation.
Package Contents
Verify that all components are present in your package:
- 1 x Wireless Rain Gauge (Outdoor Unit)
- 1 x Remote Thermo-hygrometer Sensor
- 1 x Display Console (Indoor Unit)
- 1 x User Manual
- 1 x USB Cable for Display Console
- 2 x Screws for attachment
- 6 x Detachable Metal Bird Spikes

Image: All components included in the Urageuxy Wireless Digital Rain Gauge package.
Product Overview
Display Console (Indoor Unit)

Image: Detailed view of the display console, highlighting various data points.
- Time and Date: Displays current time, day of the week, and date.
- Indoor Temperature/Humidity: Shows current indoor environmental conditions.
- Channel Temperature/Humidity: Displays outdoor environmental conditions from the remote sensor.
- Rainfall Data: Tracks rainfall for 1 hour, 24 hours, week, month, and total.
- History Graph: Visual representation of past rainfall data.
- Min/Max Records: Records minimum and maximum values for temperature, humidity, and rainfall.
- Alarm Clock Function: Integrated alarm clock.
- Buttons: MIN/MAX, SET, ALARM, CHANNEL/+, HISTORY/- for navigation and settings.
Wireless Rain Gauge (Outdoor Unit)
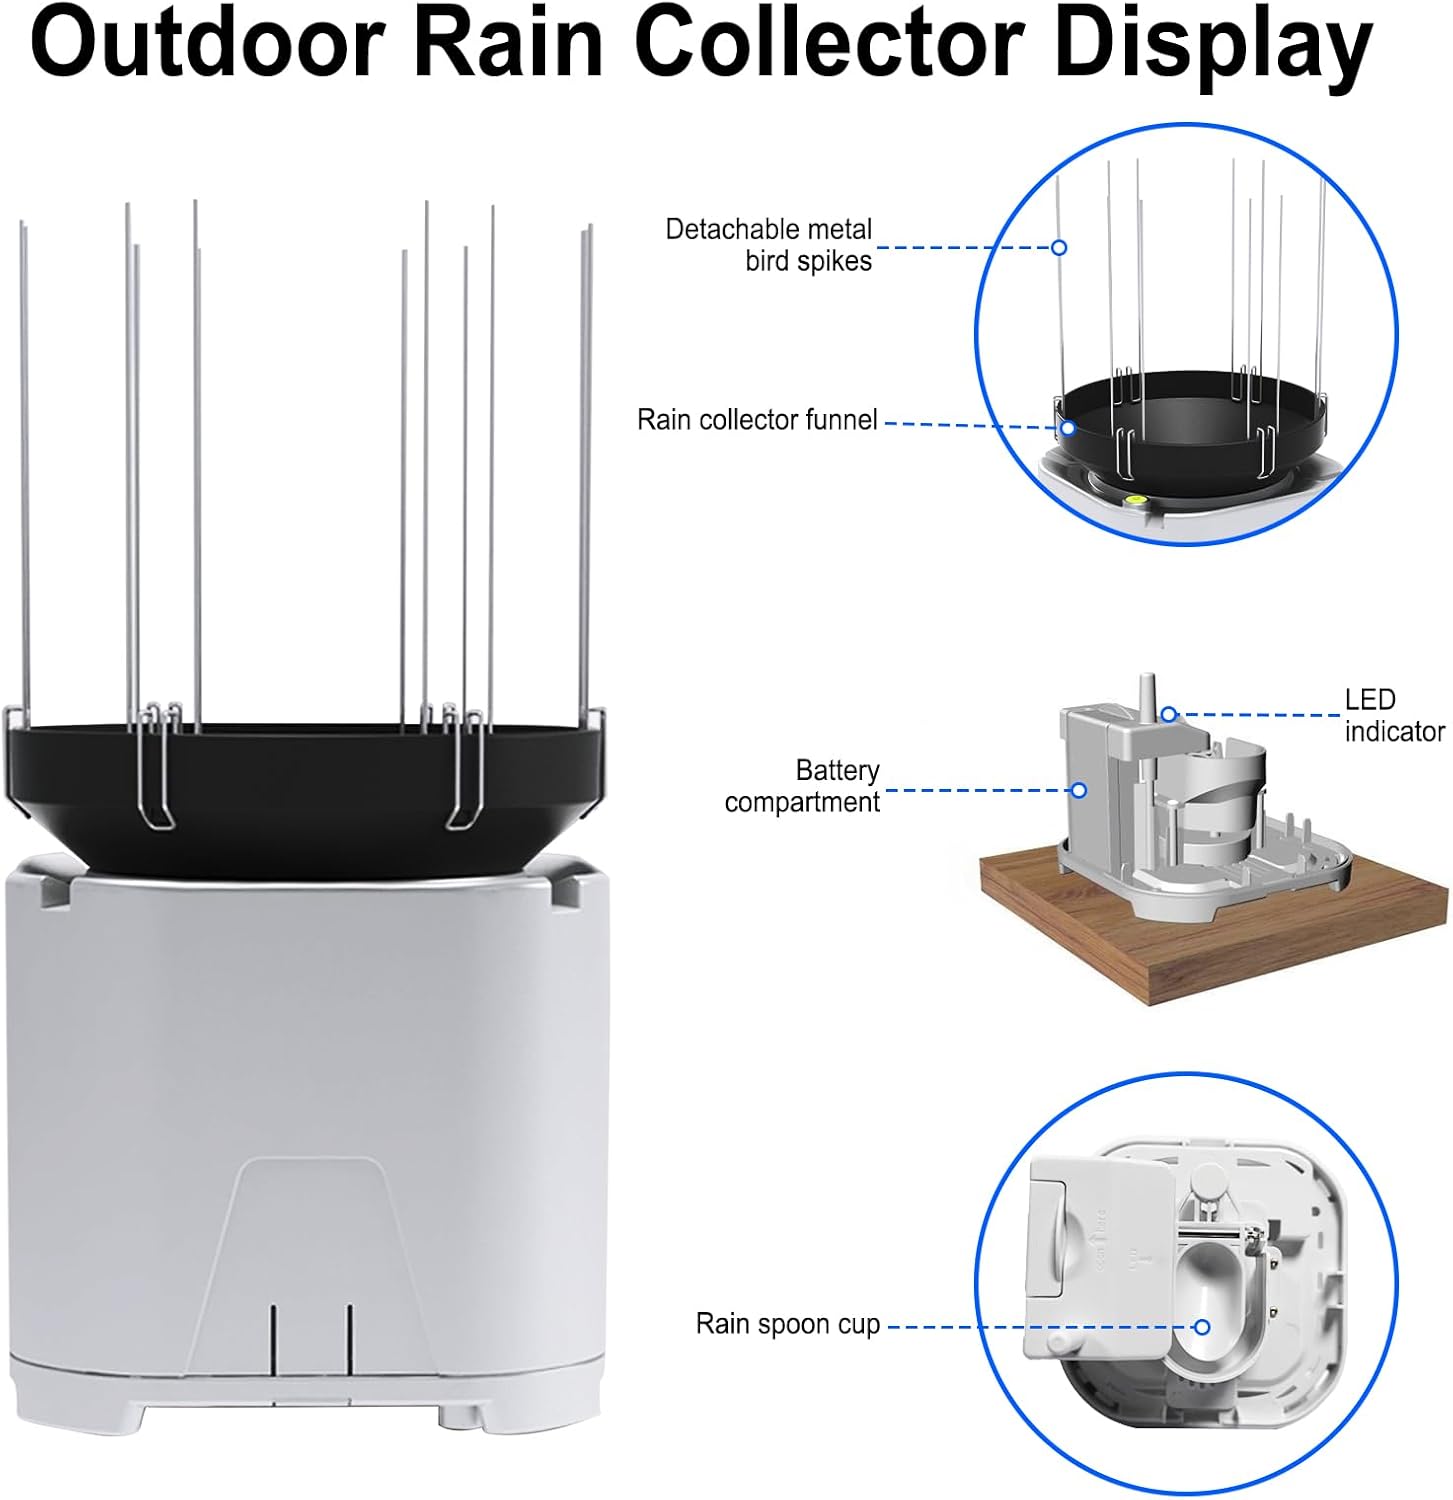
Image: Components of the outdoor rain collector unit.
- Self-Emptying Rain Collector: Automatically empties collected rain.
- Detachable Metal Bird Spikes: Prevents birds from perching and obstructing the collector.
- Battery Compartment: For power supply.
- Rain Spoon Cup: Mechanism for measuring rainfall.
Remote Thermo-hygrometer Sensor
This compact sensor wirelessly transmits outdoor temperature and humidity data to the display console.
Setup
1. Battery Installation
For Display Console:
- Open the battery compartment cover on the back of the display console.
- Insert 4 x AAA batteries (not included) according to the polarity markings (+/-).
- Alternatively, connect the display console using the provided USB cable for continuous power.
For Wireless Rain Gauge (Outdoor Unit):
- Locate the battery compartment on the outdoor unit.
- Insert the required batteries (refer to the unit's markings for type and quantity) according to the polarity markings.
For Remote Thermo-hygrometer Sensor:
- Open the battery compartment.
- Insert the required batteries according to the polarity markings.

Image: Display console with options for battery or USB power.
2. Sensor Placement
Proper placement is crucial for accurate readings and wireless transmission.
Wireless Rain Gauge (Outdoor Unit) Placement:
Choose a location that is:
- On a level surface with no obstructions above.
- Away from areas prone to flooding or excessive plant growth.
- Accessible for occasional cleaning.
Image: Guidelines for optimal rain collector placement.
Mounting Options:
- Level Surface Mounting: Place the unit directly on a flat, stable surface.
- Pole Mounting:
- Place the iron bracket into the base of the rain collector.
- Thread U-bolts into the iron bracket.
- Put the iron pipe into the U-bolt.
- Use a small wrench to rotate the nut clockwise to secure the iron pipe.
Image: Instructions for mounting the rain collector.
Remote Thermo-hygrometer Sensor Placement:
Place the remote sensor in a shaded, well-ventilated area outdoors, protected from direct sunlight and rain, to ensure accurate temperature and humidity readings. Ensure it is within the transmission range of the display console (up to 328ft/100m in open areas, typically 100ft under most conditions).

Image: Illustration of wireless transmission range between units.
3. Initial Pairing
After installing batteries in all units, the display console should automatically search for and connect to the outdoor rain gauge and remote sensor. If pairing does not occur automatically, refer to the troubleshooting section or the full manual for manual pairing instructions.
Operating Instructions
Display Functions
The display console provides various data points:
- Time/Date/Week: Set using the SET button.
- Indoor/Outdoor Temperature & Humidity: Continuously updated.
- Rainfall: Press the SET button (not hold) to cycle through 1h, 24h, week, monthly, and total rainfall.
- History Graph: Press the HISTORY/- key to toggle between the rainfall graph, indoor temperature/humidity graph, and channel temperature/humidity graph.
- Min/Max Records: Press the MIN/MAX button to view minimum and maximum recorded values for temperature, humidity, and rainfall.

Image: Explanation of rainfall history graph and measurement periods.
Setting Alarms
The device supports customizable alerts for various parameters:
- Alarm Clock: Set hour and minute.
- Outdoor (Channel 1) Temperature: High and Low alarms.
- Outdoor (Channel 1) Humidity: High and Low alarms.
- Outdoor (Channel 1) Dew Point: High and Low alarms.
- Indoor Temperature: High and Low alarms.
- Indoor Humidity: High and Low alarms.
- Rainfall: 1h High Alarm, 24h High Alarm.
When an alarm condition is exceeded, the alarm icon will flash (visual) and a beeper will sound (audible). To silence the beeper, press any key. The sound of the alarm can be switched off if only visible alerts are desired.

Image: Overview of alarm functions and settings.
Backlight Operation
- Press the [SNOOZE/LIGHT] button once: The backlight will turn on for 5 seconds. If no operation is performed for three seconds, the backlight will turn off.
- When using the adapter: The backlight will turn on permanently.
- When using only batteries: The backlight will turn on for 30 minutes.

Image: Backlight behavior with battery and adapter power.
Maintenance
Cleaning the Rain Collector
Periodically check the rain collector for debris such as leaves, twigs, or insects. Clean the funnel and the tipping bucket mechanism to ensure accurate rainfall measurements. The detachable bird spikes can be removed for easier cleaning.
Battery Replacement
Replace batteries in all units when the low battery indicator appears on the display console. Use fresh batteries of the specified type to maintain optimal performance and wireless connectivity.
Troubleshooting
| Problem | Possible Cause | Solution |
|---|---|---|
| No outdoor data displayed. |
|
|
| Inaccurate rainfall readings. |
|
|
| Display console not turning on. |
|
|
Specifications
| Feature | Detail |
|---|---|
| Model Number | WS0206 |
| Product Dimensions | 3.4 x 0.97 x 6 inches (Display Console) |
| Item Weight | 1.38 pounds |
| Indoor Temperature Range | 32 to 140 °F (0 to 60 °C) |
| Outdoor Temperature Range | -40 to 140 °F (-40 to 60 °C) |
| Indoor/Outdoor Humidity Range | 10 to 99% |
| Rainfall Range | 0 to 393in (0 to 9999mm) |
| Wireless Transmission Range | Up to 328ft (100m) in open area, 100ft under most conditions |
| Power Supply (Display Console) | 4 x AAA batteries (not included) or USB cable (included) |
| Power Supply (Outdoor Units) | (Refer to unit markings for battery type/quantity) |
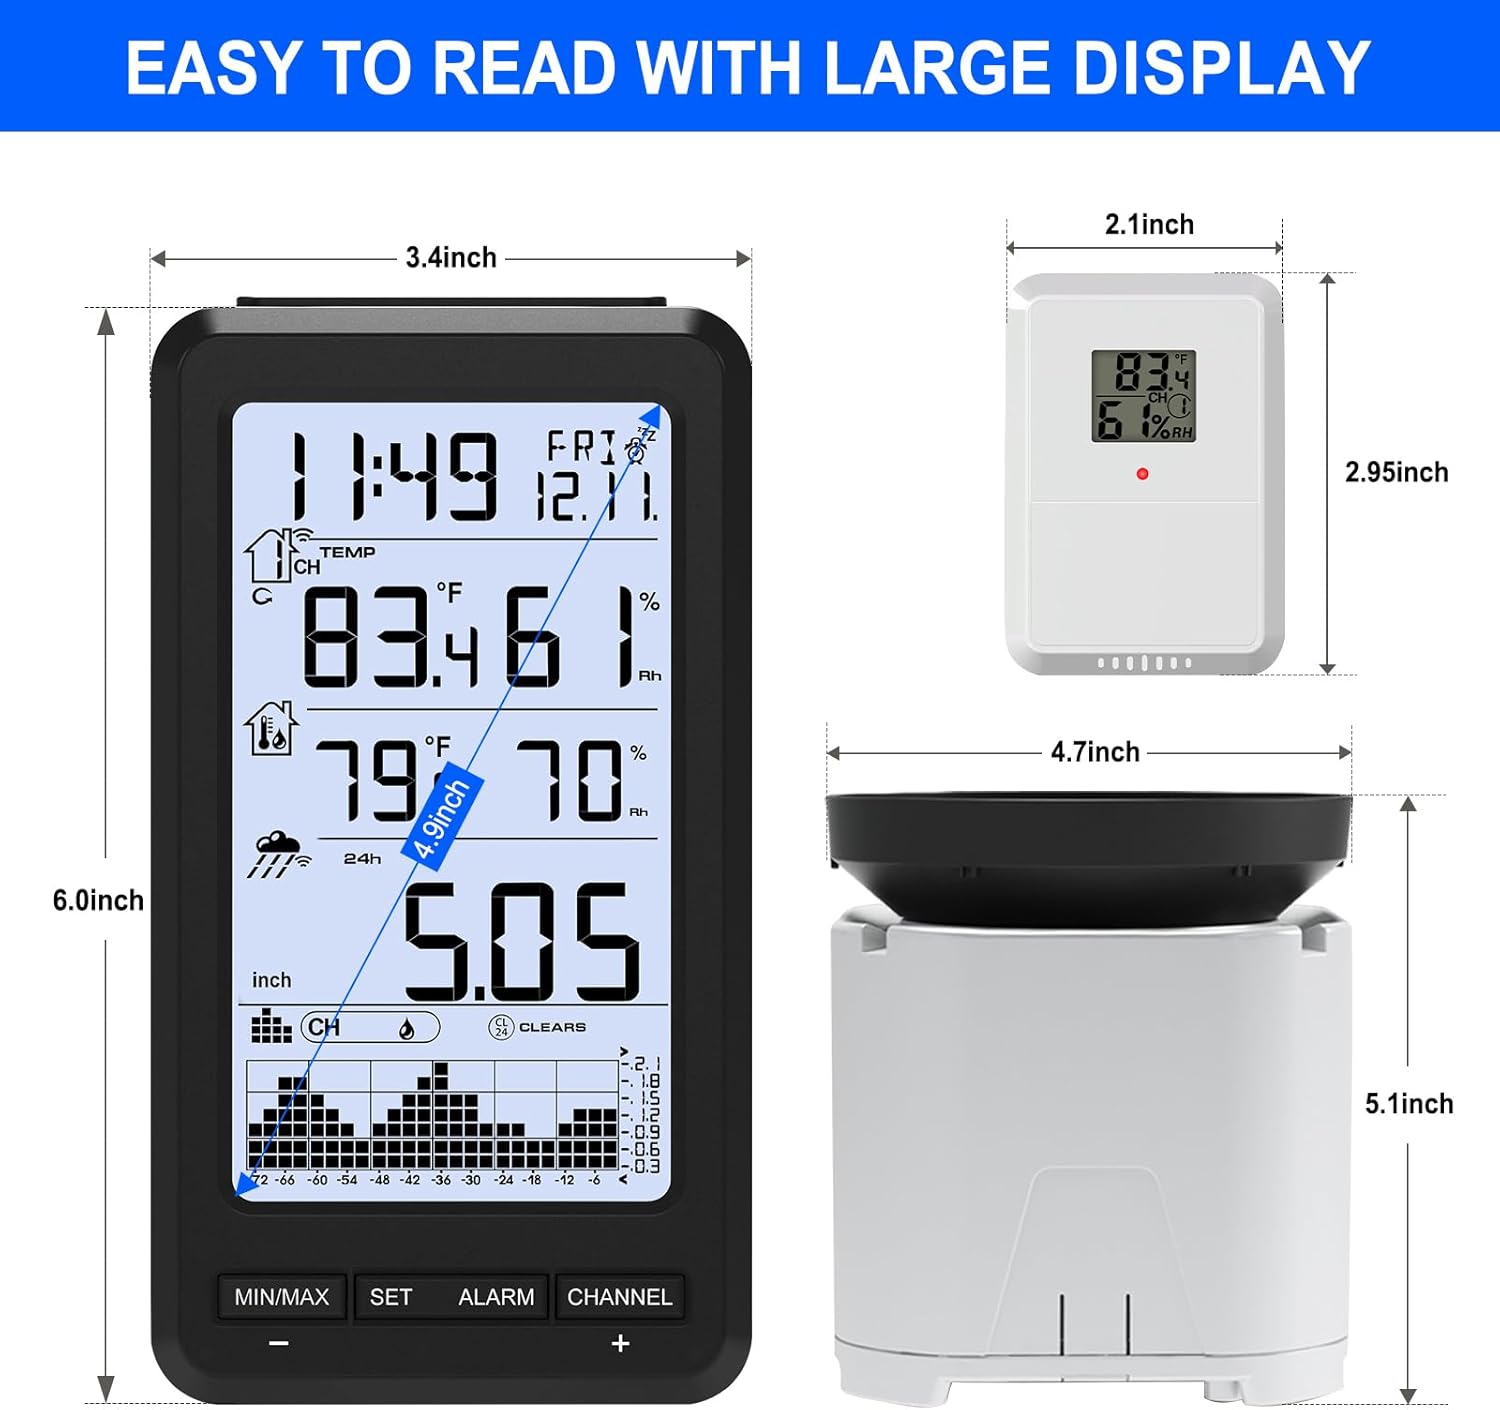
Image: Product dimensions for the main components.
Warranty and Support
For warranty information or technical support, please refer to the contact details provided with your purchase documentation or visit the official Urageuxy website. Keep your purchase receipt as proof of purchase.