1. Product Overview
The Chtoocy 18-Egg Automatic Incubator is designed for efficient and successful hatching of various poultry eggs, including chicken, quail, duck, goose, pigeon, and parrot eggs. It features precise temperature control, automatic egg turning, and an external water inlet for easy humidity management. The transparent 360° view window allows for continuous monitoring of the incubation process.
This incubator is equipped with a day display and controller for accurate temperature management, crucial for successful hatching. The external water inlet simplifies water replenishment without disturbing the internal environment, ensuring optimal conditions throughout incubation.
The automatic egg turner can be set for a countdown time of 60-180 minutes, ensuring even heat distribution and temperature stability, thereby increasing hatching success. A built-in egg candler allows for observing embryo development at any time.

Image 1: The Chtoocy 18-Egg Automatic Incubator, showcasing its transparent design and external water bottles.
2. Product Features
- Precise Hatching Day Tracking: Equipped with a day display and controller for accurate temperature management and tracking of incubation days.
- Automatic Egg Turner: Features an automatic egg turner with adjustable intervals (60-180 minutes) to ensure even heat distribution and temperature stability.
- Temperature Stability: Designed with an efficient fan-driven circulation system and a clear, large temperature display for easy monitoring and adjustment. Advanced predictive temperature control ensures consistent conditions.
- Egg Candler and Ventilation: Includes a built-in egg candler for monitoring embryo development. A vent allows for increased ventilation in later stages of incubation to manage carbon dioxide levels.
- User-Friendly Design: Simple operation suitable for beginners, with intelligent features to streamline the hatching process.
- Humidity Management: External water inlet facilitates easy water replenishment without disturbing the incubator's internal environment.

Image 2: Close-up of the incubator's smart control panel displaying temperature, humidity, and incubation day.
Video 1: An overview of the Chtoocy 18-egg incubator's features, including automatic turning, humidity control, and 360-degree view.
3. Setup Instructions
- Unpack Components: Carefully remove all components from the packaging. Verify that you have the base, grid, egg tray(s), top cover with control panel, water bottles, power adapter, and instruction manual.
- Assemble Base and Grid: Place the base grid onto the incubator base.
- Install Egg Tray: Place the appropriate egg tray (for small or large eggs) onto the grid.
- Install Small Gear: For first-time use, ensure the small gear is correctly installed on the motor shaft located on the underside of the top cover.
- Close Top Cover: Carefully place the top cover onto the base, ensuring it is securely closed. Align the small gear with the egg turning mechanism and screw the cover clockwise to lock it.
- Connect Power: Plug the power adapter into the incubator and then into a suitable power outlet. The incubator will turn on automatically.
- Fill Water Bottles: Fill the provided water bottles with clean water. Insert one bottle upside down into hole A on the side of the incubator. This will automatically release water into the base to maintain humidity.

Image 3: Contents of the incubator package, showing the main unit, egg trays, water bottles, and manual.
Video 2: Step-by-step guide on how to easily assemble the Chtoocy egg incubator.
4. Operating Instructions
4.1 Initial Settings
- Temperature Setting: Press the 'F/C' button once to set the desired temperature. Use the '+' and '-' buttons to adjust.
- Hatch Days Setting: Press the 'gear' button once, then use '+' and '-' to set the total number of hatch days for your specific egg type.
- Egg Turning Interval Setting: Press the 'gear' button a second time, then use '+' and '-' to set the automatic egg turning interval (e.g., 120 minutes).
- Temperature Unit Switch: Press the 'F/C' button once to switch between Fahrenheit and Celsius.
- Egg Turning Test Run: Press the '+' button once to initiate a test run of the egg turning mechanism.
4.2 Placing Eggs and Monitoring
- Pre-warm Incubator: Allow the incubator to reach stable temperature and humidity settings before placing eggs.
- Place Eggs: Once stable, carefully place your fertilized eggs into the egg tray.
- Egg Candling: Use the built-in egg candler (press the 'Press Once' button) to monitor embryo development. Recommended checks are on day 7 (remove unfertilized eggs), day 11, and days 18-19.
- Humidity Adjustment: If the humidity is not suitable, adjust it using the ventilation switch or by adding a second water bottle to hole B.
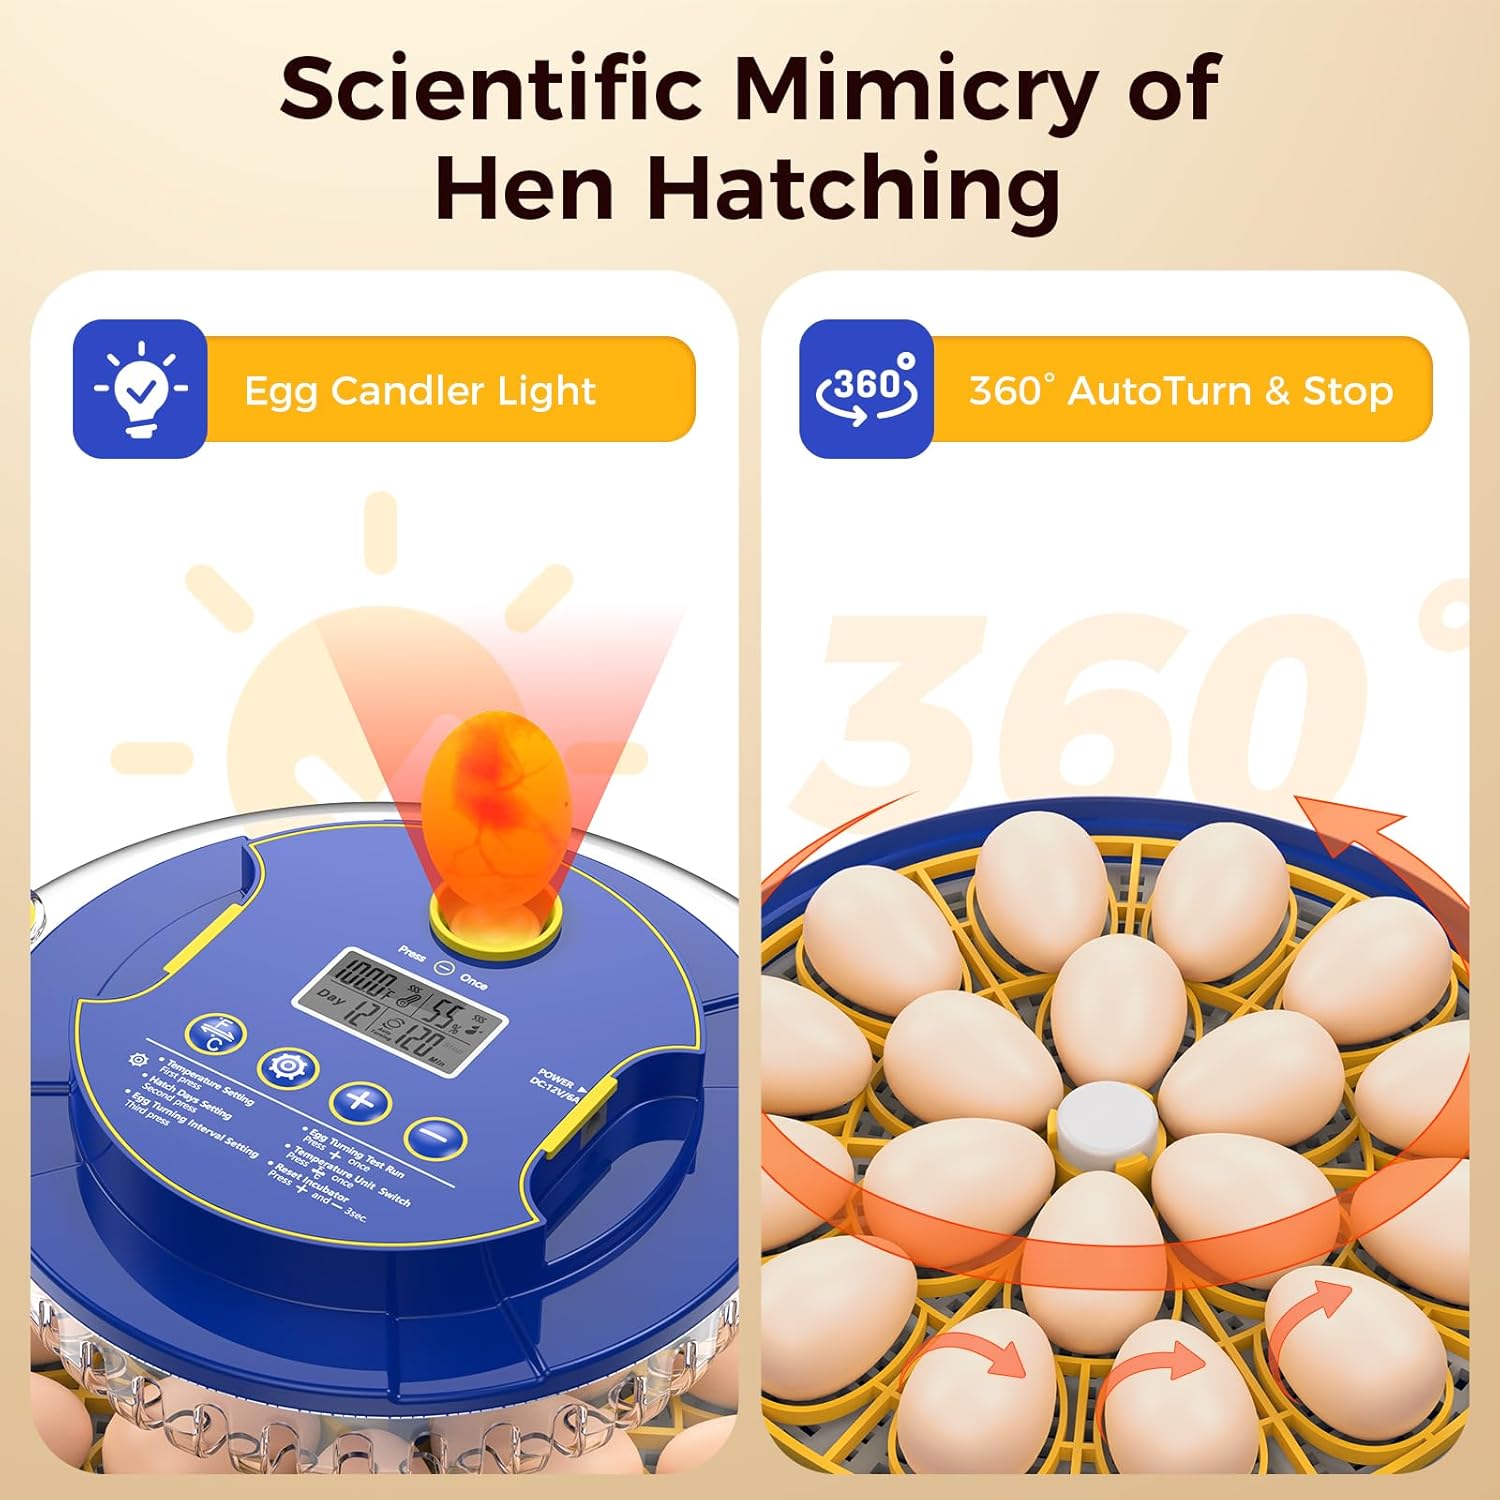
Image 4: The incubator's egg candler light in action and a visual representation of the 360° automatic egg turning.
Video 3: Instructions on how to start hatching eggs with the incubator, including setting parameters and adding water.
5. Hatching Period (Last 3 Days)
For the last 3 days of the incubation period (typically days 18-21 for chickens), specific adjustments are required to prepare for hatching:
- Stop Auto-Turner: The automatic egg turner will stop before 3 days finished hatching.
- Remove Egg Tray: Remove the egg tray and the blue rotating buckle to provide more space for chicks to move after hatching.
- Increase Humidity: Place the extra water bottle into hole B to increase humidity, which is crucial for the hatching process.
- Increase Ventilation: On the 17th day, open the incubator's vent to increase ventilation. This is vital for maintaining fresh air as carbon dioxide levels rise in the later stages of incubation.
Video 4: Important tips for the hatching period, including stopping the auto-turner and adjusting humidity.
6. Maintenance
- Cleaning: The incubator is designed for easy cleaning. The base can be rinsed with water, and the top fan is detachable for thorough cleaning. Use the provided cleaning brush for hard-to-reach areas.
- Reset Incubator: After each incubation cycle, remember to reset the incubator by pressing the '+' and '-' buttons simultaneously for 3 seconds.
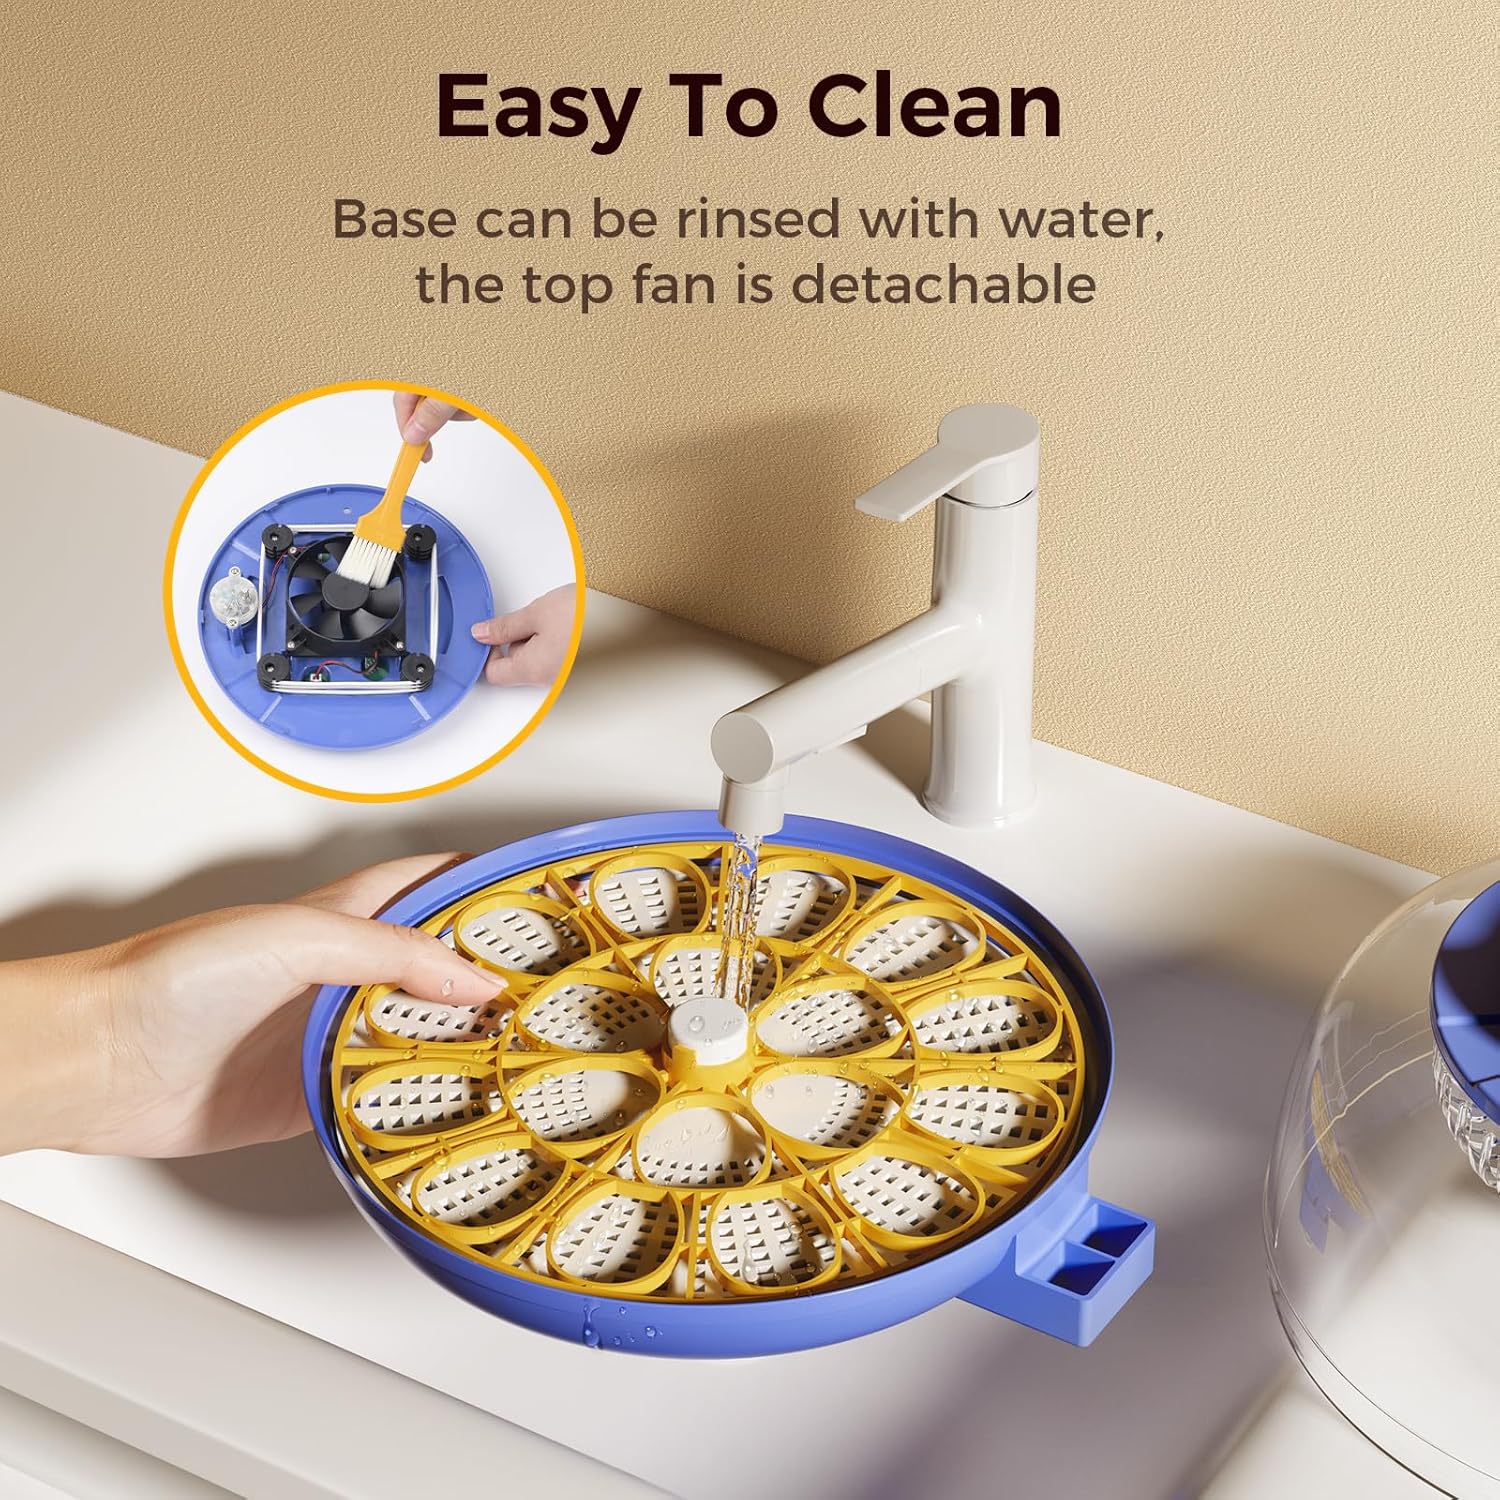
Image 5: The incubator's base being rinsed with water, highlighting its easy-to-clean design with a detachable fan.
7. Troubleshooting
- Alarm Beeping: If the machine beeps, it may indicate a lack of water or that the top cover is not closed properly. Address these issues and press any key to cancel the alarm.
- Temperature Inaccuracy: If you suspect temperature inaccuracies, use an external thermometer to verify. Adjust the incubator's temperature settings as needed.
- Low Hatch Rate: Ensure proper egg selection, consistent temperature and humidity, and correct egg turning. Refer to the provided Beginner's Guide for detailed tips.
8. Specifications
- Brand: Chtoocy
- Model Number: 18H
- Capacity: 18 Eggs (chicken eggs, adjustable for various sizes)
- Color: Blue
- Material: ABS + PET
- Product Dimensions: 12"L x 12"W x 6.5"H
- Item Weight: 5.68 pounds
- UPC: 786411740338
9. Warranty and Support
For any questions, troubleshooting assistance, or warranty inquiries, please contact Chtoocy customer support. Refer to the contact information provided in your product packaging or visit the official Chtoocy website.
Always ensure to follow the instructions in this manual for optimal performance and longevity of your incubator.