
1. Introduction
The Jieotwice DTL-150 is a versatile 150W 20A adjustable constant current electronic load designed for testing power supplies, batteries, and other electronic components. It features a 2.4-inch TFT color display and supports four working modes: constant current (CC), constant voltage (CV), constant power (CP), and constant resistance (CR). This manual provides detailed instructions for the safe and effective use of your DTL-150 electronic load.
2. Safety Information
Please read and understand all safety instructions before operating the device. Failure to follow these instructions may result in electric shock, fire, or damage to the product.
- Ensure the working voltage is within the specified range (12VDC for the device itself, 0-150VDC for the load).
- Do not exceed the maximum load current of 20A or maximum load power of 150W. Note that power is limited to 60W above 120V.
- Connect the load correctly using the A+ V+ V- A- four-wire system, or a compatible two-wire system.
- Avoid short circuits. Pay attention to the insulation of the circuit board.
- Operate in a well-ventilated area to prevent overheating. The device includes a cooling fan.
- Keep the device away from moisture and extreme temperatures.
- Do not attempt to disassemble or modify the device. Refer servicing to qualified personnel.
3. Package Contents
Verify that all items are present in your package:
- 1 x Electronic Load (DTL-150)
- 1 x 12V, 1A Power Adapter
- 1 x NTC Sensor
4. Product Overview
The DTL-150 electronic load features a compact design with a 2.4-inch TFT color display for clear data visualization and intuitive operation. Key components include the load terminals, control buttons, and a cooling fan for thermal management.

Figure 4.1: Top-down view of the DTL-150 Electronic Load, showing the cooling fan, display, and terminal blocks.

Figure 4.2: Angled view of the DTL-150 Electronic Load, highlighting the heatsink and fan assembly.

Figure 4.3: View of the DTL-150 Electronic Load with the NTC temperature sensor connected to its dedicated port.

Figure 4.4: Bottom view of the DTL-150 Electronic Load, showing the circuit board and mounting points.
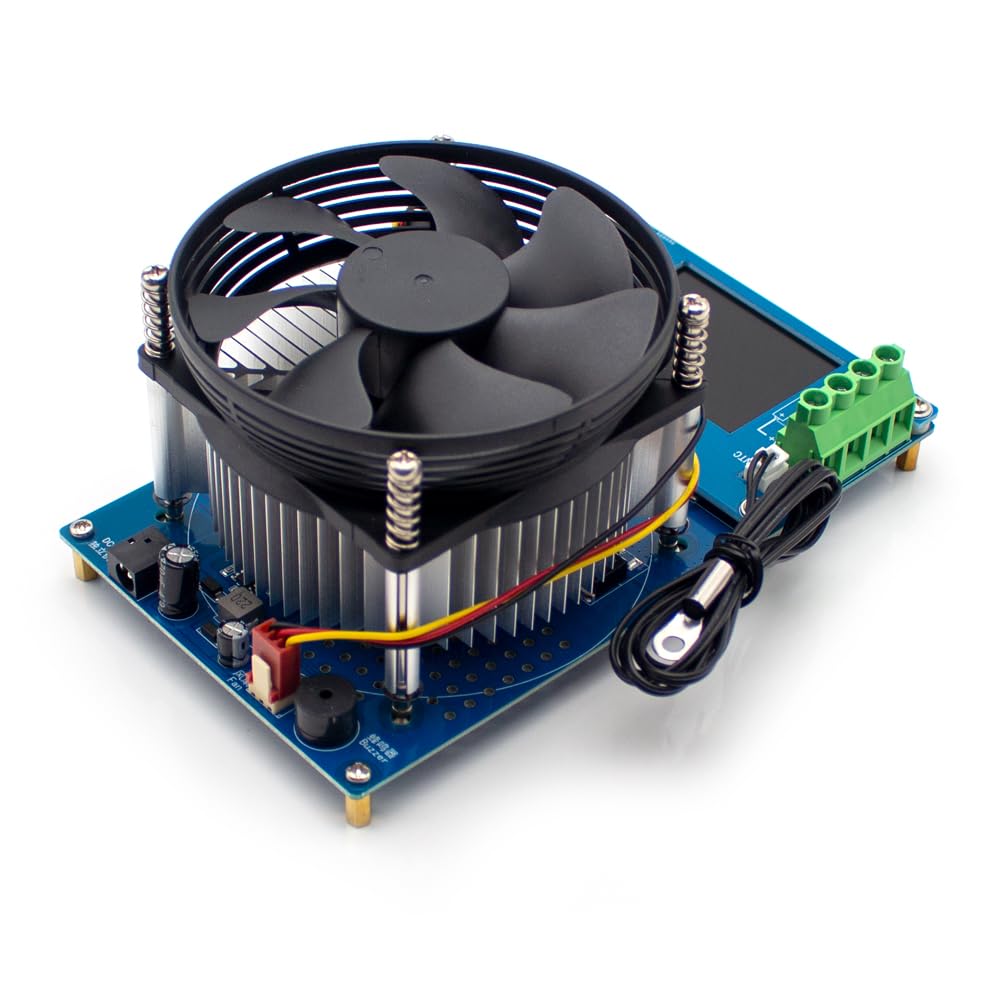
Figure 4.5: Side view of the DTL-150 Electronic Load, illustrating the fan and heatsink assembly from another angle.
5. Setup
5.1 Power Connection
- Connect the provided 12V, 1A power adapter to the DC input jack on the DTL-150 electronic load.
- Plug the power adapter into a suitable power outlet. The device display should illuminate.
5.2 Load Connection
The DTL-150 supports both four-wire and two-wire connection methods. The four-wire system (A+ V+ V- A-) is recommended for higher accuracy, especially for voltage measurement, as it separates the current path from the voltage sensing path.
- Four-wire system: Connect the load's positive terminal to A+ and V+. Connect the load's negative terminal to A- and V-.
- Two-wire system: Connect the load's positive terminal to A+ (and V+ if available on your load). Connect the load's negative terminal to A- (and V- if available on your load).
Caution: Ensure correct polarity when connecting the load to prevent damage to the device or the load source.
5.3 NTC Sensor Connection
Connect the NTC temperature sensor to its designated port on the electronic load if temperature monitoring is required.
6. Operating Instructions
6.1 Interface Navigation
The 2.4-inch TFT color display provides real-time data and menu options. Use the control buttons (usually labeled UP, DOWN, SET, OK/RUN) to navigate menus and adjust parameters.
6.2 Working Modes
The DTL-150 supports four primary working modes:
- Constant Current (CC) Mode: The electronic load draws a constant current regardless of the input voltage. Set the desired current value.
- Constant Voltage (CV) Mode: The electronic load maintains a constant voltage across its terminals by adjusting the current draw. Set the desired voltage value.
- Constant Power (CP) Mode: The electronic load draws a constant power from the source. Set the desired power value.
- Constant Resistance (CR) Mode: The electronic load simulates a constant resistance. Set the desired resistance value.
Select the desired mode from the main menu and then set the corresponding parameters using the navigation buttons.
6.3 Protection Settings
The device includes configurable protection features to safeguard the load and the device itself:
- Voltage Overrun Protection: Set a maximum voltage limit. If the input voltage exceeds this limit, the load will stop.
- Current Overrun Protection: Set a maximum current limit. If the current draw exceeds this limit, the load will stop.
- Power Overrun Protection: Set a maximum power limit. If the power draw exceeds this limit, the load will stop.
- Stop Discharge Voltage: For battery testing, set a minimum voltage. The load will stop discharging when the battery voltage drops to this level.
- Discharge Time Setting: Set a maximum discharge duration. The load will stop after this time expires.
6.4 System Settings and Calibration
Access the system menu to configure various device settings:
- Language Switching: Toggle between Chinese and English interface languages.
- Zeroing Accumulated Data: Reset cumulative measurements (Wh, Ah).
- Voltage and Current No-Load Nulling: Calibrate zero readings for voltage and current when no load is connected.
- Voltage Open Calibration: Perform voltage calibration.
- Current Open Calibration: Perform current calibration.
- Screen Brightness Adjustment: Adjust the display backlight intensity.
- Screen Hibernation Standby Setting: Configure the display's sleep mode.
- Restore Factory Settings: Reset all device settings to their default values.
7. Maintenance
- Cleaning: Use a soft, dry cloth to clean the device. Do not use abrasive cleaners or solvents.
- Storage: Store the device in a cool, dry place away from direct sunlight and extreme temperatures.
- Ventilation: Ensure the cooling fan and vents are free from dust and obstructions to maintain proper airflow.
8. Troubleshooting
8.1 Device Not Powering On
- Check if the 12V power adapter is correctly connected and plugged into a live outlet.
- Verify the power adapter is functioning correctly.
8.2 Incorrect Readings
- Ensure the load is connected correctly, especially if using a two-wire system where voltage drop across wires can affect readings.
- Perform voltage and current calibration from the system settings menu.
- Check for proper no-load nulling.
8.3 Load Stops Unexpectedly
- Check if any protection settings (voltage, current, power overrun, stop discharge voltage, discharge time) have been triggered. Adjust limits if necessary.
- Ensure the load power does not exceed 150W (or 60W above 120V).
- Verify adequate ventilation to prevent overheating.
9. Specifications
| Parameter | Value |
|---|---|
| Model | DTL-150 |
| Working Voltage | 12VDC (with 12V, 1A power adapter) |
| Load Voltage Range | 0-150VDC |
| Load Current Range | 0-20A |
| Load Power Range | 0-150W (max. 60W above 120V) |
| Wiring Method | A+ V+ V- A- four-wire system, downward compatible with two-wire system |
| Maximum Power Measurement | 999.999Wh |
| Maximum Capacity Measurement | 999.999Ah |
| Cumulative Timing Range | ddd:hh:mm:ss (days:hours:minutes:seconds) |
| Display | 2.4-inch TFT Color Screen |
| Working Modes | Constant Current (CC), Constant Voltage (CV), Constant Power (CP), Constant Resistance (CR) |
| Interface Language | Chinese and English switching supported |
| PC Software Online | Not supported |
| Item Size | 165 * 95 * 80mm / 6.50 * 3.74 * 3.15in |
| Item Weight | 400g / 0.88lb |
10. Warranty Information
Jieotwice products are typically covered by a manufacturer's warranty. For specific warranty terms and conditions, including duration and coverage details, please refer to the warranty card included with your product or visit the official Jieotwice website. Keep your purchase receipt as proof of purchase for warranty claims.
11. Customer Support
If you encounter any issues or have questions regarding your Jieotwice DTL-150 Electronic Load, please contact Jieotwice customer support. Contact information can usually be found on the product packaging, the official website, or through your retailer.
For online resources, you may visit the Jieotwice brand page on Amazon.