
Introduction
This manual provides detailed instructions for the safe and effective use of your WEP 928D-IV Soldering Iron Kit. Please read this manual thoroughly before operating the device and retain it for future reference. The WEP 928D-IV is a compact, fast-heating USB soldering iron designed for electronics assembly and circuit board repair, featuring a dynamic screen, multi-functional cap, and versatile powering options.

Image: The WEP 928D-IV Soldering Iron Kit, showcasing the soldering iron, various tips, power adapter, USB-C cable, soldering iron stand, and lead-free solder wire.
Safety Information
WARNING: Improper use can lead to electric shock, burns, or fire. Always follow these safety guidelines.
- Always wear appropriate personal protective equipment, including safety glasses, when soldering.
- Ensure adequate ventilation in your workspace to avoid inhaling solder fumes.
- Do not touch the soldering iron tip or heating element when hot. Temperatures can reach up to 842°F (450°C).
- Place the soldering iron in its stand when not in use to prevent accidental burns or damage.
- Disconnect the power supply when changing tips or when the iron is not in use.
- Keep the soldering iron and all accessories out of reach of children.
- This product is rated for 110-127V USA specifications. Do not connect this iron to a 220V power socket.
- Do not use the soldering iron near flammable materials or liquids.
- Ensure the power supply used meets the recommended specifications (20V 60W for optimal performance).
Package Contents
Verify that all items listed below are present in your WEP 928D-IV Soldering Iron Kit:
- USB Soldering Iron (WEP 928D-IV)
- Compact Tool Bag
- 5 Fast-Heating Cartridge Tips:
- C235-3C
- C235-SI
- C235-I (x2)
- C235-3.2D
- Type-C Cord
- Charging Adapter
- Soldering Iron Stand
- Lead-Free Solder Wire (10g, 0.8mm)

Image: The compact tool bag, designed to store the soldering iron and its accessories for portability.
Setup
1. Installing the Soldering Tip
- Ensure the soldering iron is cool and disconnected from power.
- Select the desired C235 cartridge tip.
- Insert the tip fully into the heating element receptacle of the soldering iron. Ensure the marking line on the heating element reaches the rim of the handpiece's receptacle for proper connection.
- Twist gently to secure if necessary, but avoid excessive force.
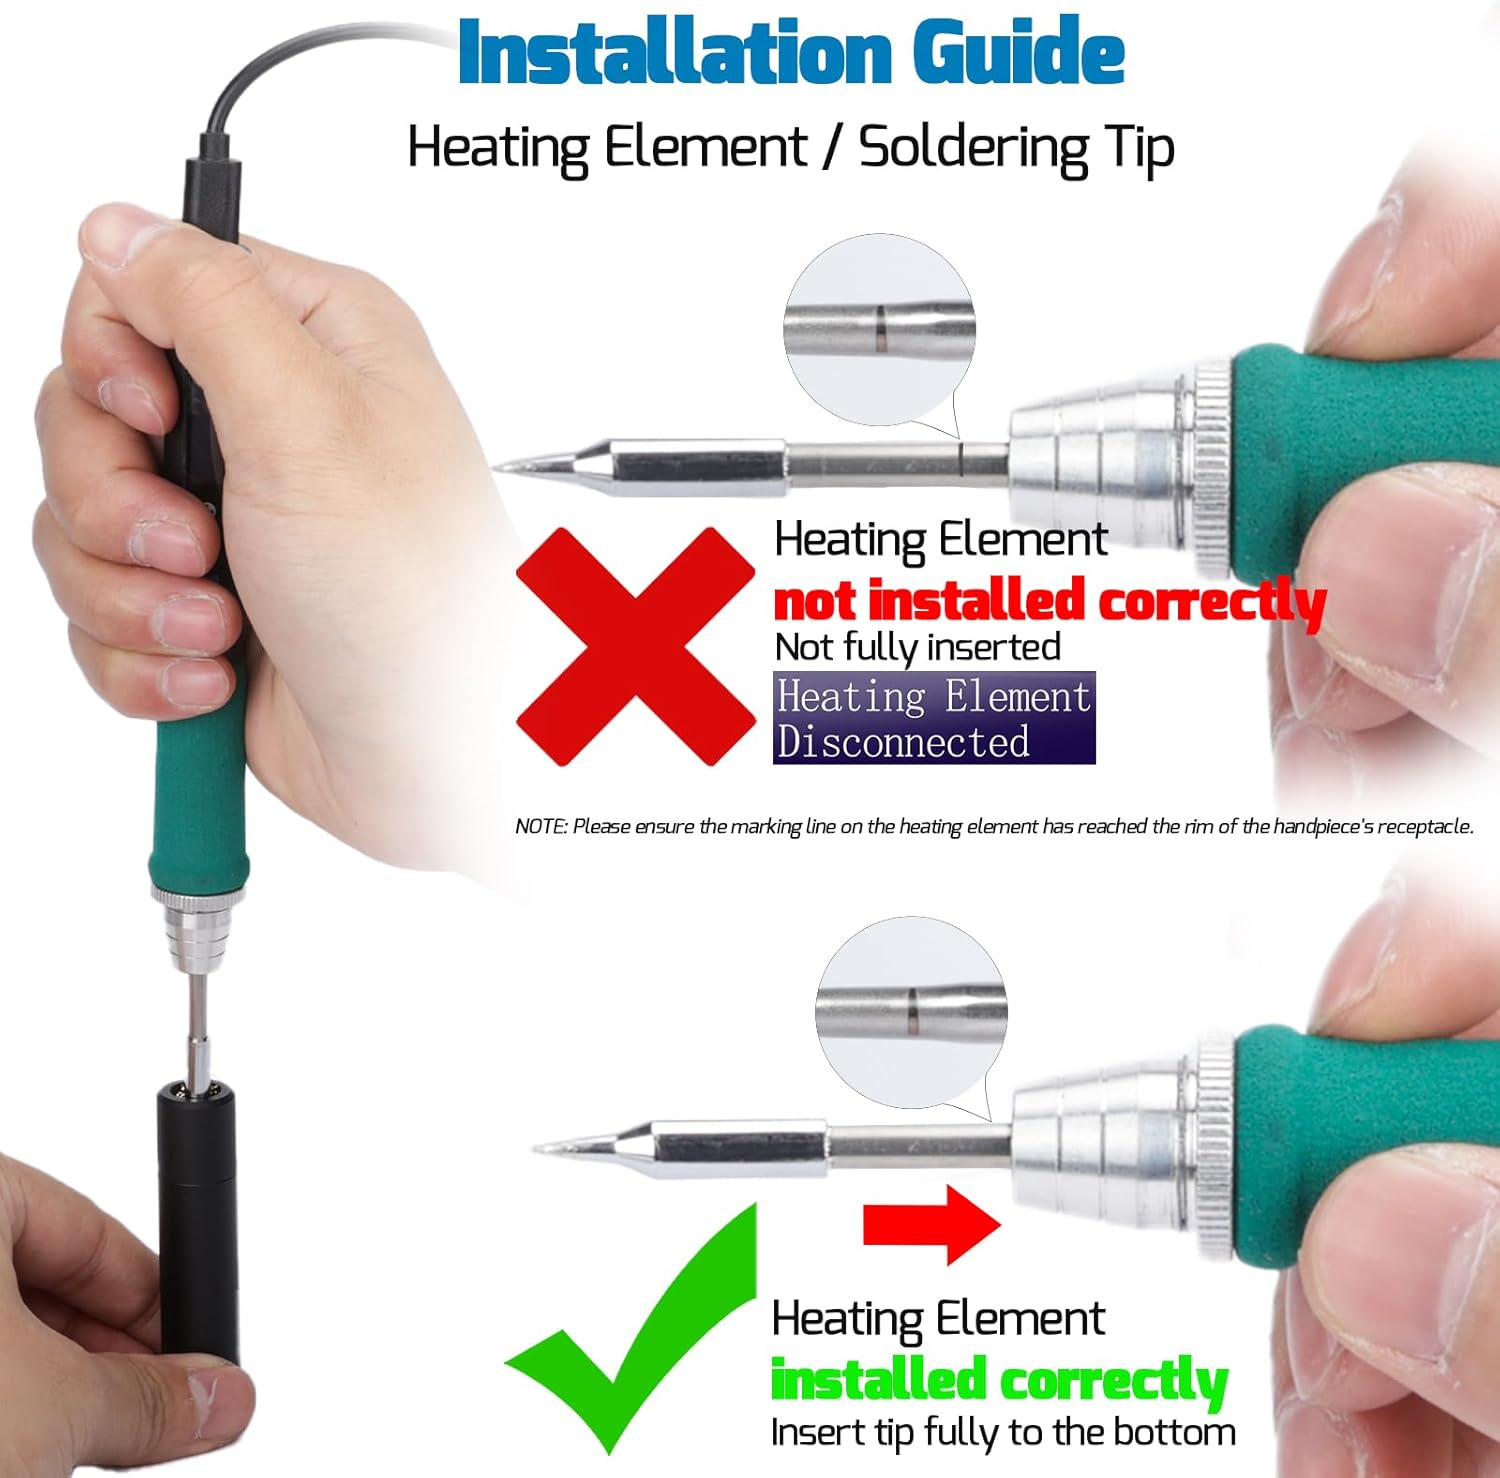
Image: Visual guide for correctly installing the heating element/soldering tip, emphasizing full insertion.
2. Connecting Power
The WEP 928D-IV supports PD (Power Delivery) and QC (Quick Charge) protocols via its Type-C port. For optimal performance and faster heat-up times, a 20V 60W power supply, adapter, or power bank is recommended.
- Connect the Type-C cord to the soldering iron's Type-C port.
- Connect the other end of the Type-C cord to a compatible power source (e.g., the included charging adapter or a power bank).
- The soldering iron will power on and display the current temperature and settings.
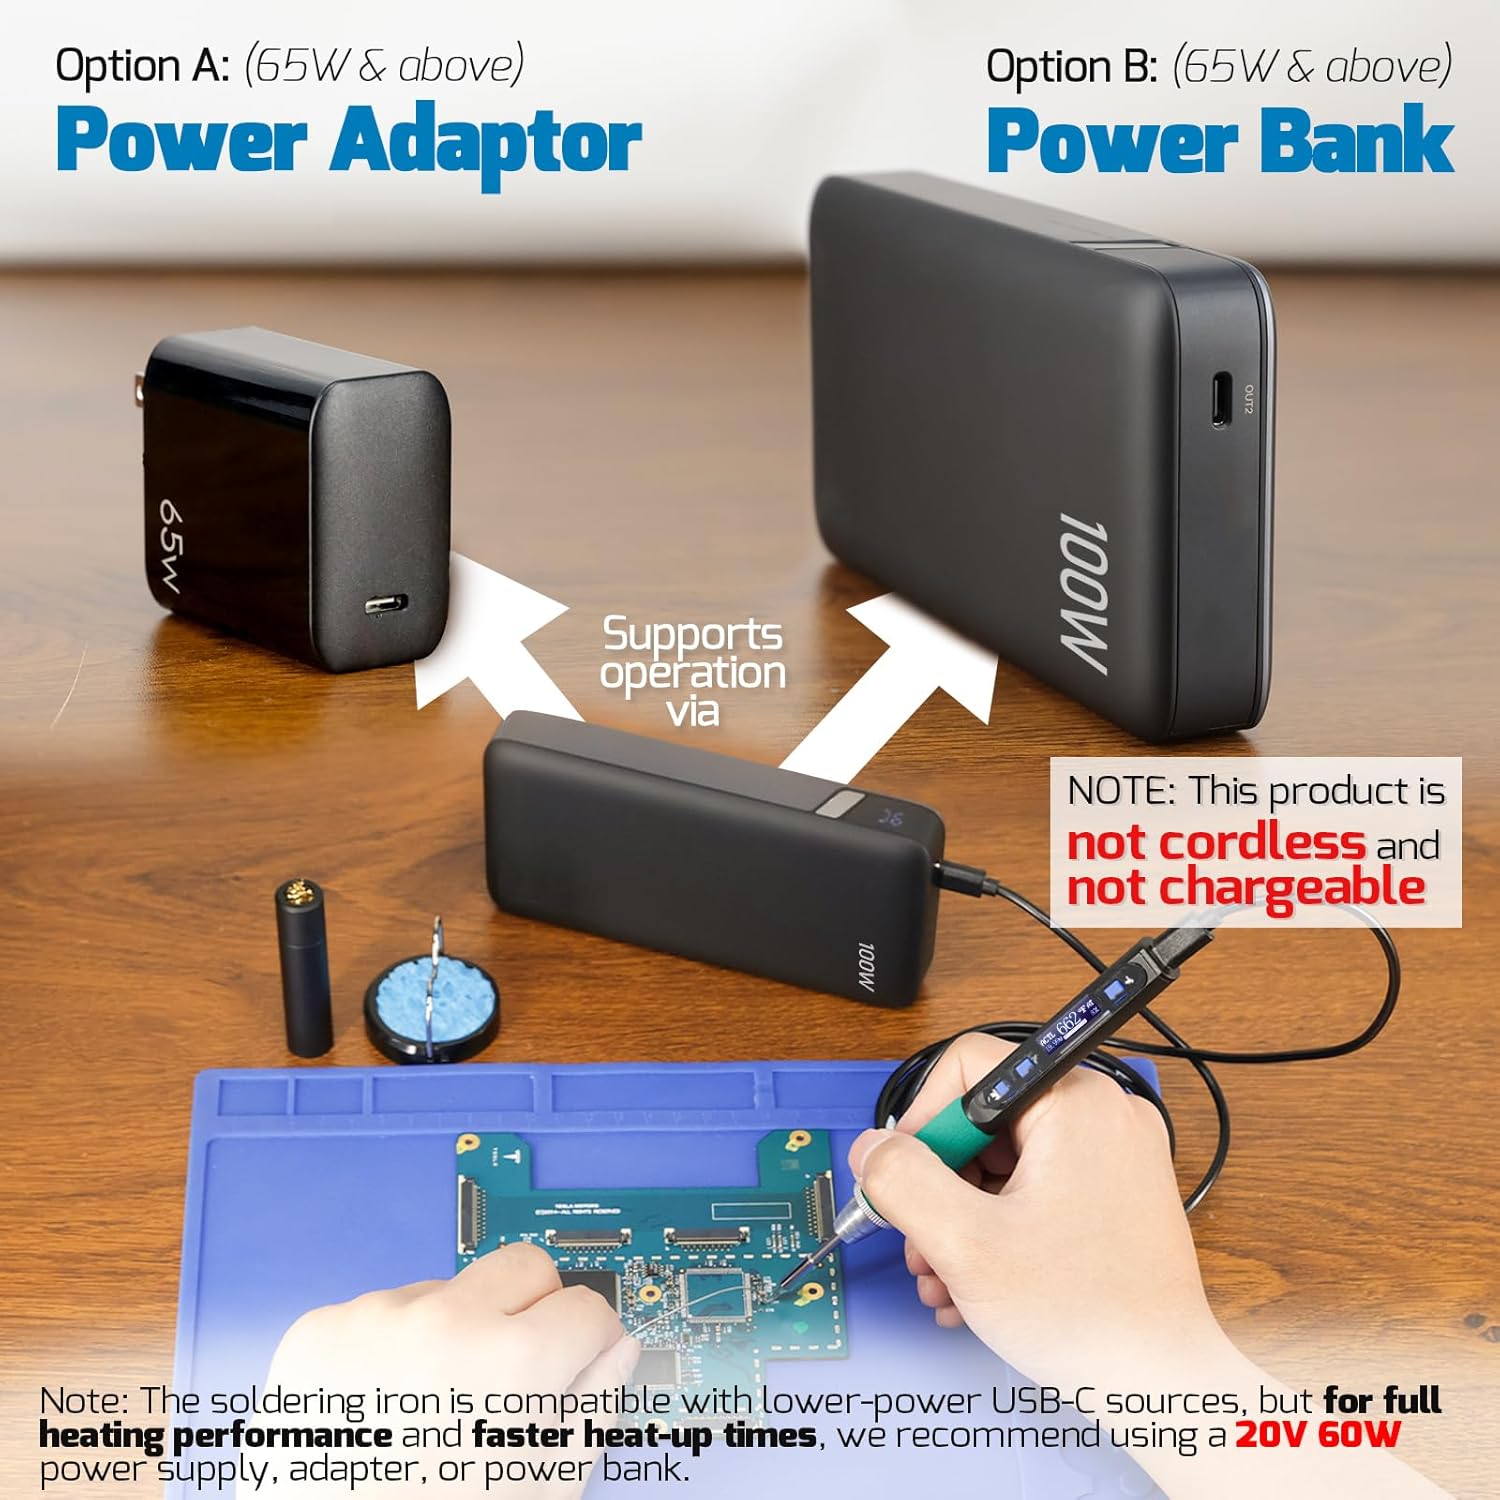
Image: Illustrates connecting the soldering iron to either a power adapter or a power bank for operation.
Note: This product is not cordless and not chargeable. It requires continuous power from a Type-C source during operation.
Operation
1. Fast Heating and Temperature Adjustment
The C235 cartridge tip heats up rapidly, typically within seconds, when powered by a 60W adapter or power bank. The adjustable temperature range is from 194°F to 842°F (90°C to 450°C).
- Use the + and - buttons on the soldering iron to adjust the target temperature.
- The dynamic screen will display the set temperature and the current tip temperature.

Image: The soldering iron's display indicating PID temperature control and its capability for 5-second quick heating.
2. Adaptive Screen and Menu Navigation
The display automatically rotates based on the orientation of the soldering iron, similar to a smartphone. This feature can be locked if preferred.
- To access the menu, press and hold the designated menu button (often marked with an asterisk or similar symbol).
- Navigate through menu options using the + and - buttons.
- Press the menu button again to select an option or confirm a setting.

Image: The soldering iron's adaptive screen feature, showing how the display automatically rotates for left or right-handed use.
3. Customizable Menu Settings
The menu allows for various customizations to enhance your soldering experience:
- Temperature Units: Switch between Celsius (°C) and Fahrenheit (°F).
- Sleep Mode Timer: Configure the sleep mode activation time from 5 to 30 minutes.
- Sleep Temperature: Adjust the temperature the iron maintains during sleep mode (194-842°F / 90-450°C).
- Auto-Shutdown Timer: Set the auto-shutdown time from 1 to 10 minutes.
- Power Protocol Selection: Manually select PD, QC, or Auto-selection for power input.
- Display Direction: Lock or unlock the automatic display rotation.
4. Multi-Functional Cap Usage
The threaded protective cap serves multiple purposes:
- Protection: Provides a secure fit for the tip when not in use, offering heat insulation.
- Tip Cleaner: Features an integrated brass wool tip cleaner for maintaining tip cleanliness.
- Tip Installation Aid: Can assist in safely handling and installing tips.
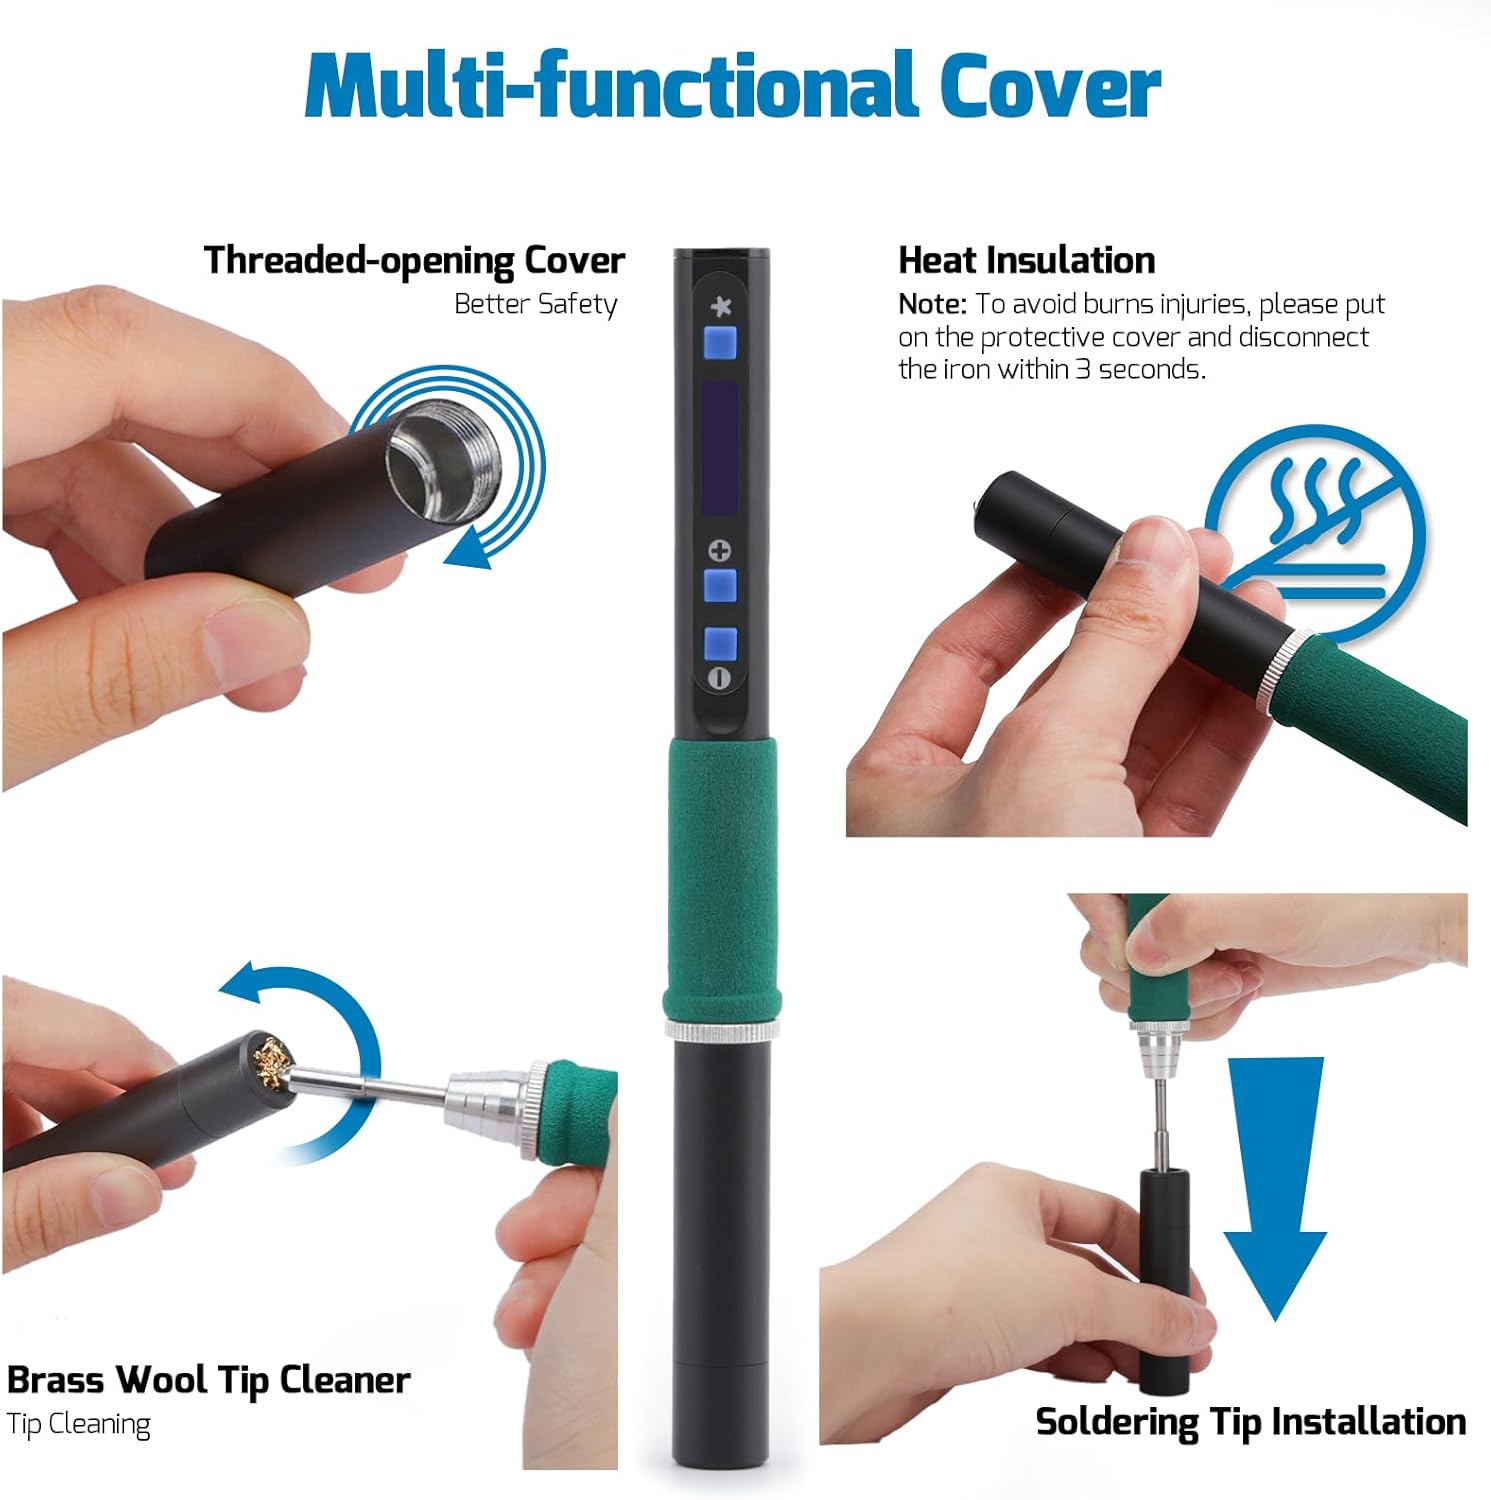
Image: Detailed view of the multi-functional cap, illustrating its use for protection, heat insulation, and tip cleaning with integrated brass wool.
Maintenance
1. Tip Cleaning
Regular cleaning of the soldering tip is crucial for optimal performance and longevity.
- Use the brass wool tip cleaner integrated into the multi-functional cap or a separate brass wool cleaner to remove excess solder and oxidation from the tip.
- Avoid using abrasive materials or harsh chemicals, as these can damage the tip plating.
- After cleaning, re-tin the tip with a small amount of fresh solder to prevent oxidation.

Image: A soldering iron tip being cleaned using brass wool, demonstrating proper maintenance technique.
2. General Care and Storage
- Always disconnect the power and allow the iron to cool completely before storing.
- Store the soldering iron and accessories in the provided compact tool bag to protect them from dust and damage.
- Inspect the Type-C cord for any signs of damage before each use. Replace if damaged.
Troubleshooting
| Problem | Possible Cause | Solution |
|---|---|---|
| Soldering iron does not heat up. |
|
|
| Temperature does not reach set value or heats slowly. |
|
|
| Display does not rotate automatically. | Display rotation feature is locked. | Access the menu settings and unlock the display direction feature. |
| Soldering iron enters sleep mode or shuts down unexpectedly. | Sleep mode or auto-shutdown timers are active. | Adjust the sleep mode timer and auto-shutdown timer settings in the menu to your preference. |
Specifications
| Feature | Detail |
|---|---|
| Model | WEP 928D-IV |
| Brand | WEP |
| Power Source | AC (via Type-C adapter/power bank) |
| Wattage | 60 watts (recommended for optimal performance) |
| Voltage | 110-127V (USA specifications) |
| Special Feature | USB-C, PD/QC Protocols, Dynamic Screen, Sleep Mode |
| Temperature Range | 194°F - 842°F (90°C - 450°C) |
| Heating Element Type | C235 Cartridge Tip |
| Item Length | 7.75 Inches (19.7 cm) |
| Item Weight | 0.12 Pounds (55 g) |
| Specific Uses | Electronics Assembly, Circuit Board Repair |

Image: Dimensions of the WEP 928D-IV Soldering Iron and its accompanying portable case.
Warranty and Support
The WEP 928D-IV Soldering Iron Kit is covered by a 1-year USA technical support warranty. For any technical assistance or inquiries, please contact our dedicated support team. WEP also offers an affordable range of compatible replacement parts and accessories.
Contact information for support is typically found on the product packaging or the manufacturer's official website.


