
1. Introduction
This manual provides comprehensive instructions for the installation, operation, and maintenance of the OceanicEcho Handicap Drivers Fixed Hand Controls Permanent Device, Model OE-GDS-X. This device is designed to enable individuals who cannot operate vehicle pedals with their feet to control acceleration and braking using their hands. Please read this manual thoroughly before installation and use to ensure safe and proper operation.
2. Safety Information
WARNING: Improper installation or use of this device can lead to serious injury or death. Always prioritize safety.
- It is highly recommended that installation be performed by a qualified professional mechanic or an individual experienced in vehicle modifications.
- Before driving, ensure all components are securely fastened and functioning correctly.
- Familiarize yourself with the operation of the hand controls in a safe, controlled environment before driving on public roads.
- If you experience any discomfort, unusual operation, or feel unsafe while using the device, discontinue use immediately and have the system inspected.
- Regularly inspect the device for wear, damage, or loose connections.
- This device is designed for vehicles with left-hand steering. It may not be suitable for vehicles with right-hand steering (Left Hand Traffic countries).
3. Package Contents
Verify that all components listed below are present and undamaged before beginning installation.
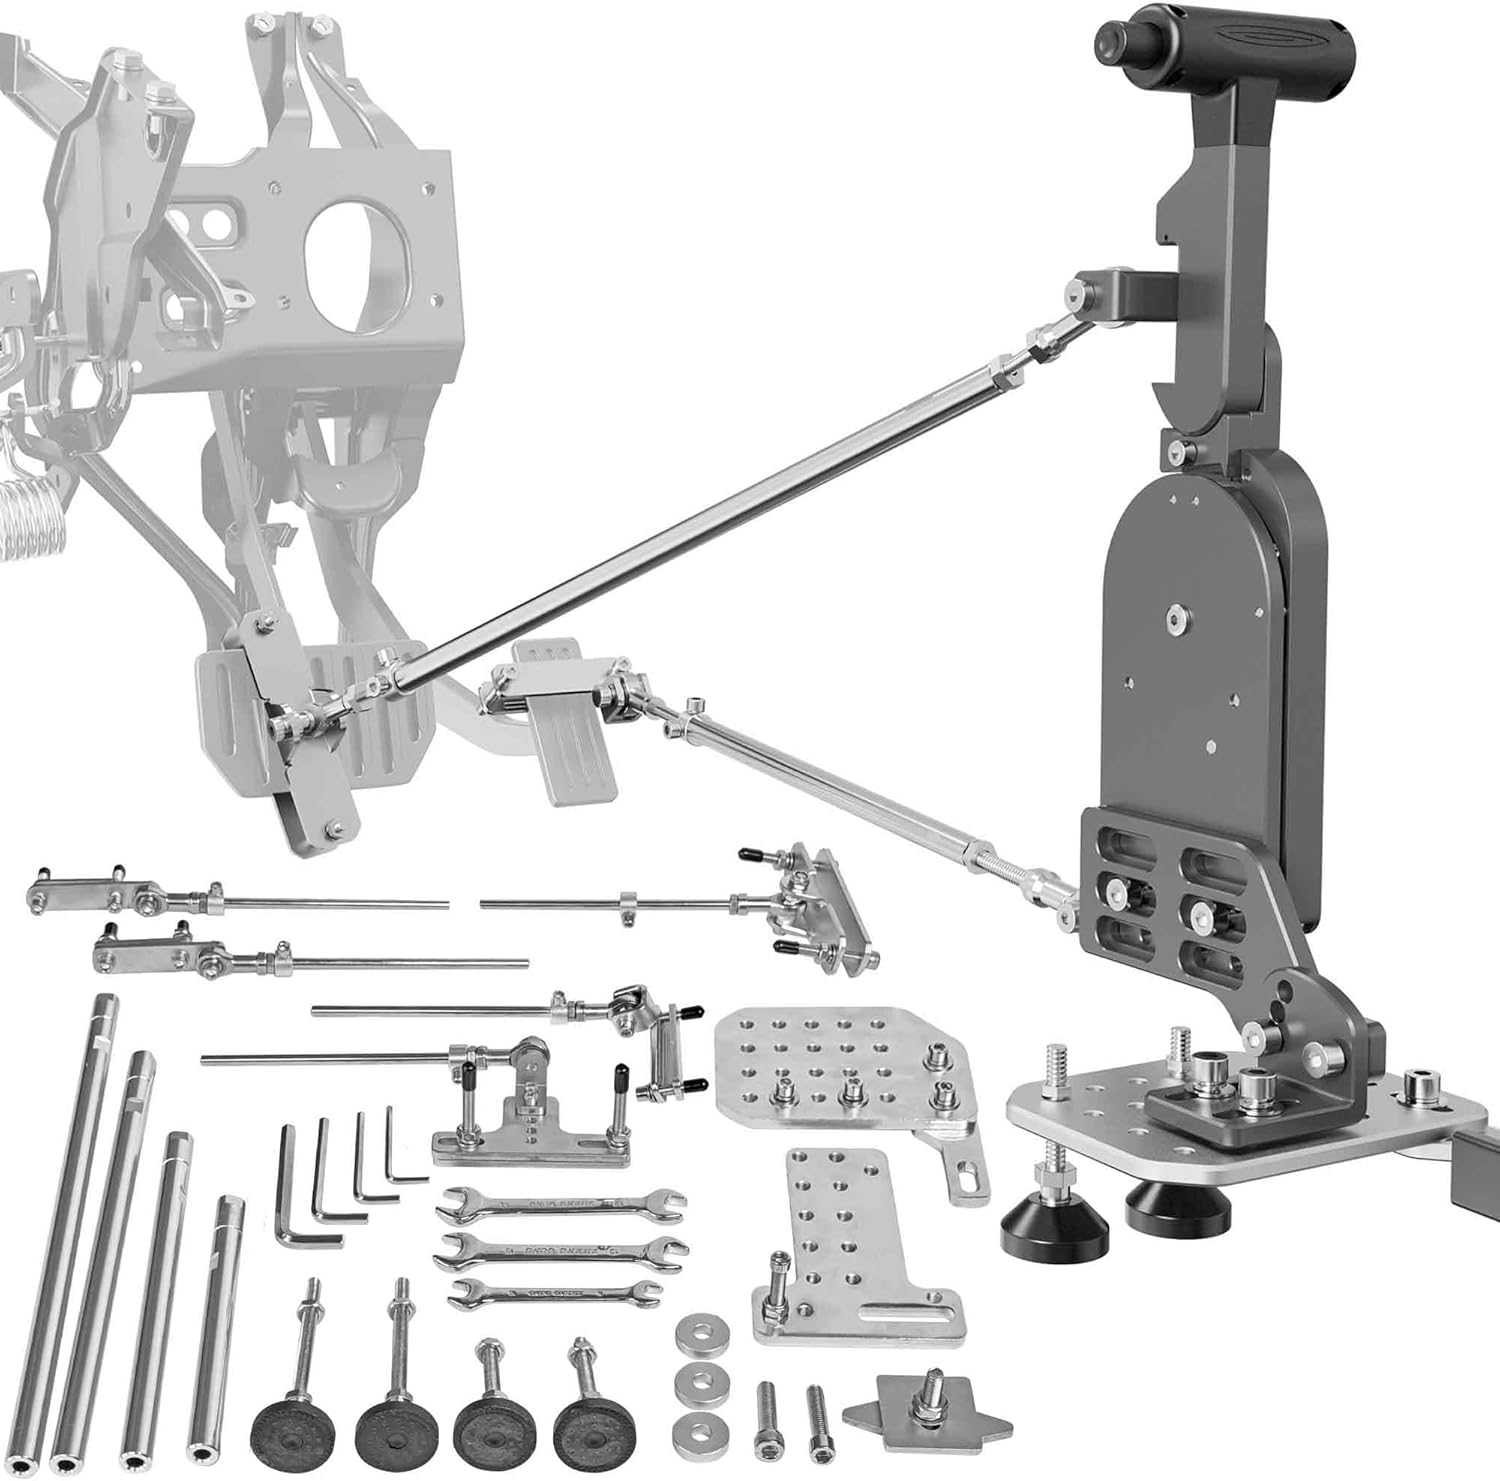
Image 1: Overview of all components included in the package, showing the main control unit, connecting rods, pedal clamps, base plates, and various tools and fasteners.
- Main Hand Control Unit
- Connecting Rods (various lengths)
- Pedal Clamps (multiple types for accelerator and brake pedals)
- Base Plates (T-shaped and Adjustable 9-shaped)
- Base Plate Attachment (for seat rail without screws)
- Installation Tools (wrenches, Allen keys)
- Fasteners and Washers
4. Setup and Installation
The OceanicEcho Hand Controls are designed to be highly adjustable to fit most vehicles. Careful attention to detail during installation is crucial for safety and functionality.
4.1. General Installation Steps
- Positioning the Base Plate: Select the appropriate base plate (T-shaped or Adjustable 9-shaped) and position it securely on the vehicle's floor, typically near the driver's seat rail. If your seat rail does not have screws for attachment, use the provided Base Plate Attachment. Ensure the base plate is stable and does not interfere with any vehicle controls or wiring.
- Mounting the Main Control Unit: Attach the main hand control unit to the installed base plate using the provided fasteners. Ensure it is firmly secured and positioned comfortably for the driver.
- Attaching Pedal Clamps: Identify the correct pedal clamps for your vehicle's accelerator and brake pedals. The device includes two types of accelerator pedal clamps and three types of brake pedal clamps to accommodate various pedal designs. Securely attach the clamps to the respective pedals. Ensure they grip the pedals firmly without slipping. Note: Some vehicle brake pedals may be too thick for the standard adapters. Verify fitment before permanent installation.

Image 2: Illustration of different pedal clamp types designed to fit various vehicle accelerator and brake pedals.

Image 3: Depiction of the T-shaped and Adjustable 9-shaped base plates, along with an attachment for seat rails without screws.
- Connecting Rods: Connect the main control unit to the pedal clamps using the appropriate connecting rods. Adjust the length of the rods to ensure proper alignment and full range of motion for both acceleration and braking without obstruction.
- Final Adjustments and Testing: After initial assembly, perform a thorough check of all connections. Test the full range of motion for acceleration and braking while the vehicle is stationary and the engine is off. Ensure there is no binding or excessive play.
4.2. Post-Installation Check
Before operating the vehicle, ensure:
- All bolts and fasteners are tightened to specification.
- The device does not interfere with steering, other vehicle controls, or the driver's movement.
- The accelerator and brake pedals return to their resting positions freely.
- The device is stable and does not shift during operation.

Image 4: The hand control device shown installed in the driver's footwell of a vehicle, connected to the accelerator and brake pedals.
5. Operation
The OceanicEcho Hand Controls provide intuitive push/pull operation for vehicle control.
5.1. Accelerating
To accelerate, gently pull the handle towards you. The further you pull, the more the accelerator pedal is depressed, increasing vehicle speed.

Image 5: Visual guide demonstrating the action of pulling the hand control handle to engage the accelerator pedal.
5.2. Braking
To brake, gently push the handle away from you. The further you push, the more the brake pedal is depressed, decreasing vehicle speed.

Image 6: Visual guide demonstrating the action of pushing the hand control handle to engage the brake pedal.
5.3. Parking/Shifting
To engage the parking brake or shift gears (if applicable to your vehicle's setup), pull the handle and simultaneously press the button located on the handle. This action depresses the brake pedal and locks it in place, allowing for safe parking or gear selection.

Image 7: Illustration detailing the process of pulling the handle and pressing the integrated button to activate the parking/shifting mechanism, which depresses and locks the brake pedal.
5.4. Unlocking
To unlock the brake pedal from the depressed state, slightly push the handle forward. The locking block will disengage, allowing the brake pedal to return to its normal position.
6. Maintenance
Regular maintenance ensures the longevity and safe operation of your hand controls.
- Routine Inspection: Periodically check all moving parts, connecting rods, and fasteners for any signs of wear, damage, or looseness.
- Cleaning: Keep the device clean from dirt and debris. Use a damp cloth to wipe down surfaces. Avoid using harsh chemicals that could damage the materials.
- Lubrication: Moving joints and pivot points may benefit from occasional lubrication with a suitable dry lubricant to ensure smooth operation. Consult a professional if unsure.
- Professional Check: It is recommended to have the device professionally inspected at least once a year, or more frequently with heavy use.
7. Troubleshooting
If you encounter issues with your hand controls, refer to the following common problems and solutions.
- Problem: Device feels stiff or difficult to operate.
Solution: Check for any obstructions. Ensure all moving parts are clean and consider applying a dry lubricant to pivot points. Verify that connecting rods are not bent or damaged. - Problem: Pedals do not fully return to their resting position.
Solution: Inspect connecting rods for proper length adjustment and ensure they are not binding. Check pedal clamps for secure attachment and proper alignment. - Problem: Device feels loose or unstable.
Solution: Re-tighten all fasteners on the base plate and main control unit. Ensure the base plate is securely anchored to the vehicle floor. - Problem: Brake pedal clamp does not fit.
Solution: The device includes multiple types of pedal clamps. Ensure you are using the correct clamp for your specific pedal design. If the pedal is unusually thick, the device may not be compatible. - Problem: Device is not suitable for my vehicle (e.g., right-hand drive).
Solution: This device is primarily designed for left-hand drive vehicles. Compatibility with right-hand drive vehicles is not guaranteed and may require significant modification or may not be possible.
If problems persist after troubleshooting, contact OceanicEcho customer support or a qualified professional.
8. Specifications
| Feature | Detail |
|---|---|
| Brand | OceanicEcho |
| Model Number | OE-GDS-X |
| Manufacturer | OceanicEcho |
| Construction Material | All metal construction, CNC machined |
| Item Weight | 7.93 kg |
| Parcel Dimensions | 44.5 x 34.7 x 14.91 cm |
| Compatibility | Adjustable to fit most vehicles (left-hand drive) |
9. Warranty and Support
For information regarding warranty coverage, technical support, or replacement parts for your OceanicEcho Hand Controls, please contact the manufacturer directly. Refer to the product packaging or the official OceanicEcho website for current contact details.