Apdoe AD01
Automatic Chicken Coop Door User Manual
Model: AD01 | Brand: Apdoe
Introduction
This manual provides detailed instructions for the installation, operation, and maintenance of your Apdoe Automatic Chicken Coop Door. Designed for convenience and the safety of your flock, this door features solar power, multiple operating modes, and anti-pinch technology. Please read this manual thoroughly before use to ensure proper function and longevity of the product.

Figure 1: Apdoe Automatic Chicken Coop Door and included accessories.
What's in the Box
Verify that all components are present before beginning installation:
- Chicken Coop Door
- ETFE Solar Panel (with 9.8ft cable)
- Remote Control
- USB Type-C Charging Cable
- Screw Kit with Screwdriver
- Template Card
- User Manual (this document)

Figure 2: All components included in the product package.
Installation Guide
The installation process is designed to be straightforward and can be completed in under 10 minutes with the provided template.
- Mark the Dimensions: Align the template card to outline the precise opening required for the door. The inner door provides a 9.4" W × 10.8" H entryway.
- Cut the Opening: Use an appropriate saw to carefully cut out the marked area.
- Secure the Door: Fasten the chicken coop door securely in place using the provided screws and screwdriver.
- Test the Door: Ensure the door operates smoothly by manually opening and closing it.

Figure 3: Visual guide for installing the automatic chicken coop door.
Operating Modes
The Apdoe Automatic Chicken Coop Door offers four convenient operating modes to suit your needs:
- Light Sensor Mode: The door automatically opens at sunrise and closes at sunset. Sensitivity can be adjusted via the LCD screen.
- Timer Mode: Program custom opening and closing schedules based on specific times.
- Remote Control: Operate the door wirelessly from up to 65 feet away using the included remote control.
- Manual Override: Use the physical buttons on the control panel for direct manual operation.
The LCD screen provides a clear display for setting and monitoring the current time, mode, and other parameters, even in direct sunlight. The display dims automatically to conserve power when inactive.
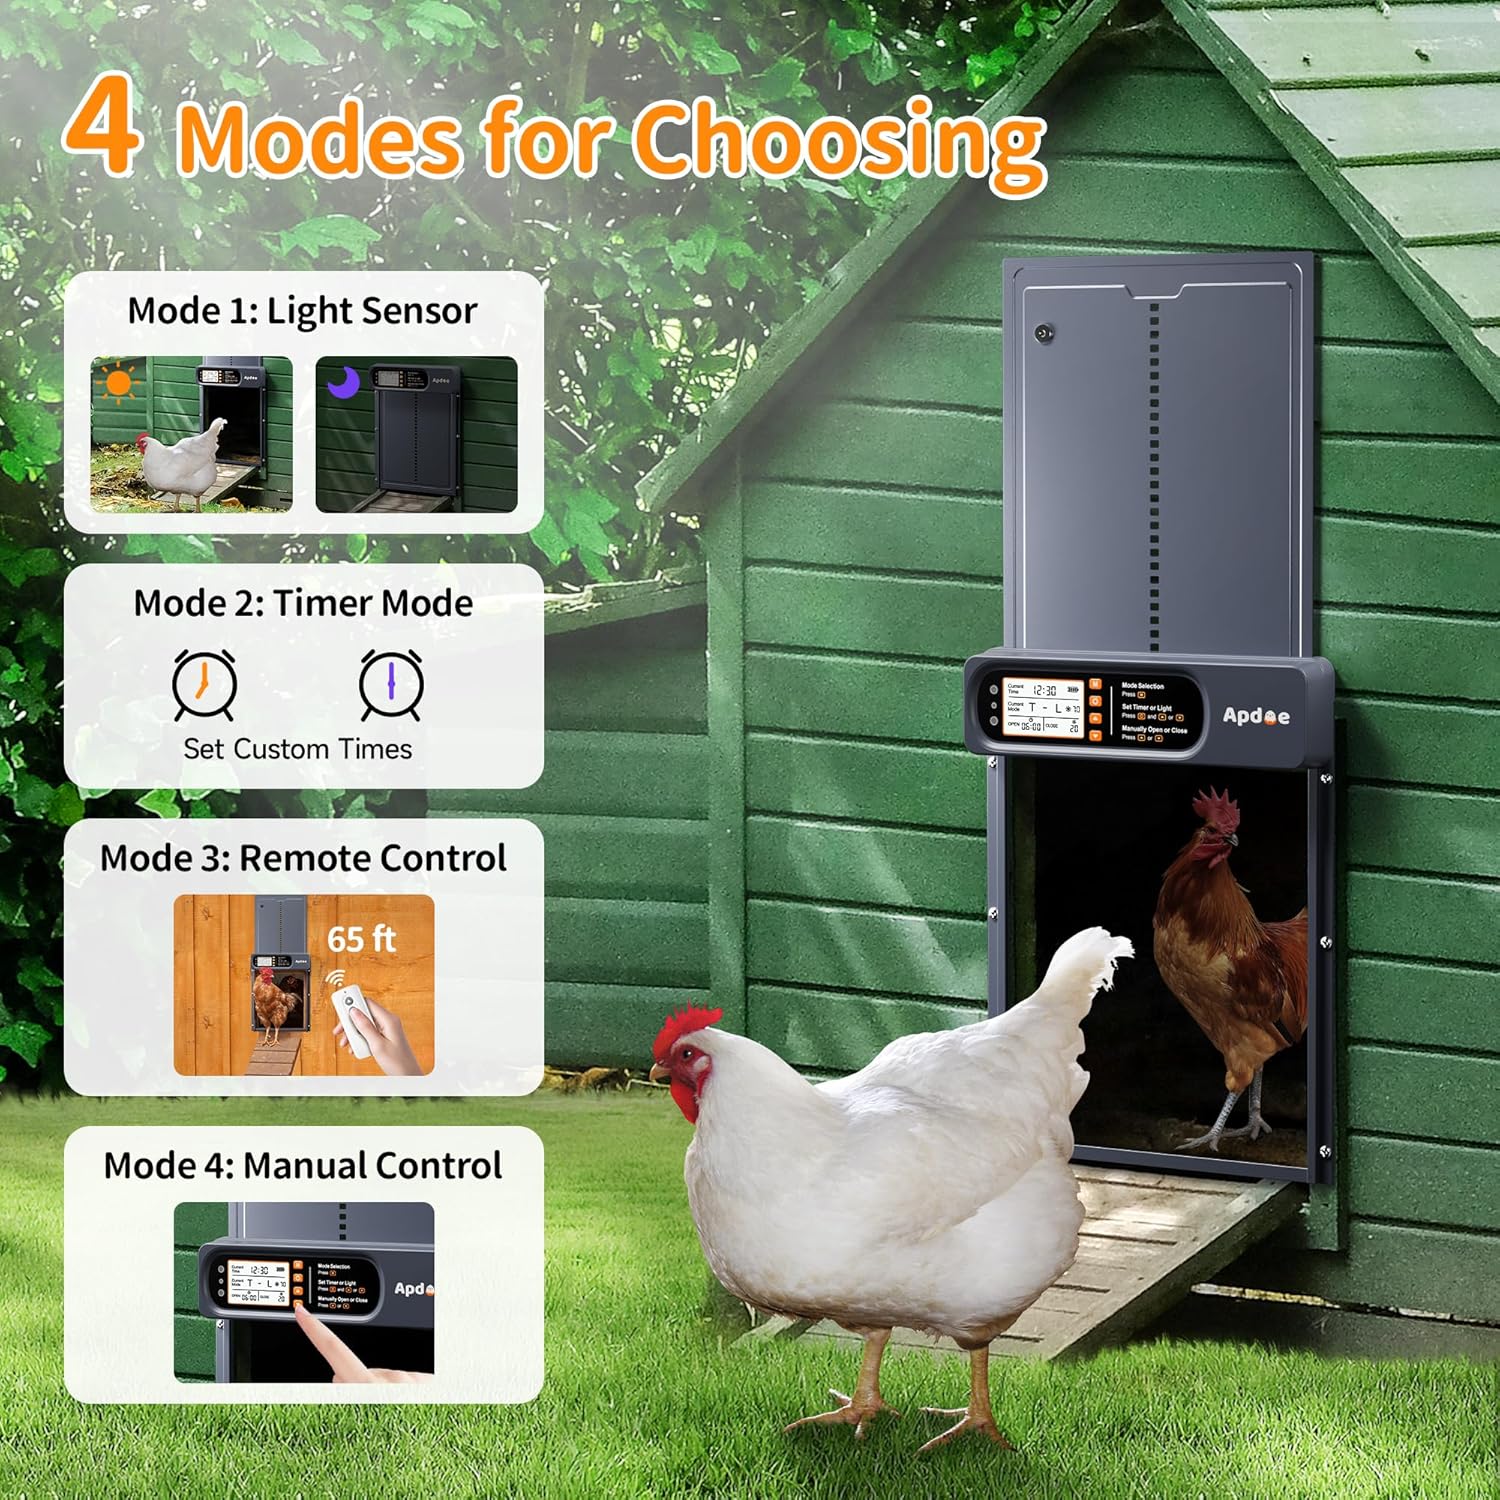
Figure 4: Overview of the four available operating modes.
Flexible Light and Timer Combinations
You can combine light sensor and timer functions for customized operation:
| Mode | Open | Close |
|---|---|---|
| T - T | Timer | Timer |
| L - L | Light Sensor | Light Sensor |
| L - T | Light Sensor | Timer |
| T - L | Timer | Light Sensor |

Figure 5: Customizable light and timer settings on the LCD display.
Safety Features
Your Apdoe chicken coop door is equipped with advanced safety mechanisms to protect your flock:
- Anti-Pinch Protection: If the door encounters an obstruction (e.g., a chicken) during closing, it will immediately stop, reverse direction, and reopen fully. It will then attempt to close again once the path is clear.
- Smart Safety Alerts:
- An audible alert will sound when the battery level is low.
- If the door fails to close properly, a continuous red light will flash, accompanied by a buzzing sound, until the door is securely closed.

Figure 6: Anti-pinch safety mechanism and all-weather durability.
Charging Options
The chicken coop door offers flexible charging solutions to ensure continuous operation:
- High-Efficiency ETFE Solar Panel: The included solar panel is highly durable and charges the built-in 2000mAh battery efficiently. It provides up to 30 days of use on a single charge. The solar panel can be adjusted 360 degrees for optimal sun exposure.
- Type-C Charging: For quick charging or during periods of low sunlight, use the provided Type-C cable. This option is ideal for indoor or shaded coops.
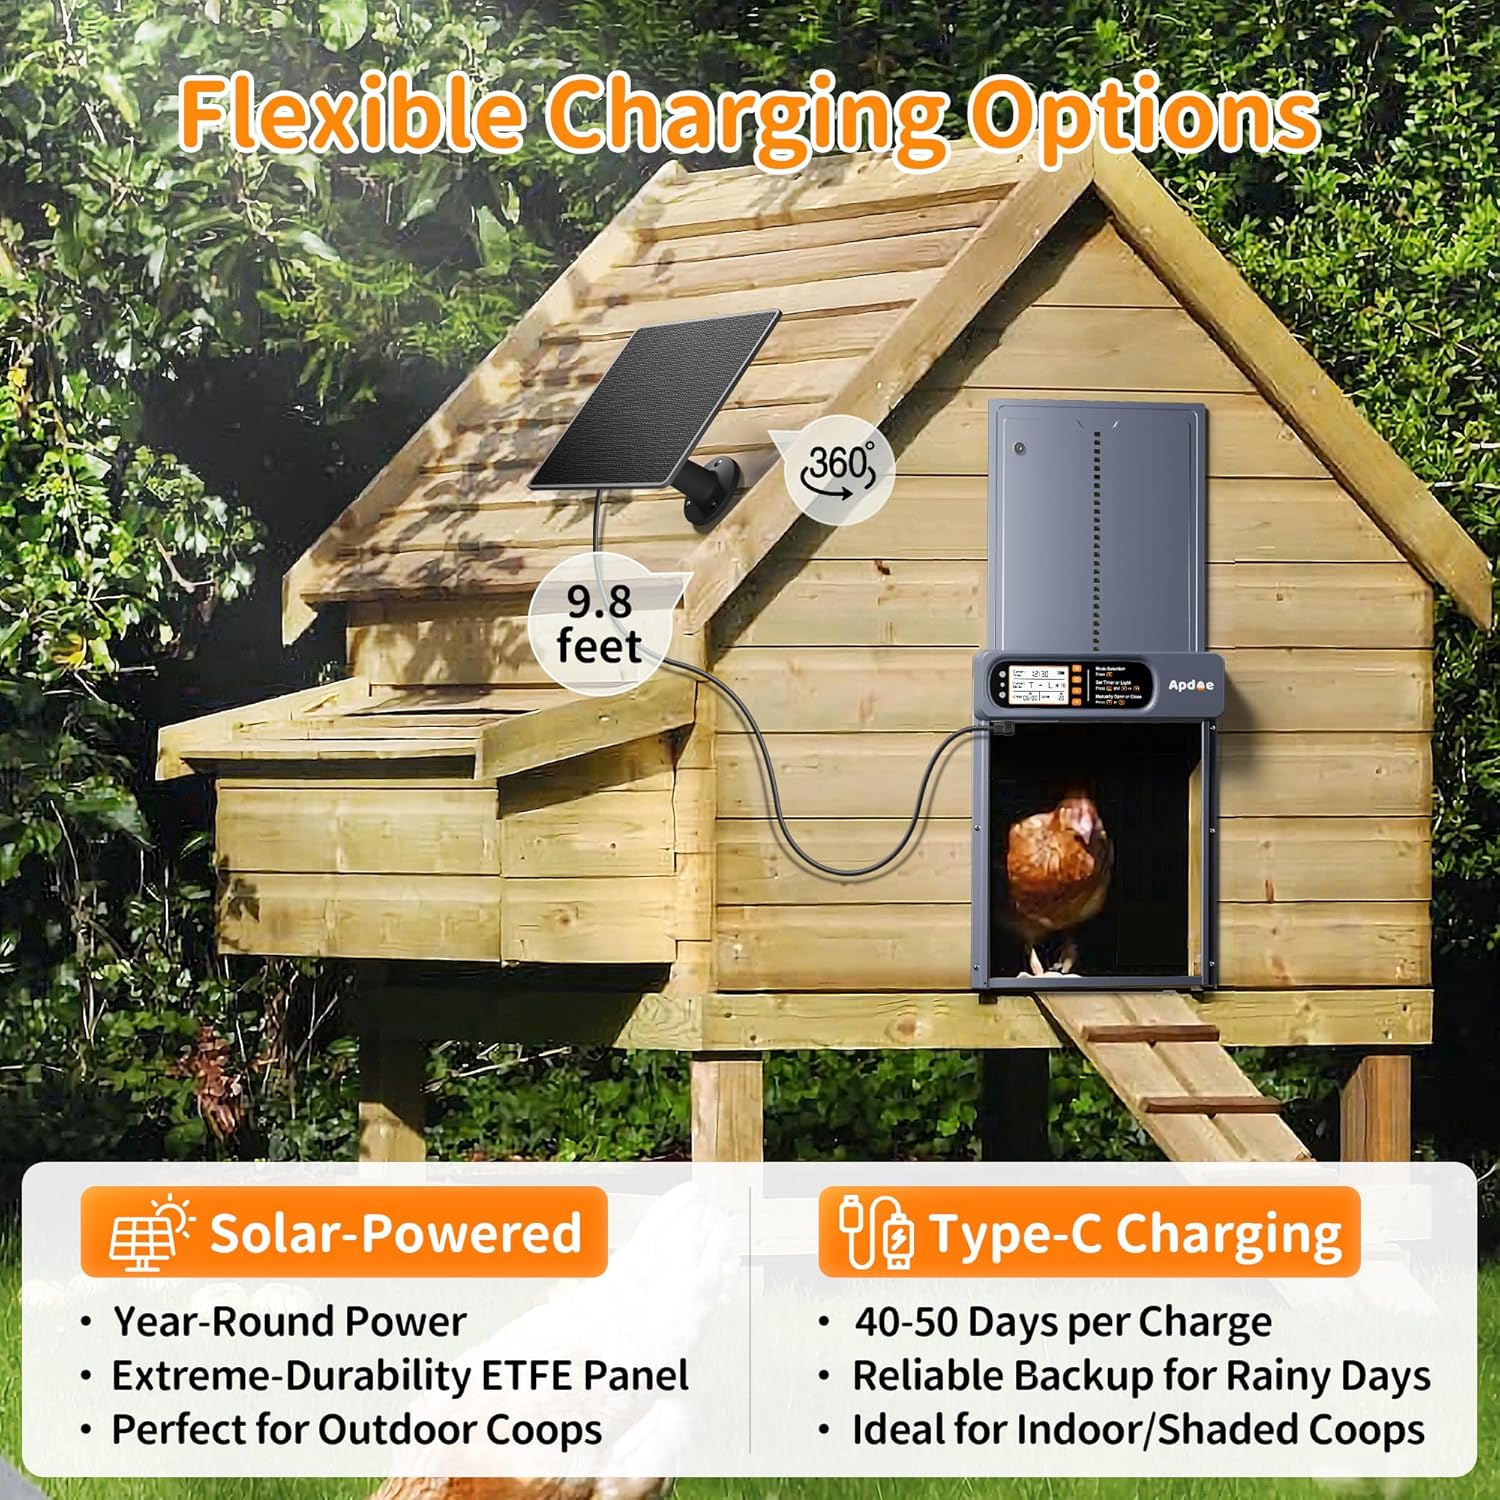
Figure 7: Solar-powered and Type-C charging options.
Maintenance
To ensure smooth and reliable operation of your chicken coop door, regular maintenance is recommended:
- Cleaning the Door Frame: Regularly check and clean any dirt or debris from the bottom of the door frame. This prevents obstructions that could interfere with the door's movement. Weekly cleaning is recommended.
- Battery Check: Pay attention to the low battery alert. Recharge the door promptly using the solar panel or Type-C cable when indicated.
Troubleshooting
This section addresses common issues you might encounter with your automatic chicken coop door.
- Door Not Opening/Closing:
- Check battery level. Recharge if low.
- Inspect the door track and bottom frame for obstructions (dirt, debris, ice). Clean as necessary.
- Verify the selected operating mode (Light Sensor, Timer, Remote, Manual) and its settings are correct.
- For Light Sensor mode, ensure the sensor is not blocked and is receiving adequate light.
- Door Stops During Operation (Anti-Pinch):
- This is a safety feature. Check for any animals or objects obstructing the door's path. The door will attempt to close again once the path is clear.
- Remote Control Not Working:
- Ensure the remote control's battery is not depleted.
- Verify you are within the 65ft operating range.
- Check for any physical obstructions between the remote and the door's receiver.
- Inaccurate Light Sensor Operation:
- Adjust the light sensor sensitivity via the LCD screen settings.
- Ensure the light sensor is clean and not obstructed by dirt, dust, or external objects.
Specifications
| Feature | Detail |
|---|---|
| Model Name | AD01 |
| Brand | Apdoe |
| Material | Aluminum, LCD Display |
| Overall Dimensions (W x H) | 10.8" x 14.3" |
| Inner Door Entryway (W x H) | 9.4" x 10.8" |
| Item Weight | 3 Pounds |
| Power Source | ETFE Solar Panel, Type-C Charging |
| Battery Capacity | 2000mAh (up to 30 days use) |
| Operating Temperature | -15°F to 140°F |
| Waterproof Rating | IP65 |
| Remote Control Range | Up to 65ft |
| Target Audience | Chickens, Ducks, Geese, Rabbits & Other Poultry |

Figure 8: Dimensions and size comparison of the chicken coop door.
Warranty and Support
The Apdoe Automatic Chicken Coop Door comes with a 3-Year Limited Warranty. Additionally, a 30-Day Money-Back Refund or Replacement policy is in effect from the date of purchase.
For technical support, warranty claims, or any questions regarding your product, please contact Apdoe customer service through the vendor's official channels or the platform where the product was purchased.
Related Documents - AD01
 |
FO-006 Automatic Chicken Coop Door User Manual and Warranty User manual and two-year warranty policy for the FO-006 Automatic Chicken Coop Door by Home Farm Helper. Includes product parameters, features, troubleshooting, and installation instructions. |
 |
VIVOSUN Automatic Chicken Coop Door User Manual and Operation Guide Learn how to operate and configure your VIVOSUN Automatic Chicken Coop Door, including light sensor and timer modes, and anti-pinch safety features. This guide provides clear instructions for setup and daily use. |
 |
Automatic Chicken Coop Door User Manual and Features Comprehensive guide to the Automatic Chicken Coop Door, covering setup, features like light sensing and remote control, app integration, and troubleshooting. Includes solar power usage and FCC compliance information. |
 |
Run-Chicken Automatic Coop Door T50 Instruction Manual Comprehensive instruction manual for the Run-Chicken Automatic Coop Door T50, covering installation, battery replacement, operation, and troubleshooting. Learn how to set opening and closing times, understand indicator lights, and perform factory resets. |
 |
POBOMVOM Solar Powered Chicken Coop Door - Installation & Operation Manual Comprehensive guide for the POBOMVOM Solar Powered Chicken Coop Door (Model JY-JMT037). Learn about installation, basic button functions, operating steps, and various modes (T-T, L-L, T-L, L-T) for automatic chicken coop management. |
 |
VEVOR JUMCC06B Automatic Chicken Coop Door Opener - User Manual & Guide Comprehensive user manual and installation guide for the VEVOR JUMCC06B Automatic Chicken Coop Door Opener. Learn about setup, programming, troubleshooting, and maintenance for your automated poultry door. |
Ask a question about this manual
Ask about setup, troubleshooting, compatibility, parts, safety, or missing instructions. Manuals+ will review the question and use this page’s manual context to help answer it.