
EF ELECFREAKS Micro:bit Space Kit
ELECFREAKS Micro:bit Space Kit User Manual
Model: Micro:bit Space Kit with Nezha Pro Expansion Board
1. Introduction
The ELECFREAKS Micro:bit Space Kit is an educational platform designed for exploring space-themed robotics and programming. This kit, featuring the Nezha Pro Expansion Board, allows users to construct and program various space-related models such as rockets, space shuttles, and lunar landers. It is intended to introduce fundamental concepts of STEM (Science, Technology, Engineering, and Mathematics) through hands-on projects and coding.
Note: This kit does NOT include a Micro:bit board. A Micro:bit board must be purchased separately to utilize the full functionality of this kit.
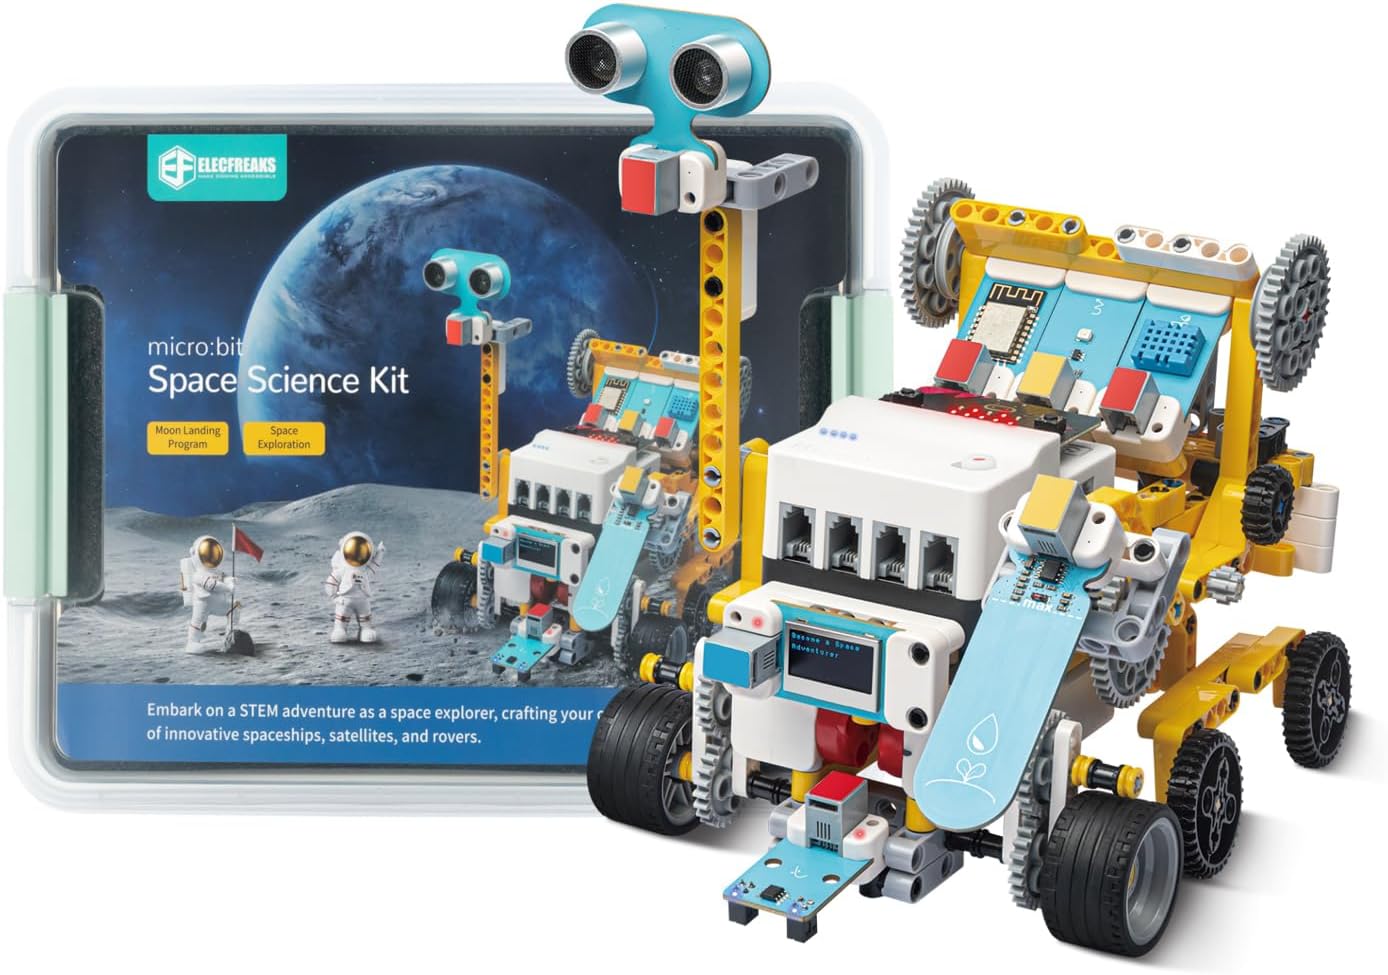
Figure 1.1: Assembled ELECFREAKS Micro:bit Space Kit showcasing a rover model.
2. Kit Components
The ELECFREAKS Micro:bit Space Kit includes a variety of components essential for building and programming your projects. Please refer to the packing list image below to ensure all parts are present.

Figure 2.1: Comprehensive packing list of the kit's contents.
2.1 Nezha Pro Expansion Board V2
The Nezha Pro Expansion Board V2 serves as the central hub for connecting sensors and motors to your Micro:bit (not included). Key features include:
- 8-way sensor interfaces (RJ11).
- 4-way closed-loop motor interfaces (RJ11).
- Color-coded labels for easy connection with planetary sensors and motors.
- Direct motor control via buttons (no master control mode required).
- Approximately 4 hours of battery life.
- Compatibility with building block structural parts.
- 4 power indicator lights and a physical power toggle switch.
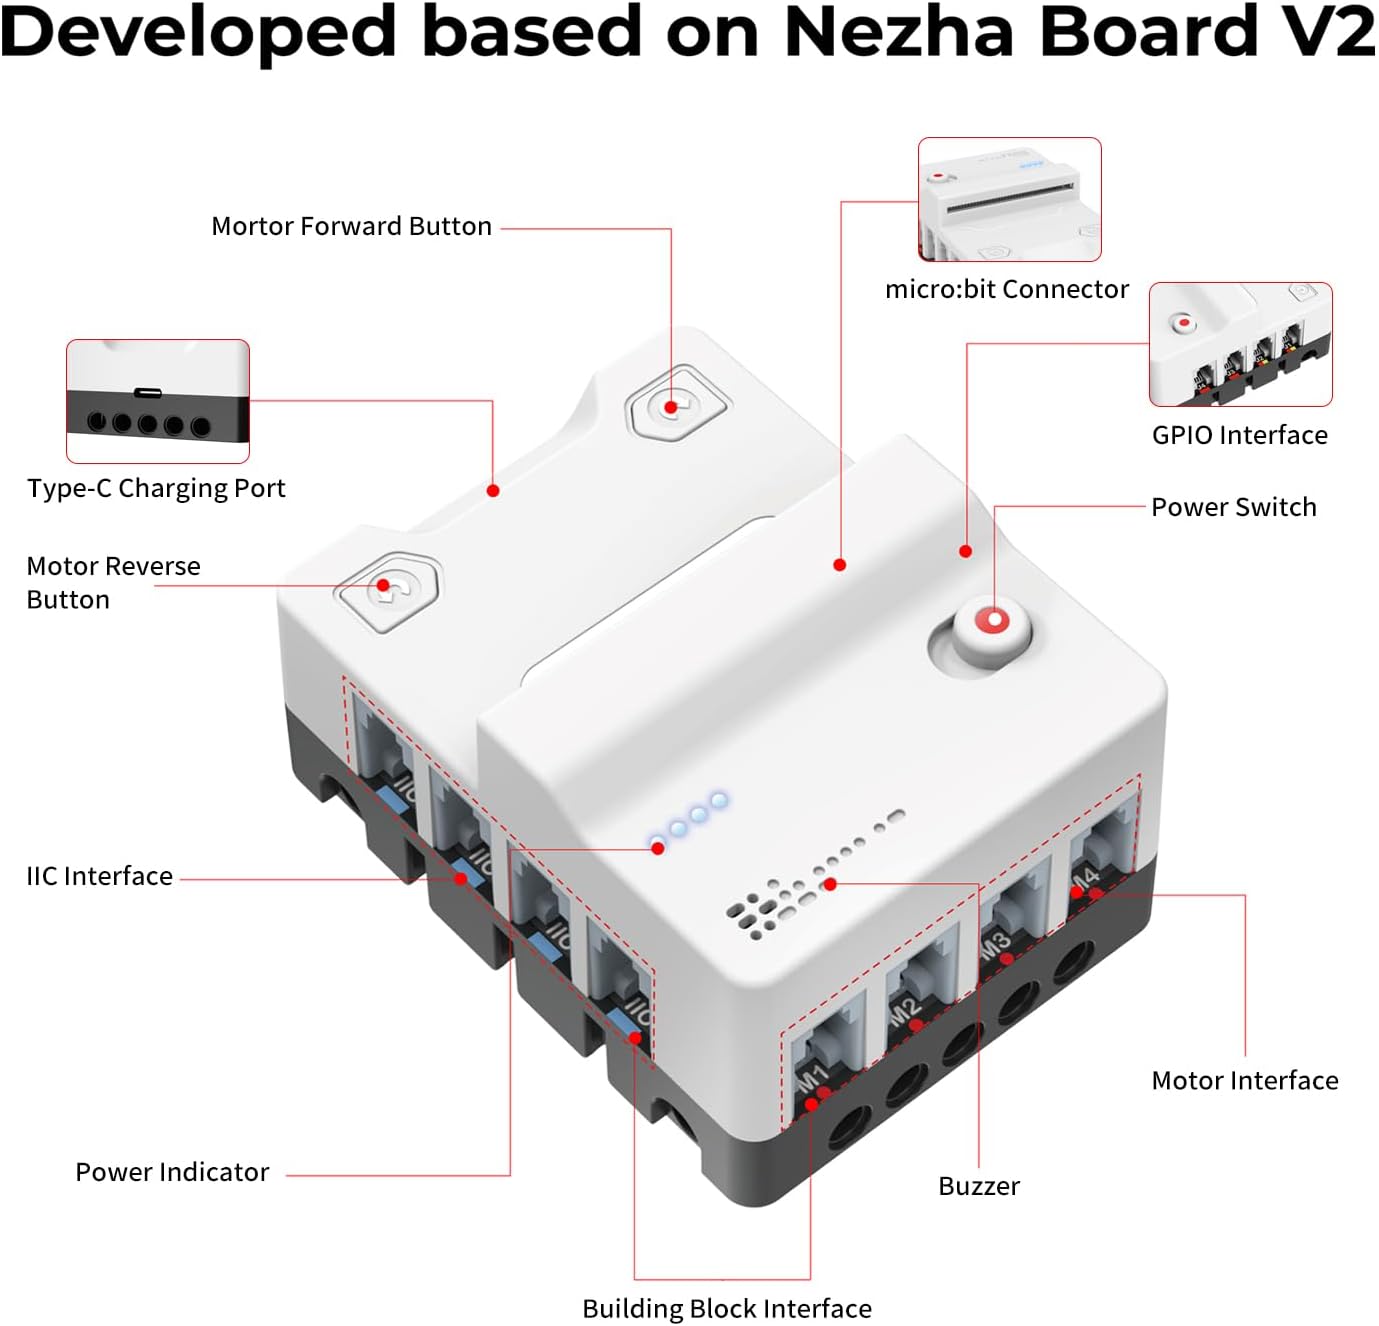
Figure 2.2: Nezha Pro Expansion Board V2 layout and interfaces.
2.2 Elecfreaks Closed-Loop Motor
The planetary series intelligent building block motor offers precise control and high efficiency. Its features include:
- Ultra-high control accuracy.
- Instantaneous response speed.
- Powerful torque.
- Built-in intelligent protection system (temperature monitoring, stall detection, voltage stability).
- Full compatibility with building block structural parts.

Figure 2.3: Elecfreaks Closed-Loop Motor details.
3. Setup Instructions
3.1 Required Items (Not Included)
- Micro:bit Board: Essential for programming and controlling the kit.
3.2 Assembly
Follow the detailed assembly instructions provided in the official ELECFREAKS Wiki for specific space-themed projects. The kit's components are designed to be compatible with standard building blocks, allowing for flexible construction.
General Assembly Steps:
- Identify the structural components required for your chosen project (e.g., rocket, rover).
- Connect the Nezha Pro Expansion Board V2 to your Micro:bit board.
- Attach sensors and motors to the corresponding RJ11 interfaces on the Nezha board, matching the color codes.
- Integrate the assembled electronic components into your physical building block structure.
- Ensure all connections are secure before powering on the device.


Figure 3.1: Examples of connecting sensors and motors to the Nezha board.
4. Operating Instructions
4.1 Programming with MakeCode
The ELECFREAKS Micro:bit Space Kit is primarily programmed using the MakeCode editor, a block-based visual programming environment. This allows for an intuitive introduction to coding concepts. Python and JavaScript programming are also supported for more advanced users.
To begin programming:
- Connect your Micro:bit (with the Nezha board attached) to a computer via USB.
- Access the MakeCode editor online or through its desktop application.
- Install the necessary extensions for the Nezha board and Planet X sensors.
- Drag and drop programming blocks to create your desired logic for controlling motors, reading sensor data, and interacting with the kit.
- Download the compiled program (.hex file) to your Micro:bit.


Figure 4.1: Supported programming environments: MakeCode, Python, and JavaScript.
4.2 Space-Themed Projects
The kit is designed to facilitate various space exploration projects. Examples include:
- Rocket Launcher: Build and program a mechanism to simulate a rocket launch.
- Lunar Lander: Construct a model that can simulate landing on the moon.
- Lunar Exploration Vehicle: Design and program a rover to navigate and explore simulated lunar surfaces.
The kit also includes an event map to guide interactive projects related to space missions.
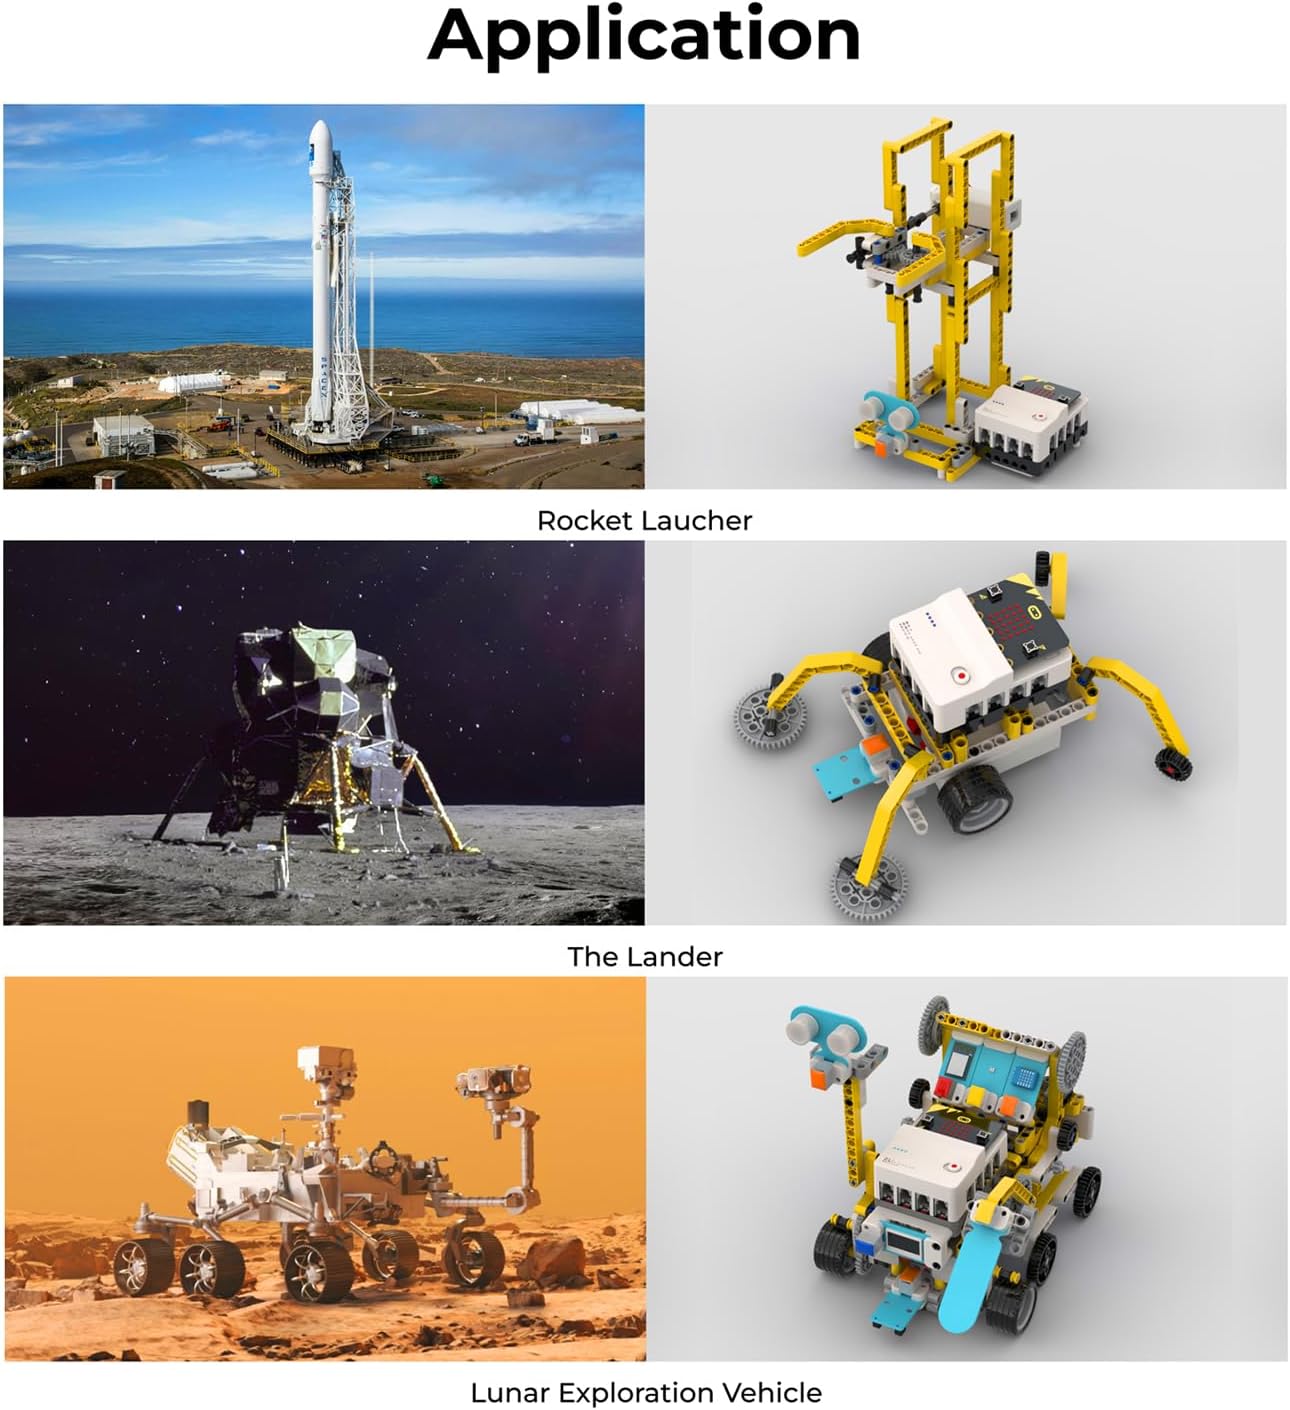
Figure 4.2: Application examples of the Micro:bit Space Kit.

Figure 4.3: Event map for interactive space projects.
5. Maintenance
- Cleaning: Use a soft, dry cloth to clean the components. Avoid using liquids or abrasive cleaners.
- Storage: Store the kit and its components in a dry, cool place away from direct sunlight and extreme temperatures. Keep small parts in their designated compartments to prevent loss.
- Battery Care: The Nezha Pro Expansion Board has a built-in battery. Charge it using the provided Type-C cable. Avoid overcharging or fully discharging the battery frequently to prolong its lifespan. If storing for extended periods, charge the battery to about 50%.
- Connection Integrity: Periodically check RJ11 cables and connectors for any signs of wear or damage. Ensure secure connections during assembly and operation.
6. Troubleshooting
If you encounter issues with your ELECFREAKS Micro:bit Space Kit, consider the following troubleshooting steps:
- Kit Not Powering On:
- Ensure the Nezha Pro Expansion Board is fully charged.
- Verify the power switch on the Nezha board is in the 'ON' position.
- Confirm the Micro:bit board is correctly inserted and powered.
- Motors Not Responding:
- Check that motors are securely connected to the correct motor interfaces on the Nezha board.
- Review your MakeCode program to ensure motor control blocks are correctly implemented and downloaded to the Micro:bit.
- Test the motor directly using the buttons on the Nezha board to rule out programming issues.
- Sensors Not Reading Data:
- Verify that sensors are connected to the appropriate RJ11 sensor interfaces.
- Ensure the correct MakeCode extensions for Planet X sensors are installed and used in your program.
- Check for any physical obstructions or damage to the sensor.
- Programming Upload Issues:
- Ensure the Micro:bit is properly connected to your computer via USB.
- Verify that the Micro:bit appears as a drive on your computer.
- Try a different USB cable or port.
For further assistance, please refer to the official ELECFREAKS Wiki or contact customer support.
7. Specifications
| Feature | Detail |
|---|---|
| Brand | EF ELECFREAKS |
| Model Name | Micro:bit Space Kit |
| Series | Micro:bit Space Kit |
| Operating System (Programming) | Windows (compatible with MakeCode, Python, JavaScript environments) |
| Item Weight | 4.58 pounds |
| Package Dimensions | 14.37 x 11.38 x 7.4 inches |
| Processor Brand | ARM (Micro:bit dependent) |
| Batteries | 1 Lithium Ion battery required (included with Nezha board) |
| Connectivity Technology | USB, Wi-Fi (Micro:bit dependent) |
| Nezha Board Interfaces | 8x Sensor (RJ11), 4x Motor (RJ11) |
| Motor Accuracy | Error within 3° |
8. Warranty and Support
8.1 Technical Support
For comprehensive technical support, detailed tutorials, and updated project cases, please visit the official ELECFREAKS Wiki:
wiki.elecfreaks.com/en/microbit/building-blocks/
You can also find additional support and contact information by visiting the ELECFREAKS store on Amazon.
8.2 Warranty Information
Specific warranty details for the ELECFREAKS Micro:bit Space Kit are typically provided at the point of purchase or can be found on the official ELECFREAKS website. Please retain your proof of purchase for any warranty claims.
Related Documents - Micro:bit Space Kit
 |
R4G Robotics: Guide to Using Micro:bit and Hardware Without Lego Guide to using the R4G web app with hardware like the BBC micro:bit, Waveshare motor driver board, and diymore chassis. Includes firmware, app setup, and programming instructions for educational robotics projects. |
 |
Elecfreaks Future Innovators Set: WRO Robotics Kit for Young Enthusiasts Explore the Elecfreaks Future Innovators Set, a comprehensive robotics kit designed for young enthusiasts participating in the World Robot Olympiad (WRO) Future Innovators category. Developed in collaboration with WRO, this advanced kit includes controllers, motors, sensors, and building blocks, along with access to a WRO-designed learning platform, to foster creativity and hands-on skills in robotics. |
 |
Pravidla soutěže „Soutěž s Elecfreaks“ od Elecfreaks a Zonepi s.r.o. Oficiální pravidla soutěže „Soutěž s Elecfreaks“ pořádané společností Zonepi s.r.o. pro značku Elecfreaks. Informace o termínu konání, výhrách (Cutebot Kit, Micro:bit hodinky), podmínkách účasti, výběru výherců a zpracování osobních údajů. |
 |
CD-Soft Educational Resources Catalog - STEM Products, Robotics, 3D Printing & More Explore the comprehensive CD-Soft catalog featuring a wide range of educational technology products, including LEGO Education, 3D printers from Flashforge and Ultimaker, robotics kits, coding and electronics tools, science equipment, and classroom furniture. Discover innovative STEM solutions for schools and educators. |
Ask a question about this manual
Ask about setup, troubleshooting, compatibility, parts, safety, or missing instructions. Manuals+ will review the question and use this page’s manual context to help answer it.