
Introduction
Thank you for purchasing the DATOUBOSS 1600W Pure Sine Wave Power Inverter. This device is designed to convert 12V DC power from your vehicle battery or solar system into stable 100V AC power, suitable for a wide range of electronic appliances. Featuring advanced SPWM technology, it provides a clean and stable power output, ensuring no damage to sensitive electronics. This manual provides essential information for safe and efficient operation, installation, and maintenance of your inverter.
Safety Information
Please read all safety instructions carefully before operating the inverter. Failure to follow these instructions may result in electric shock, fire, or serious injury.
- Do not open the inverter casing. There are no user-serviceable parts inside.
- Ensure proper ventilation around the inverter to prevent overheating.
- Keep the inverter away from water, moisture, and flammable materials.
- Connect the inverter only to a 12V DC power source.
- Always connect the inverter to the battery before connecting any AC loads.
- Disconnect the inverter from the power source before performing any maintenance or cleaning.
- This inverter is equipped with multiple protection features including overheat protection, overvoltage protection, undervoltage protection, short circuit protection, and overload protection to ensure safe operation.

Figure 1: Inverter safety features, including protection against overload, overheating, overvoltage, undervoltage, and short circuits.
Product Overview
The DATOUBOSS 1600W Pure Sine Wave Inverter is a robust power solution for various applications. It features multiple output ports and a durable design.

Figure 2: The DATOUBOSS 1600W Pure Sine Wave Power Inverter, showing the main unit, remote control, and power cables.
Components and Ports
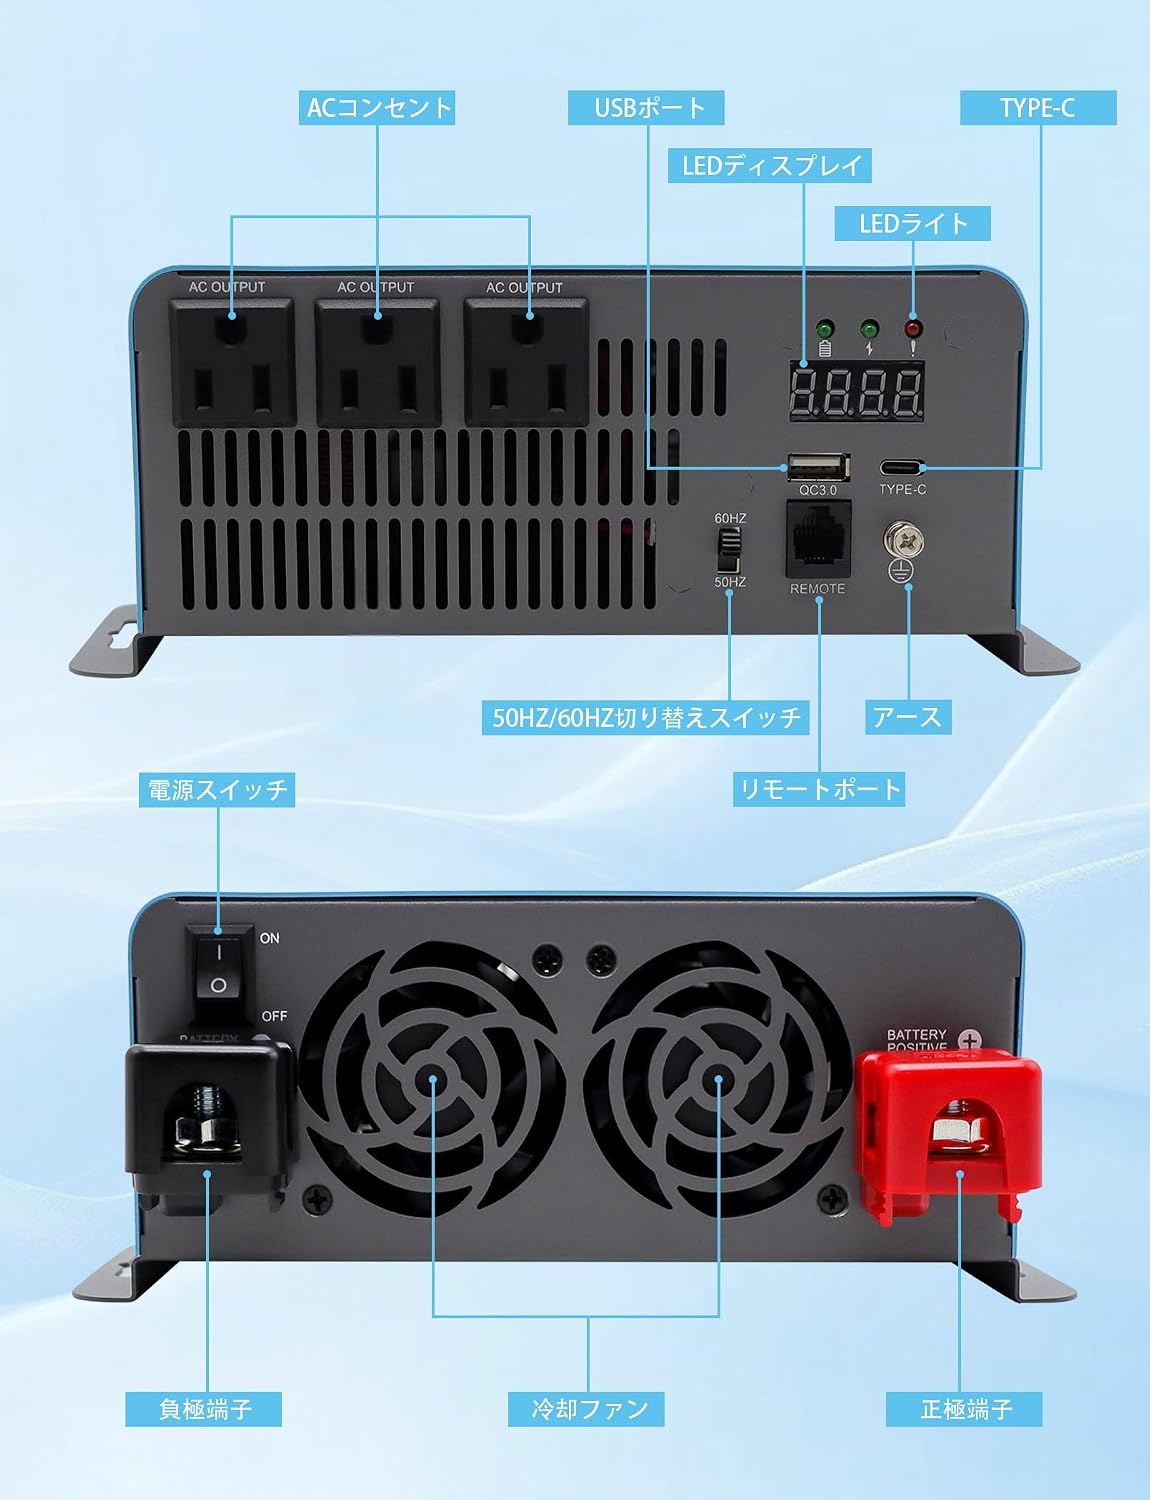
Figure 3: Detailed view of the inverter's front and rear panels, highlighting AC outlets, USB port, Type-C port, LED display, LED indicator, 50Hz/60Hz switch, remote port, ground terminal, power switch, cooling fans, negative terminal, and positive terminal.
- AC Outlets: Three 100V AC outlets for connecting standard appliances.
- USB Port: For charging USB-powered devices.
- Type-C Port: For charging Type-C compatible devices.
- LED Display: Shows real-time operational status.
- LED Indicators: Provide visual feedback on power and fault status.
- 50Hz/60Hz Switch: Allows selection of output frequency.
- Remote Port: For connecting the included remote control.
- Ground Terminal: For safety grounding.
- Power Switch: Main ON/OFF switch for the inverter.
- Cooling Fans: Two built-in fans for efficient heat dissipation.
- Negative Terminal (-): For connecting the negative DC input cable.
- Positive Terminal (+): For connecting the positive DC input cable.
Setup
Installation Location
Choose a dry, well-ventilated area for installation. Ensure there is sufficient space around the inverter for air circulation, especially around the cooling fans. Avoid direct sunlight, heat sources, and areas with excessive dust or moisture.
Connecting to a Power Source
- Ensure the inverter's power switch is in the OFF position.
- Connect the positive (+) red cable to the positive (+) terminal on the inverter and the positive (+) terminal of your 12V battery.
- Connect the negative (-) black cable to the negative (-) terminal on the inverter and the negative (-) terminal of your 12V battery.
- Ensure all connections are tight and secure to prevent loose connections and sparking.
- For safety, connect the ground terminal of the inverter to a proper earth ground or vehicle chassis.
Connecting the Remote Control
The inverter comes with a remote control for convenient operation. Plug the remote control cable into the Remote Port on the inverter.

Figure 4: The remote control connected to the inverter, allowing for convenient power management.
Operating Instructions
Powering On/Off
- After ensuring all connections are secure, switch the main power switch on the inverter to the ON position. The LED display will light up, and the LED indicator will show the operational status.
- To turn off the inverter, switch the main power switch to the OFF position.
Frequency Selection (50Hz/60Hz)
The inverter supports both 50Hz and 60Hz output frequencies, making it compatible with various regional power standards. Use the 50Hz/60Hz Switch on the inverter to select the appropriate frequency for your appliances.

Figure 5: The 50Hz/60Hz frequency selection switch on the inverter.
Connecting AC and USB/Type-C Devices
Once the inverter is powered on, you can connect your devices:
- Plug AC appliances into the AC Outlets.
- Connect USB-powered devices to the USB Port.
- Connect Type-C compatible devices to the Type-C Port.

Figure 6: The inverter providing power to a laptop and smartphone, demonstrating its pure sine wave output capability.
Maintenance
Regular maintenance ensures the longevity and optimal performance of your inverter.
- Cleaning: Periodically wipe the exterior of the inverter with a dry, soft cloth. Do not use liquid cleaners or solvents.
- Fan Maintenance: Ensure the cooling fans are free from dust and debris. Blocked fans can lead to overheating and reduced performance. The two built-in cooling fans are designed for efficient heat dissipation and extended service life.
- Connection Check: Regularly check all cable connections to ensure they are tight and free from corrosion.
- Storage: If storing the inverter for an extended period, ensure it is clean, dry, and stored in a cool, well-ventilated area.
Troubleshooting
This section addresses common issues you might encounter with your inverter.
| Problem | Possible Cause | Solution |
|---|---|---|
| Inverter does not turn on. | Loose battery connections, low battery voltage, faulty fuse. | Check battery cable connections. Ensure battery voltage is above 11V. Check and replace fuses if necessary. |
| No AC output. | Overload protection, short circuit protection, undervoltage/overvoltage protection. | Reduce the load. Disconnect all loads and restart the inverter. Check battery voltage. Ensure the appliance wattage is within the inverter's capacity (1600W continuous, 3200W peak). |
| Inverter shuts down frequently. | Overheat protection, excessive load, low battery voltage. | Ensure adequate ventilation. Reduce the load. Charge or replace the battery. |
| Cooling fan is noisy. | Normal operation under load, dust accumulation, fan malfunction. | The fan may run periodically even without load to maintain internal temperature. Clean the fan vents. If noise is excessive or unusual, contact support. |
| Appliances not working despite inverter being on. | Appliance power requirement exceeds inverter capacity, incorrect frequency setting. | Verify the wattage of your appliance. Ensure the 50Hz/60Hz switch is set correctly for your region/appliance. |
Specifications

Figure 7: Product dimensions of the DATOUBOSS 1600W Inverter.
| Feature | Detail |
|---|---|
| Brand | DATOUBOSS |
| Model Number | 2410151709 |
| Wattage | 1600 W (Continuous) / 3200 W (Peak) |
| Input Voltage | 12V DC |
| Output Voltage | 100V AC |
| Output Waveform | Pure Sine Wave |
| Frequency | 50Hz / 60Hz (Switchable) |
| Product Dimensions | 32.5 x 22.8 x 7.8 cm |
| Item Weight | 4.14 kg |
| Power Source | Solar battery and battery powered |
| Included Components | Pure sine wave inverter unit, remote control, cables, instruction manual |
Warranty and Support
DATOUBOSS products are manufactured to high-quality standards. This product comes with a standard manufacturer's warranty. For specific warranty details, please refer to the warranty card included with your product or contact DATOUBOSS customer support.
Customer Support
If you encounter any issues or have questions regarding your DATOUBOSS inverter, please contact the seller or manufacturer's customer support. Please have your model number (2410151709) and purchase information ready when contacting support.


