
1. Introduction
The Fender Champion II 25 is a versatile electric guitar amplifier designed for a wide range of players, from beginners to experienced musicians. It offers 25 watts of power and features a variety of amp voices and effects, making it suitable for practice, recording, and small performances. This manual will guide you through the amplifier's features, setup, operation, and maintenance to ensure optimal performance and longevity.
2. Safety Instructions
- Power Source: Connect the amplifier only to a power supply of the specified voltage (100V JP). Ensure the power cord is securely plugged into both the amplifier and a grounded outlet.
- Ventilation: Do not block any ventilation openings. Maintain adequate space around the amplifier for proper airflow to prevent overheating.
- Moisture: Do not expose the amplifier to rain, moisture, or excessive humidity. Keep liquids away from the unit.
- Heat: Do not place the amplifier near heat sources such as radiators, heat registers, stoves, or other heat-producing apparatus.
- Servicing: Do not attempt to service the amplifier yourself. Refer all servicing to qualified service personnel.
- Cleaning: Unplug the amplifier from the power outlet before cleaning. Use a dry cloth for cleaning.
- Object/Liquid Entry: Never push objects of any kind into this product through openings as they may touch dangerous voltage points or short-out parts that could result in a fire or electric shock.
3. Package Contents
Please check that all items are present in the package:
- Fender Champion II 25 Electric Guitar Amplifier
- Power Cord
- User Manual (this document)
4. Product Overview
4.1 Front Panel Controls
The front panel provides access to all primary controls for shaping your sound.

Image: Front view of the Fender Champion II 25 amplifier, showing the input jack, control knobs, and speaker grille.

Image: Close-up of the Fender Champion II 25 amplifier's front panel controls, including Input, Gain, Volume, Voice, Treble, Bass, Modify, FX Select, Tap, AUX, Phones, and Power switch.
- INPUT: Connect your guitar here using a standard 1/4-inch instrument cable.
- GAIN: Adjusts the amount of pre-amp distortion and sustain. Higher settings produce more aggressive tones.
- VOLUME: Controls the overall output level of the amplifier.
- VOICE: Selects different amplifier voicings (amp models) from clean to various overdrive and distortion types.
- TREBLE: Adjusts the high-frequency content of your sound.
- BASS: Adjusts the low-frequency content of your sound.
- MODIFY: Adjusts a specific parameter for the currently selected effect.
- FX SELECT: Chooses from various built-in effects such as Reverb, Delay/Echo, Chorus, Tremolo, and Vibratone.
- TAP: Used to set the tempo for time-based effects like Delay and Tremolo. Tap the button twice at your desired tempo.
- AUX: Connect an external audio device (e.g., MP3 player, phone) using a 1/8-inch stereo cable to play along with music.
- PHONES: Connect stereo headphones here for silent practice. This mutes the internal speaker.
- PWR (Power Switch): Turns the amplifier on or off. The LED indicates power status.
4.2 Rear Panel
The rear panel houses the power input and USB port.
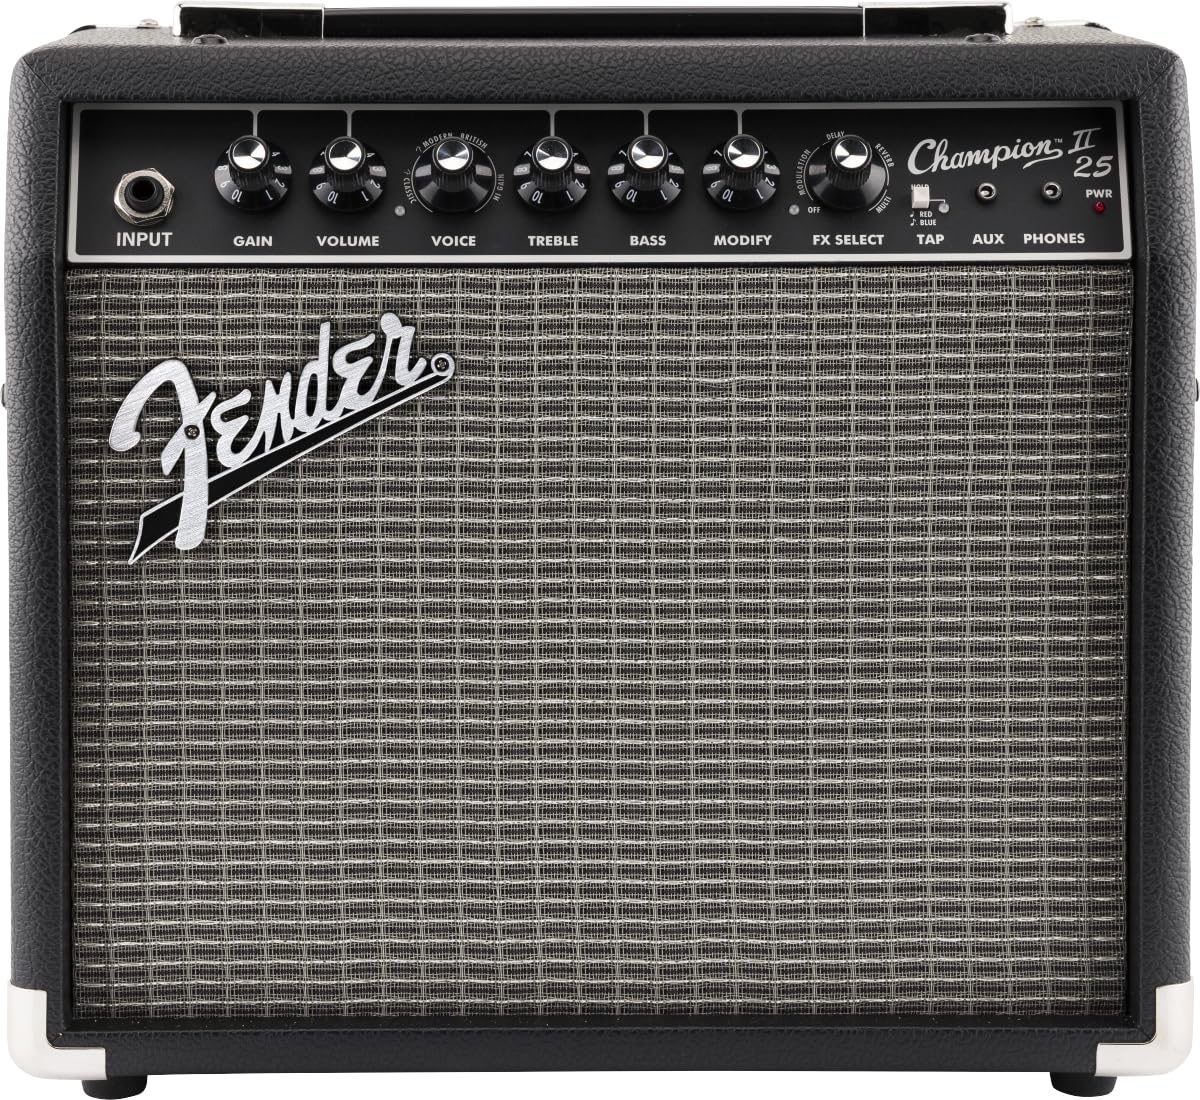
Image: Rear view of the Fender Champion II 25 amplifier, showing the power input, USB port, and speaker. Warning labels are visible.
- INPUT POWER (100-120V ~ 50/60Hz): Connect the provided power cord here.
- USB: Connect to a computer for potential firmware updates or recording capabilities (refer to Fender's official website for software/driver information).
5. Setup
- Placement: Place the amplifier on a stable, flat surface. Ensure there is adequate ventilation around the unit.
- Power Connection: Connect the power cord to the INPUT POWER receptacle on the rear panel and then to a suitable grounded electrical outlet.
- Guitar Connection: With the amplifier turned OFF and VOLUME set to minimum, connect your electric guitar to the INPUT jack on the front panel using a standard 1/4-inch instrument cable.
- External Devices (Optional): If desired, connect an external audio player to the AUX input or headphones to the PHONES output.
- Power On: Flip the PWR switch to the ON position. The power indicator LED will illuminate.
6. Operating Instructions
6.1 Basic Tone Shaping
- Start with the VOLUME knob at a low setting.
- Turn the VOICE knob to select an amplifier model. Experiment with different settings to find your preferred base tone (e.g., clean, crunch, lead).
- Adjust the GAIN knob to control the amount of overdrive or distortion. Lower gain for cleaner tones, higher gain for more aggressive sounds.
- Use the TREBLE and BASS knobs to fine-tune the high and low frequencies of your sound.
- Slowly increase the VOLUME to your desired listening level.
6.2 Using Effects
- Rotate the FX SELECT knob to choose from the available effects (Reverb, Delay/Echo, Chorus, Tremolo, Vibratone).
- Once an effect is selected, use the MODIFY knob to adjust its specific parameters (e.g., decay for reverb, delay time for delay, depth for chorus).
- For time-based effects like Delay and Tremolo, you can set the tempo by tapping the TAP button twice in rhythm with your desired speed.
6.3 Using AUX Input and Headphones
- Connect your external audio device to the AUX input using a 1/8-inch stereo cable. The volume of the external device will be controlled by its own volume control.
- Plug stereo headphones into the PHONES jack for private practice. This will automatically mute the internal speaker.
7. Maintenance
- Cleaning: Regularly wipe the amplifier's exterior with a soft, dry cloth. Avoid using abrasive cleaners or solvents.
- Storage: When not in use, store the amplifier in a dry, dust-free environment, away from extreme temperatures.
- Transportation: When moving the amplifier, ensure it is powered off and unplugged. Use the handle provided.
- Speaker Care: Avoid poking or pressing on the speaker cone, as this can cause damage.
8. Troubleshooting
| Problem | Possible Cause | Solution |
|---|---|---|
| No sound | Amplifier not powered on Volume knob set to zero Guitar cable faulty or disconnected Headphones plugged in | Check power switch and power cord Increase VOLUME knob Check/replace guitar cable Unplug headphones |
| Distorted or weak sound | GAIN too high Guitar volume too low Faulty guitar or cable | Reduce GAIN Increase guitar volume Test with another guitar/cable |
| Effects not working | FX SELECT knob not set MODIFY knob set to minimum | Rotate FX SELECT to choose an effect Increase MODIFY knob setting |
| Humming or buzzing noise | Ground loop Interference from other electronics Faulty cable | Try a different power outlet Move amplifier away from other devices Replace guitar cable |
If the problem persists after trying these solutions, please contact Fender customer support or a qualified service technician.
9. Specifications
- Output Power: 25 Watts
- Speaker: 1 x 8-inch Fender Special Design Speaker
- Channels: 1
- Inputs: 1 x 1/4-inch Instrument Input, 1 x 1/8-inch AUX Input
- Outputs: 1 x 1/8-inch Headphone Output
- Effects: Reverb, Delay/Echo, Chorus, Tremolo, Vibratone
- Amp Types: Various built-in amp models and distortion types
- Controls: Input, Gain, Volume, Voice, Treble, Bass, Modify, FX Select, Tap, AUX, Phones, PWR
- Dimensions (D x W x H): 32 cm x 19 cm x 35 cm (approximately 12.6 inches x 7.5 inches x 13.8 inches)
- Power Source: AC Power Cord (100V JP)
- Amplifier Type: Solid State
- Color: Black
- Included Accessories: Power Cord
- Manufacturer Model Number: 2330707900
10. Warranty and Support
This Fender Champion II 25 amplifier comes with a 1-year manufacturer's warranty from the date of purchase. This warranty covers defects in materials and workmanship under normal use.
For warranty claims, technical support, or service inquiries, please contact Fender customer support through their official website or authorized service centers. Please retain your proof of purchase for warranty validation.
For the latest information, software updates, and additional resources, please visit the official Fender website: www.fender.com


