
1. Introduction
Thank you for choosing the xsdzgdzy 2-Stroke 63cc 3 HP Gas Powered Earth Auger. This manual provides essential information for the safe and efficient operation, maintenance, and troubleshooting of your new post hole digger. Please read this manual thoroughly before assembly or operation and keep it for future reference.
This powerful tool is designed for efficient digging of post holes in various soil conditions, suitable for tasks such as installing fences, planting trees, and other ground-boring applications.
2. Safety Information
Operating power equipment can be dangerous if proper safety precautions are not followed. Always prioritize your safety and the safety of others.
- Read the Manual: Understand all instructions and warnings before use.
- Personal Protective Equipment (PPE): Always wear appropriate safety gear, including safety glasses, hearing protection, gloves, and sturdy footwear.
- Fuel Handling: Handle gasoline with extreme care. Store fuel in approved containers, away from ignition sources. Refuel in a well-ventilated area with the engine off and cool.
- Work Area: Ensure the work area is clear of bystanders, pets, and obstacles. Be aware of underground utilities (cables, pipes) before digging.
- Secure Grip: Maintain a firm grip on both handles during operation.
- Engine Exhaust: Operate in well-ventilated areas to avoid inhaling exhaust fumes.
- Maintenance: Perform all maintenance as instructed. Disconnect the spark plug wire before performing any maintenance or repairs.
3. Package Contents
Verify that all components are present and undamaged upon unpacking:
- 1 x Digging Machine (Main Unit)
- 1 x Drill Bit (11-inch diameter)
- 1 x Fuel Mixing Bottle
- 1 x Product Illustration (this manual)
- All Accessories for Assembly (bolts, nuts, tools, etc.)
4. Assembly and Setup
Follow these steps to assemble your earth auger:
- Attach the Wheel Assembly: Secure the wheel to the main frame using the provided hardware. Ensure it rotates freely.
- Install the Handles: Mount the dual handles to the main unit. Ensure all connections are tight and secure. The throttle and power switches are integrated into the handle assembly.
- Connect the Engine Unit: Attach the 63cc engine to the main frame, ensuring it is firmly seated and all mounting bolts are tightened.
- Attach the Auger Bit: Securely fasten the 11-inch drill bit to the gearbox output shaft. Ensure the pin or bolt is properly inserted and secured to prevent the bit from detaching during operation.
- Fuel Mixing: This is a 2-stroke engine. Mix gasoline with 2-stroke engine oil at a ratio of 25:1 (Gasoline:Oil) using the provided fuel mixing bottle. Do not use pure gasoline.
- Fill Fuel Tank: Carefully pour the mixed fuel into the fuel tank. Do not overfill.

Image: Detailed view of key components including handles, silencer, carburetor, and gearbox.
Video: Official product video demonstrating the assembly and features of the 2-Stroke 63cc Post Hole Digger.
5. Operating Instructions
Before starting, ensure you have read and understood all safety warnings.
- Starting the Engine:
- Place the auger on a flat, stable surface.
- Ensure the power switch is in the 'ON' position.
- Engage the choke (if cold start).
- Pull the hand-pull starter cord firmly and smoothly until the engine starts.
- Once started, disengage the choke gradually.
- Digging Operation:
- Position the auger bit over the desired digging location.
- Hold the handles firmly with both hands.
- Slowly press the throttle to engage the auger bit.
- Apply downward pressure to allow the auger to penetrate the soil. The wheelbarrow design allows you to push down for easier digging.
- Periodically lift the auger slightly to clear soil from the bit and prevent binding.
- Continue digging until the desired depth is reached.
- Stopping the Engine: Release the throttle and switch the power button to the 'OFF' position.

Image: Demonstrating easy operation with throttle, power switches, and hand-pull starter.

Image: Illustrates wide application areas and soil types unsuitable for this auger.
6. Maintenance
Regular maintenance ensures the longevity and optimal performance of your earth auger.
- After Each Use:
- Clean the auger bit and main unit of dirt and debris.
- Inspect the auger bit for wear or damage. Replace if necessary.
- Check all bolts and fasteners for tightness.
- Fuel System:
- Always use the correct 25:1 fuel mix.
- Do not store fuel in the tank for extended periods. Drain the fuel tank if storing for more than 30 days.
- Clean or replace the fuel filter as needed.
- Air Filter: Regularly inspect and clean the air filter. A dirty air filter can reduce engine performance and increase fuel consumption.
- Spark Plug: Inspect the spark plug periodically. Clean or replace if it is fouled or worn.
- Gearbox: The gearbox is designed for stable and low-noise operation with good sealing. Check for any leaks or unusual noises.
7. Troubleshooting
If you encounter issues, refer to the following common troubleshooting steps:
| Problem | Possible Cause | Solution |
|---|---|---|
| Engine does not start |
|
|
| Loss of power during operation |
|
|
| Auger bit binds in soil |
|
|
8. Specifications
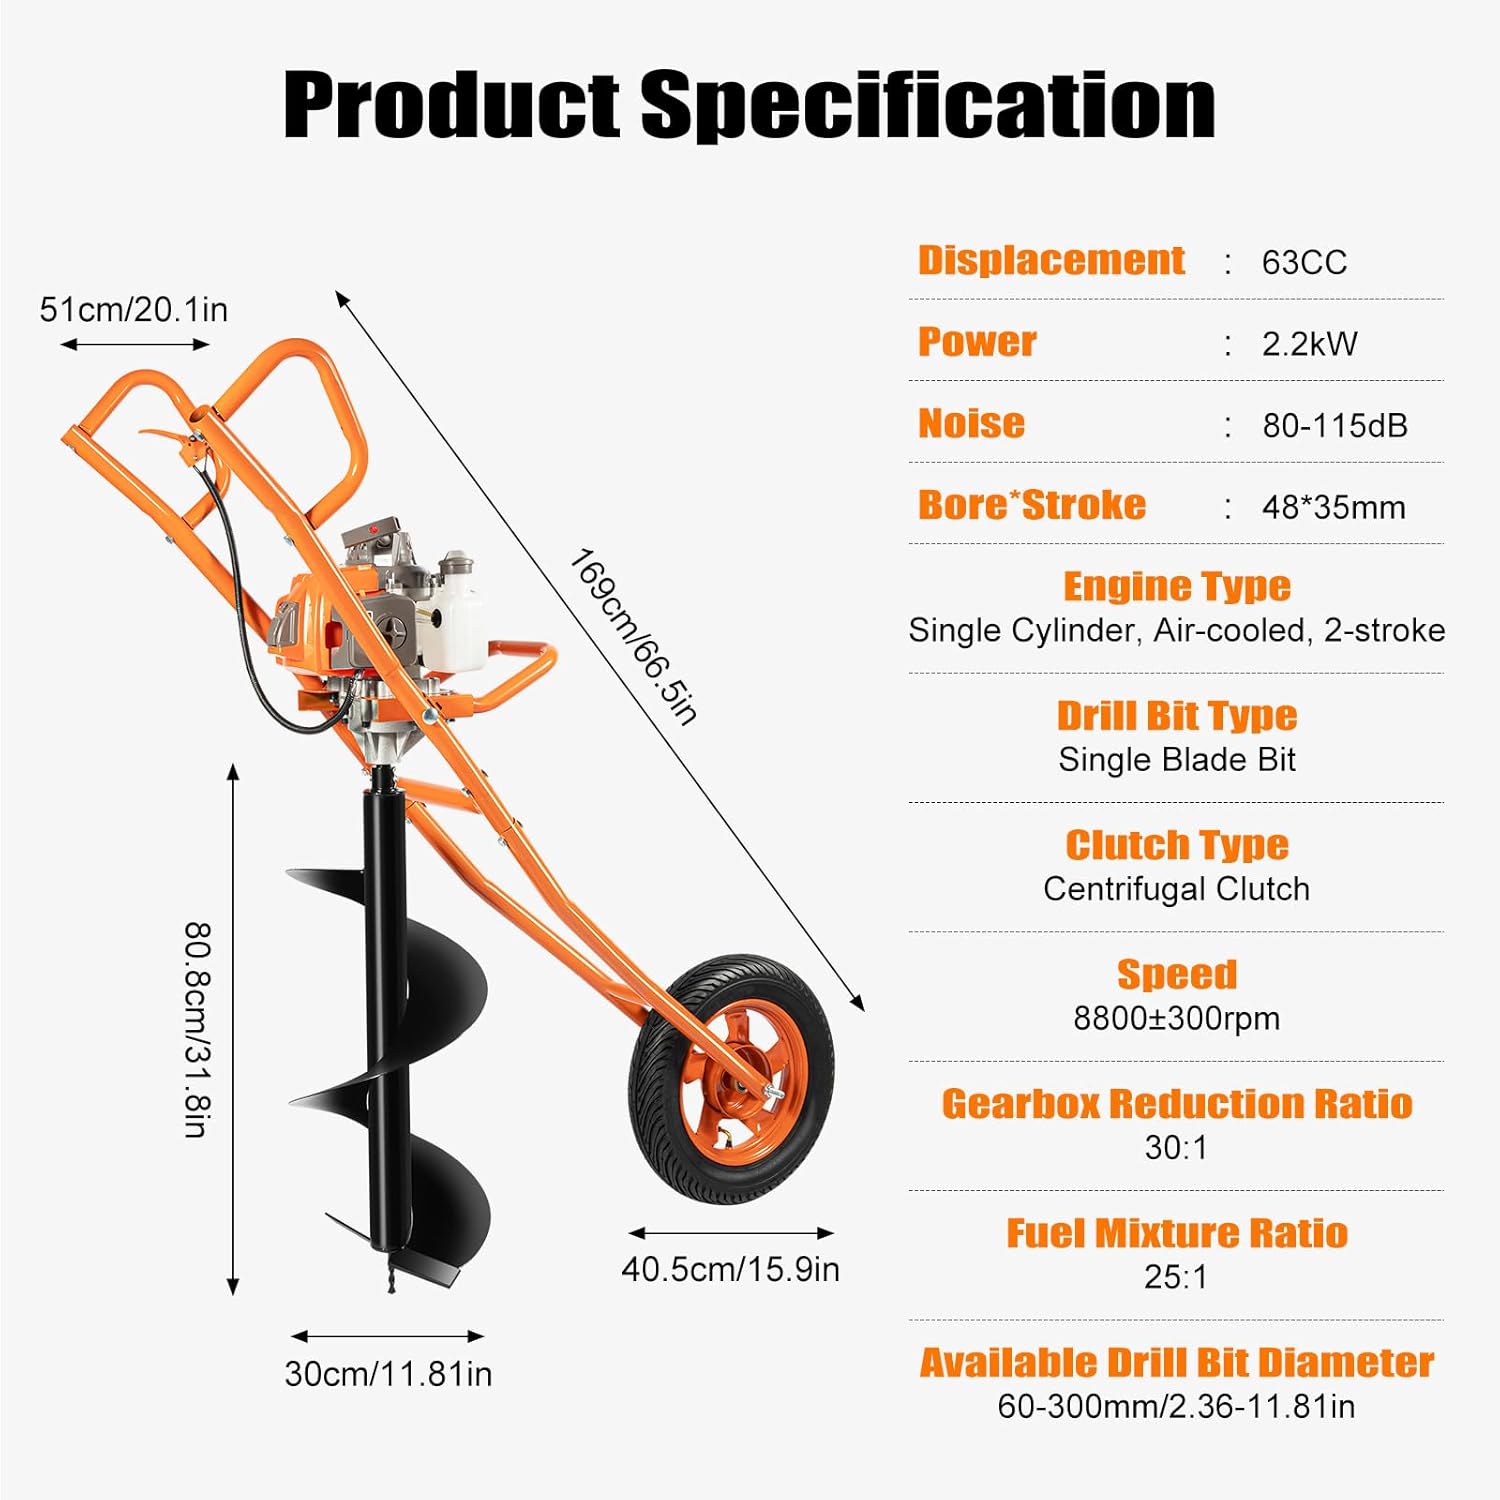
Image: Detailed product specification diagram.
| Specification | Value |
|---|---|
| Manufacturer | xsdzgdzy |
| Part Number | YLBSQ7-003000+YLBSQ7-002900-dzy |
| Product Dimensions | 15.9 x 11.8 x 66.48 inches |
| Item Model Number | 2-Stroke 63cc |
| Color | Orange |
| Engine Displacement | 63cc |
| Engine Power | 3 HP (2.2 kW) |
| Engine Type | Single Cylinder, Air-cooled, 2-stroke |
| Max Engine Speed | 8800 ± 300 rpm |
| Fuel Tank Capacity | 1200ml (approx. 0.34 Gallons) |
| Fuel Mixture Ratio | 25:1 (Gasoline:2-Stroke Oil) |
| Drill Bit Type | Single Blade Bit |
| Included Drill Bit Diameter | 11 inches (approx. 280mm) |
| Available Drill Bit Diameter Range | 60-300mm (2.36-11.81 inches) |
| Carburetor Type | Diaphragm |
| Starting System | Hand-pull Starter |
| Clutch Type | Centrifugal Clutch |
| Gearbox Reduction Ratio | 30:1 |
9. Warranty and Support
For warranty information or technical support, please contact xsdzgdzy customer service. Keep your purchase receipt as proof of purchase.
Contact information may be found on the product packaging or the retailer's website where the product was purchased.