
1. Introduction
Thank you for choosing the Bukumo 8.2 Cuft Extra Large Fireproof Safe Box. This safe is designed to provide secure storage for your valuables, offering protection against fire, water, and unauthorized access. Please read this manual thoroughly before operating your safe to ensure proper use and to maximize its security features.
Key Features:
- Extra-large capacity (8.2 Cuft) for various valuables.
- Heavy-duty alloy steel construction with a 65mm thick pry-resistant door.
- Fireproof and waterproof document bag included for enhanced protection.
- Dual unlocking methods: digital keypad and emergency keys.
- Internal cabinet and hidden lock box for additional security and privacy.
- Removable shelf for flexible storage organization.
- Dual security alarm system for unauthorized access attempts.

Image 1.1: Bukumo 8.2 Cuft Extra Large Fireproof Safe Box with its door open, revealing various items like passports, jewelry, and cash, alongside the included fireproof bag.
2. Package Contents
Before proceeding with setup, please verify that all components are present:
- 1 x Bukumo 8.2 Cuft Home Safe
- 1 x Fireproof Bag (A4 size)
- 2 x Emergency Keys
- 2 x Hidden Safe Keys (for inner cabinet)
- 2 x Inner Cabinet Keys
- 4 x Foot Pads
- 1 x User Manual (this document)

Image 2.1: An illustration showing all items included in the Bukumo safe package.
3. Setup Instructions
3.1 Unpacking and Placement
- Carefully remove the safe from its packaging. Due to its weight (approximately 83 pounds), it is recommended to have assistance during this process.
- Place the safe on a flat, stable surface. The safe is designed as a freestanding unit and does not feature an anchoring design.
- Attach the four foot pads to the bottom of the safe to prevent scratching surfaces and provide stability.
3.2 Battery Installation
The digital keypad requires 4*AAA batteries (not included) for operation. The battery compartment is located externally to allow for battery replacement even if the safe is locked.
- Locate the external battery case on the keypad panel.
- Slide open the battery compartment cover.
- Insert 4*AAA batteries, ensuring correct polarity (+/-).
- Close the battery compartment cover securely.
3.3 Initial Opening and Passcode Setup
For the first use, or if you forget your passcode, the safe can be opened using the emergency key.
- Using the Emergency Key: Remove the cover on the keypad panel to reveal the emergency keyhole. Insert one of the emergency keys and turn it clockwise while simultaneously turning the handle to open the safe door.
- Once the safe is open, locate the reset button on the inside of the door.
- Press the reset button. The keypad will emit a beep, and an indicator light will illuminate.
- On the keypad, enter your desired 3-8 digit passcode, then press the '#' key to confirm. The indicator light will turn off, confirming the new passcode is set.
- Test the new passcode with the door open before closing it. Enter your passcode, then press '#' and turn the handle.
Image 3.1: Visual guide for opening the safe using either the digital keypad or the emergency key.
4. Operating Instructions
4.1 Opening the Safe with Passcode
- Enter your 3-8 digit passcode on the digital keypad.
- Press the '#' key.
- Within 5 seconds, turn the handle clockwise to open the safe door.
4.2 Closing and Locking the Safe
- Close the safe door firmly.
- Turn the handle counter-clockwise until it is fully engaged. The safe is now locked.
4.3 Using Internal Storage
The safe features an inner cabinet, a bottom hidden lock box, and a removable shelf for organized storage.
- Inner Cabinet: Located at the top, this cabinet provides an additional layer of security for smaller, highly sensitive items. It is secured with its own key.
- Bottom Hidden Lock Box: A discreet compartment at the bottom of the safe, also secured with its own key, ideal for privacy.
- Removable Shelf: The main compartment includes a removable shelf. This can be adjusted or removed to accommodate items of varying sizes, such as laptops, documents, or firearms.
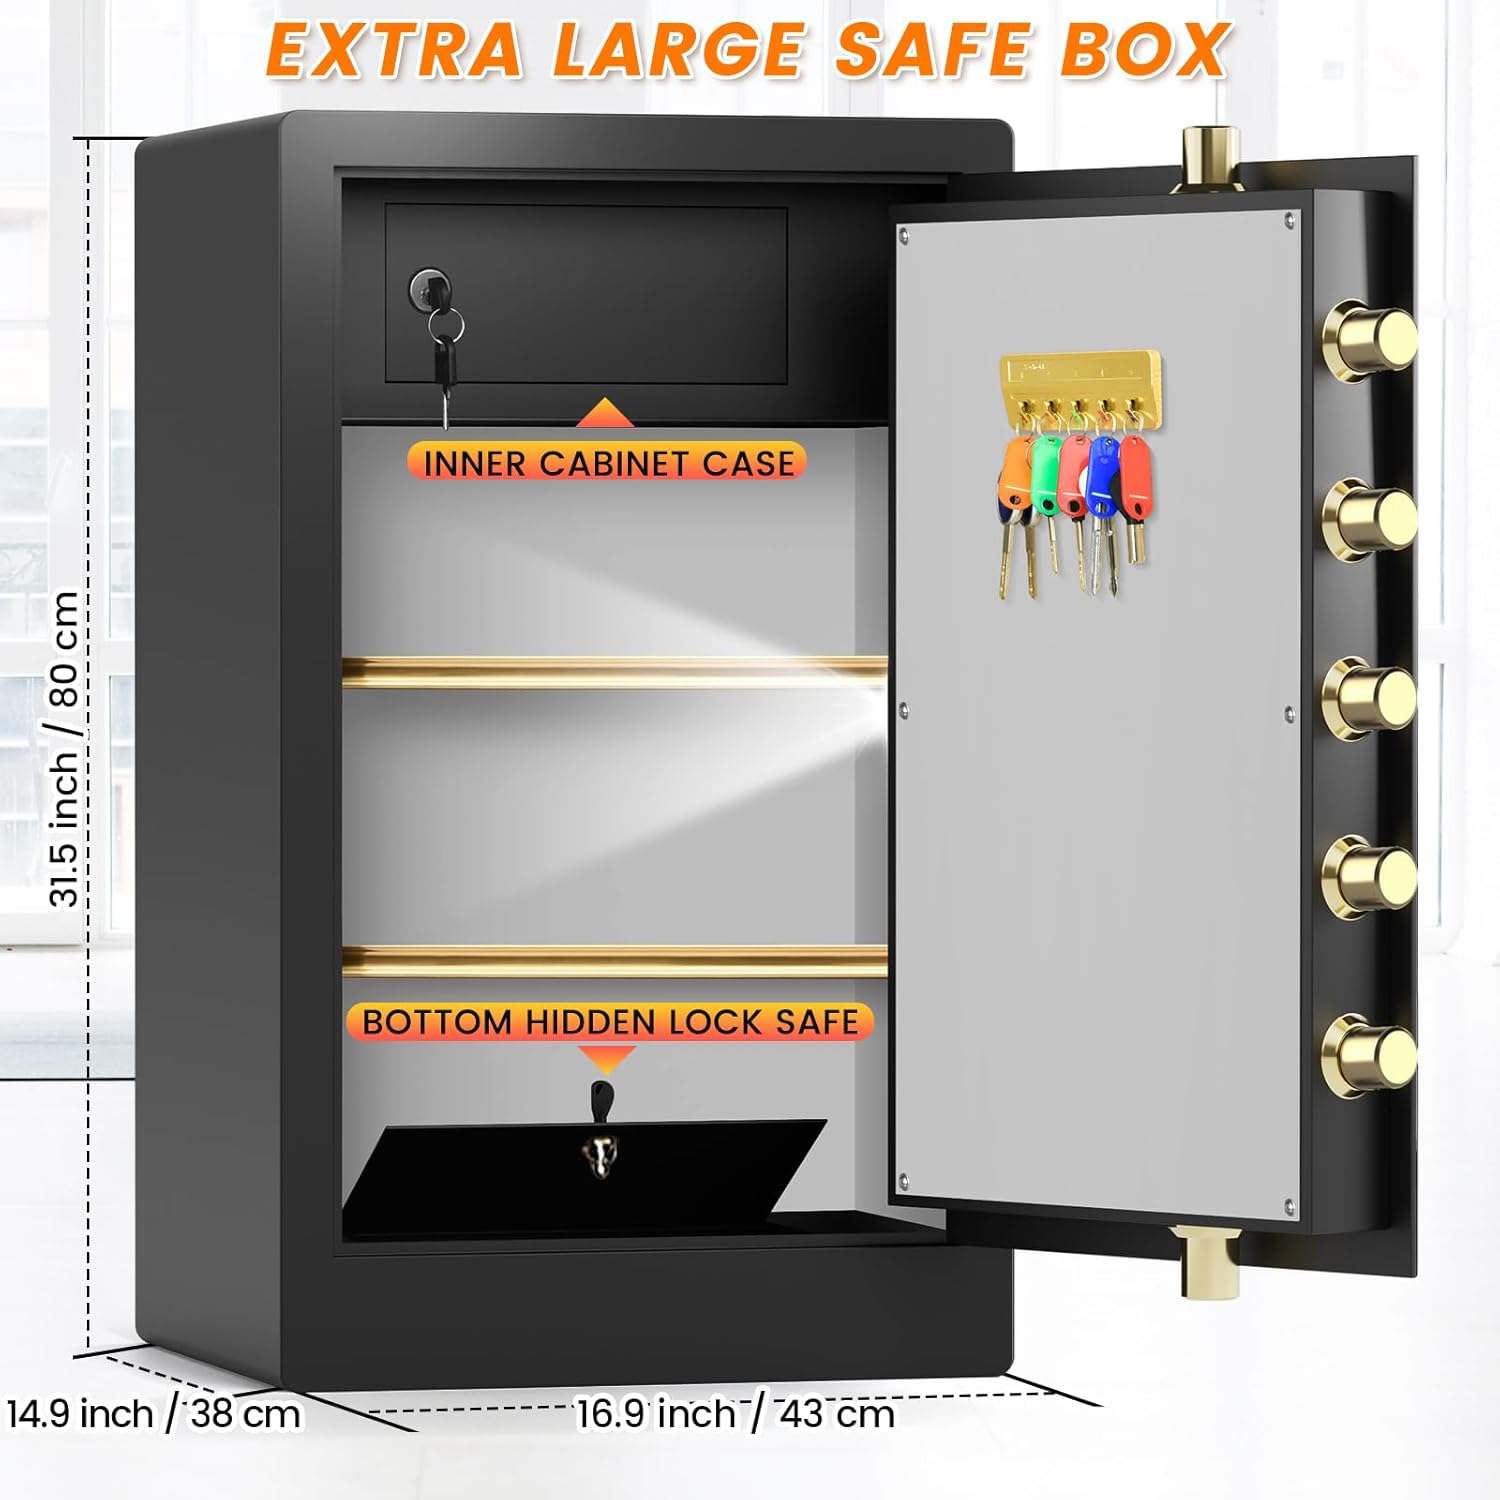
Image 4.1: Internal layout of the safe, highlighting the inner cabinet and hidden lock box.

Image 4.2: The safe's interior demonstrating the flexibility of the removable shelf for different storage needs.
4.4 Fireproof and Waterproof Bag
The included fireproof and waterproof document bag provides an extra layer of protection for critical documents, cash, and jewelry against fire and water damage. Place important paper documents inside this bag before storing them in the safe.

Image 4.3: The safe's fire and water resistance, featuring the fireproof bag.
5. Security Features
5.1 Heavy-Duty Construction
The safe is constructed from 65mm ultra-thick alloy steel, featuring 7*30mm high-strength solid core lock bolts, pry-resistant concealed hinges, and a recessed door. This design provides robust physical protection against forced entry.

Image 5.1: Details of the safe's anti-theft construction, including door thickness and lock bolts.
5.2 Dual Security Alarm System
The safe is equipped with a dual alarm system to deter unauthorized access:
- Incorrect Passcode Alarm: If an incorrect passcode is entered 3 times consecutively, the system will lock for 20 seconds. If an incorrect passcode is entered 6 times consecutively, it will lock for 5 minutes.
- Violent Vibration Alert: The safe will trigger an alarm if it detects violent vibrations or attempts to move it.

Image 5.2: Illustration of the safe's anti-theft alarm system.
6. Maintenance
6.1 Battery Replacement
Replace the 4*AAA batteries in the external battery case when the keypad indicator light dims or fails to respond. Always use fresh, high-quality batteries.
6.2 Cleaning
Wipe the exterior of the safe with a soft, damp cloth. Avoid using abrasive cleaners or solvents that could damage the finish.
6.3 Key Management
Store emergency keys and inner cabinet keys in a secure location away from the safe. Do not store them inside the safe.
7. Troubleshooting
- Safe will not open with passcode:
- Ensure batteries are fresh and correctly installed.
- Verify you are entering the correct passcode.
- If the keypad is locked due to multiple incorrect entries, wait for the lockout period to expire.
- Use the emergency key to open the safe if the passcode is forgotten or batteries are completely dead.
- Keypad is unresponsive:
- Replace the batteries.
- Ensure the battery compartment is closed securely.
- Alarm sounds unexpectedly:
- Check for any accidental impacts or movements that might have triggered the vibration sensor.
- Ensure no one is attempting to open the safe with an incorrect passcode.
- Lost Emergency Key: In case the emergency key is lost, contact customer support with your keyhole number (usually engraved near the keyhole) for a potential replacement.
8. Specifications
| Feature | Specification |
|---|---|
| Brand | Bukumo |
| Model | 8.2 Cuft |
| Product Dimensions (D x W x H) | 14.9"D x 16.9"W x 31.5"H |
| Item Weight | 76 Pounds (approx. 83 pounds in some descriptions) |
| Lock Type | Electronic Combination Lock |
| Material | Alloy Steel |
| Special Features | Alarm System, Anti-Theft, Combination Lock, Removable Shelf, Sensor Light |
| Mounting Type | No anchoring design (freestanding) |
| Water Resistance Level | Water Resistant (with included bag for documents) |
9. Warranty and Support
For any questions, technical assistance, or warranty claims, please contact Bukumo customer support. Refer to your purchase documentation for specific contact details. When contacting support, please have your model number and any relevant purchase information ready.