
MAXLANDER ML8A213
MAXLANDER 40V 4-in-1 Multi-Tool Kit Instruction Manual
Model: ML8A213
1. General Safety Information
WARNING: Always wear appropriate personal protective equipment (PPE) including safety glasses, gloves, and hearing protection when operating this tool. Keep hands and feet away from blades and moving parts. Do not use near flammable materials. Ensure children and bystanders are kept at a safe distance. Avoid contact with moving parts during operation and maintenance.
Read and understand all instructions before operating the MAXLANDER 40V 4-in-1 Multi-Tool Kit. Failure to follow all instructions listed below may result in electric shock, fire, and/or serious personal injury.
2. Product Overview
The MAXLANDER 40V 4-in-1 Multi-Tool Kit provides a versatile solution for various outdoor tasks. This cordless system includes interchangeable attachments for string trimming, edging, pole sawing, hedge trimming, and brush cutting. It is powered by two 20V 4.0Ah Lithium-Ion batteries for extended runtime.

Figure 2.1: Overview of MAXLANDER 40V 4-in-1 Multi-Tool Kit components, including the power head, 2x20V batteries, 14-inch string trimmer, 10-inch brush cutter, 16-inch pole hedge trimmer, and 8-inch pole saw.
Included Components:
- 40V Power Head (requires two 20V batteries)
- Two 20V 4.0Ah Lithium-Ion Batteries
- Battery Charger
- String Trimmer/Edger Attachment (14-inch cutting width)
- Brush Cutter Attachment (10-inch cutting swath, 3T blade)
- Hedge Trimmer Attachment (16-inch blade, adjustable angles)
- Pole Saw Attachment (8-inch bar, automatic oiler)
- Auxiliary Handle
- Shoulder Strap
- Necessary assembly tools (screwdriver, wrench, hex keys)
3. Setup and Assembly
Before initial use, ensure all components are present and undamaged. Follow the assembly instructions carefully.
3.1. Attaching the Auxiliary Handle
- Loosen the clamp on the auxiliary handle.
- Slide the handle onto the main shaft of the power head.
- Adjust the handle to a comfortable operating position.
- Tighten the clamp securely.

Figure 3.1: The auxiliary handle is attached to the main shaft for improved control and comfort during operation.
3.2. Assembling the String Trimmer/Brush Cutter
The string trimmer and brush cutter share the same attachment head. You can switch between the string spool and the 3T metal blade.
- Attach the protective guard to the trimmer head using the provided screws and screwdriver. Ensure the blade cutting line is properly installed on the guard.
- To install the 3T metal blade: Insert the screw into the designated hole on the shaft to prevent rotation. Place the blade onto the shaft, followed by the washer and nut. Tighten securely with the provided wrench. ATTENTION: The screw must be inserted to prevent rotation during tightening.
- To install the string trimmer spool: Remove the 3T metal blade components. Place the string trimmer spool onto the shaft. Insert the screw into the designated hole on the shaft to prevent rotation. Tighten the spool securely.
- Connect the assembled trimmer head to the power head by aligning the shafts and securing the quick-connect mechanism.

Figure 3.2: The 14-inch string trimmer attachment is ideal for cutting grass and light weeds.

Figure 3.3: The 10-inch brush cutter with a 3T blade is designed for tougher weeds and overgrowth.
3.3. Assembling the Hedge Trimmer
- Connect the hedge trimmer attachment to the power head by aligning the shafts and securing the quick-connect mechanism.
- The hedge trimmer head features multiple adjustable angles (0°-180°). Adjust the angle by pressing the release button and rotating the head to the desired position. Ensure it locks securely before use.

Figure 3.4: The 16-inch electric hedge trimmer is suitable for shaping shrubs and hedges.
3.4. Assembling the Pole Saw
- Install the saw chain onto the guide bar, paying close attention to the direction of the chain teeth. If the direction is reversed, the saw will not cut effectively.
- Attach the guide bar with the chain to the pole saw head. Secure the cover and tighten the nuts.
- Adjust the chain tension using the tensioning screw. The chain should be snug but still able to be pulled freely by hand.
- Fill the oil reservoir with appropriate bar and chain oil. The pole saw features an automatic lubrication system.
- Connect the assembled pole saw attachment to the power head by aligning the shafts and securing the quick-connect mechanism.

Figure 3.5: The 8-inch pole saw is designed for pruning high branches.
3.5. Video Guide for Assembly
Video 3.1: Detailed assembly instructions for the Weed Wacker (Brush Cutter Blade + Spool Trimmer Lines), Hedge Trimmer, and Pole Saw attachments. This video demonstrates step-by-step how to connect each tool head to the main power unit and prepare them for use.
4. Operating Instructions
4.1. Battery Installation and Charging
- Insert two fully charged 20V 4.0Ah Lithium-Ion batteries into the battery compartments on the power head until they click into place.
- To charge the batteries, place them into the provided charger. The indicator lights on the charger will show the charging status.
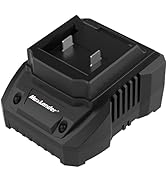
Figure 4.1: The MAXLANDER fast charger is designed to efficiently charge the 20V Lithium-Ion batteries.
4.2. Starting and Stopping the Tool
- Ensure the desired attachment is securely connected and the batteries are installed.
- To start, slide the safety switch (located near the trigger) to either the left or right position.
- Press the trigger to activate the tool.
- To stop, release the trigger. The safety switch will automatically return to the center position.
4.3. Using the String Trimmer/Edger
For string trimming, hold the tool with both hands, keeping the trimmer head parallel to the ground. Move the trimmer in a sweeping motion to cut grass. For edging, rotate the trimmer head 90 degrees (if applicable) and guide it along the edge of your lawn or pathway.

Figure 4.2: The string trimmer effectively cuts grass and light vegetation, offering two modes for different lawn maintenance needs.
4.4. Using the Brush Cutter
When using the brush cutter, maintain a firm grip on the tool. Use a controlled, sweeping motion to cut through thicker brush and dense weeds. Be aware of kickback and ensure no bystanders are in the cutting area.
4.5. Using the Hedge Trimmer
Adjust the hedge trimmer head to the most suitable angle for the task. Use smooth, even strokes to trim hedges and shrubs. Avoid cutting branches thicker than the recommended capacity of the blade.
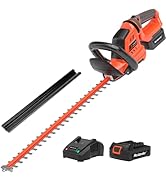
Figure 4.3: The hedge trimmer's adjustable head allows for precise trimming of various hedge shapes and heights.
4.6. Using the Pole Saw
Extend the pole saw to the required length for reaching high branches. Ensure the chain is properly tensioned and the oil reservoir is filled. Position the saw blade against the branch and allow the saw to cut through with minimal pressure. Avoid cutting branches that are too thick or unstable.
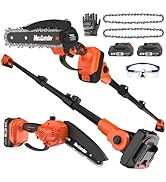
Figure 4.4: The pole saw features an integrated lubrication system to ensure smooth operation and extend chain life.
5. Maintenance
Regular maintenance ensures optimal performance and extends the life of your MAXLANDER Multi-Tool Kit.
5.1. General Cleaning
- Always remove batteries before cleaning or performing maintenance.
- Clean the tool and attachments after each use. Wipe down surfaces with a damp cloth.
- Remove any grass, debris, or sap from blades and vents.
5.2. Blade and Chain Care
- String Trimmer: Replace the string trimmer line when it becomes short or worn. Refer to the manual for specific line diameter and replacement instructions.
- Brush Cutter: Inspect the metal blade for sharpness and damage. Sharpen or replace as needed.
- Hedge Trimmer: Keep the hedge trimmer blades sharp and free of debris. Apply a light coat of oil to the blades after each use to prevent rust.
- Pole Saw: Regularly check chain tension and adjust as necessary. Keep the chain sharp and lubricated. Replace the chain when it becomes dull or damaged beyond sharpening.
5.3. Battery Care
- Store batteries in a cool, dry place away from direct sunlight and extreme temperatures.
- Do not store batteries in a discharged state for extended periods. Charge them periodically.
- Use only MAXLANDER approved chargers and batteries.
6. Troubleshooting
If you encounter issues with your MAXLANDER Multi-Tool Kit, refer to the following common problems and solutions:
| Problem | Possible Cause | Solution |
|---|---|---|
| Tool does not start | Batteries not installed correctly Batteries discharged Safety switch not engaged Trigger not fully pressed | Ensure batteries are fully seated Charge batteries fully Slide safety switch to operating position Press trigger completely |
| Poor cutting performance | Dull blade/chain/line Incorrect cutting technique Overgrown material | Sharpen or replace blade/chain/line Review operating instructions Cut smaller sections at a time |
| Excessive vibration | Damaged or unbalanced blade/spool Loose attachment | Inspect and replace damaged parts Ensure all attachments are securely fastened |
| Pole saw chain not lubricating | Oil reservoir empty Oil port clogged | Refill oil reservoir Clean oil port |
7. Specifications
| Feature | Specification |
|---|---|
| Brand | MAXLANDER |
| Power Source | Battery Powered (2x20V) |
| Item Model Number | ML8A213 |
| Item Weight | 7.48 pounds |
| Product Dimensions | 40"L x 10"W |
| Cutting Width (String Trimmer) | 14 Inches |
| Cutting Swath (Brush Cutter) | 10 Inches |
| Blade Length (Hedge Trimmer) | 16 Inches |
| Bar Length (Pole Saw) | 8 Inches |
| Batteries | 2 Lithium Ion batteries required (included) |
| Assembly Required | Yes |
8. Warranty and Support
For warranty information, please refer to the documentation included with your product or contact MAXLANDER customer support. Optional protection plans are available for purchase:
- 2-Year Protection Plan
- 3-Year Protection Plan
For technical assistance, replacement parts, or any questions regarding your MAXLANDER 4-in-1 Multi-Tool Kit, please visit the official MAXLANDER website or contact their customer service department.
Ask a question about this manual
Ask about setup, troubleshooting, compatibility, parts, safety, or missing instructions. Manuals+ will review the question and use this page’s manual context to help answer it.