
Docreate Docreate-757
Docreate Spot Welder Instruction Manual
Model: Docreate-757
1. Introduction
This instruction manual provides detailed guidance for the safe and effective operation of your Docreate LCD 99 Gear Adjustable Handheld Spot Welder. Designed for portability and precision, this device is ideal for 18650 lithium battery assembly, lithium iron phosphate battery assembly, cell phone repair, and electric car repair. Please read this manual thoroughly before use to ensure optimal performance and safety.
2. Key Features
- Portable Design: Lightweight and compact (143.6 grams, 7.72 x 1.62 x 1.62 inches), with replaceable needles and cordless operation for indoor and outdoor use.
- LCD Display: Features a color LCD screen showing temperature, mode selection, preheat time, trigger time, power level, and battery status. Includes an intelligent internal temperature detection system.
- Powerful Double Pulse: Offers 99 adjustable gears, capable of welding nickel-plated sheets from 0.10mm to 0.25mm thickness.
- Dual Operating Modes:
- Automatic Mode: Welding pins automatically trigger when placed on the desired position. Recommended welding angle: 45°-60° to the welding surface.
- Manual Mode: Adjust parameters, place pins, then press the side welding button to initiate welding.
- Multi-functionality: Suitable for home use, outdoor small welding tasks, battery repair, and DIY projects.

Figure 2.1: The Docreate handheld spot welder with its LCD display and included accessories.
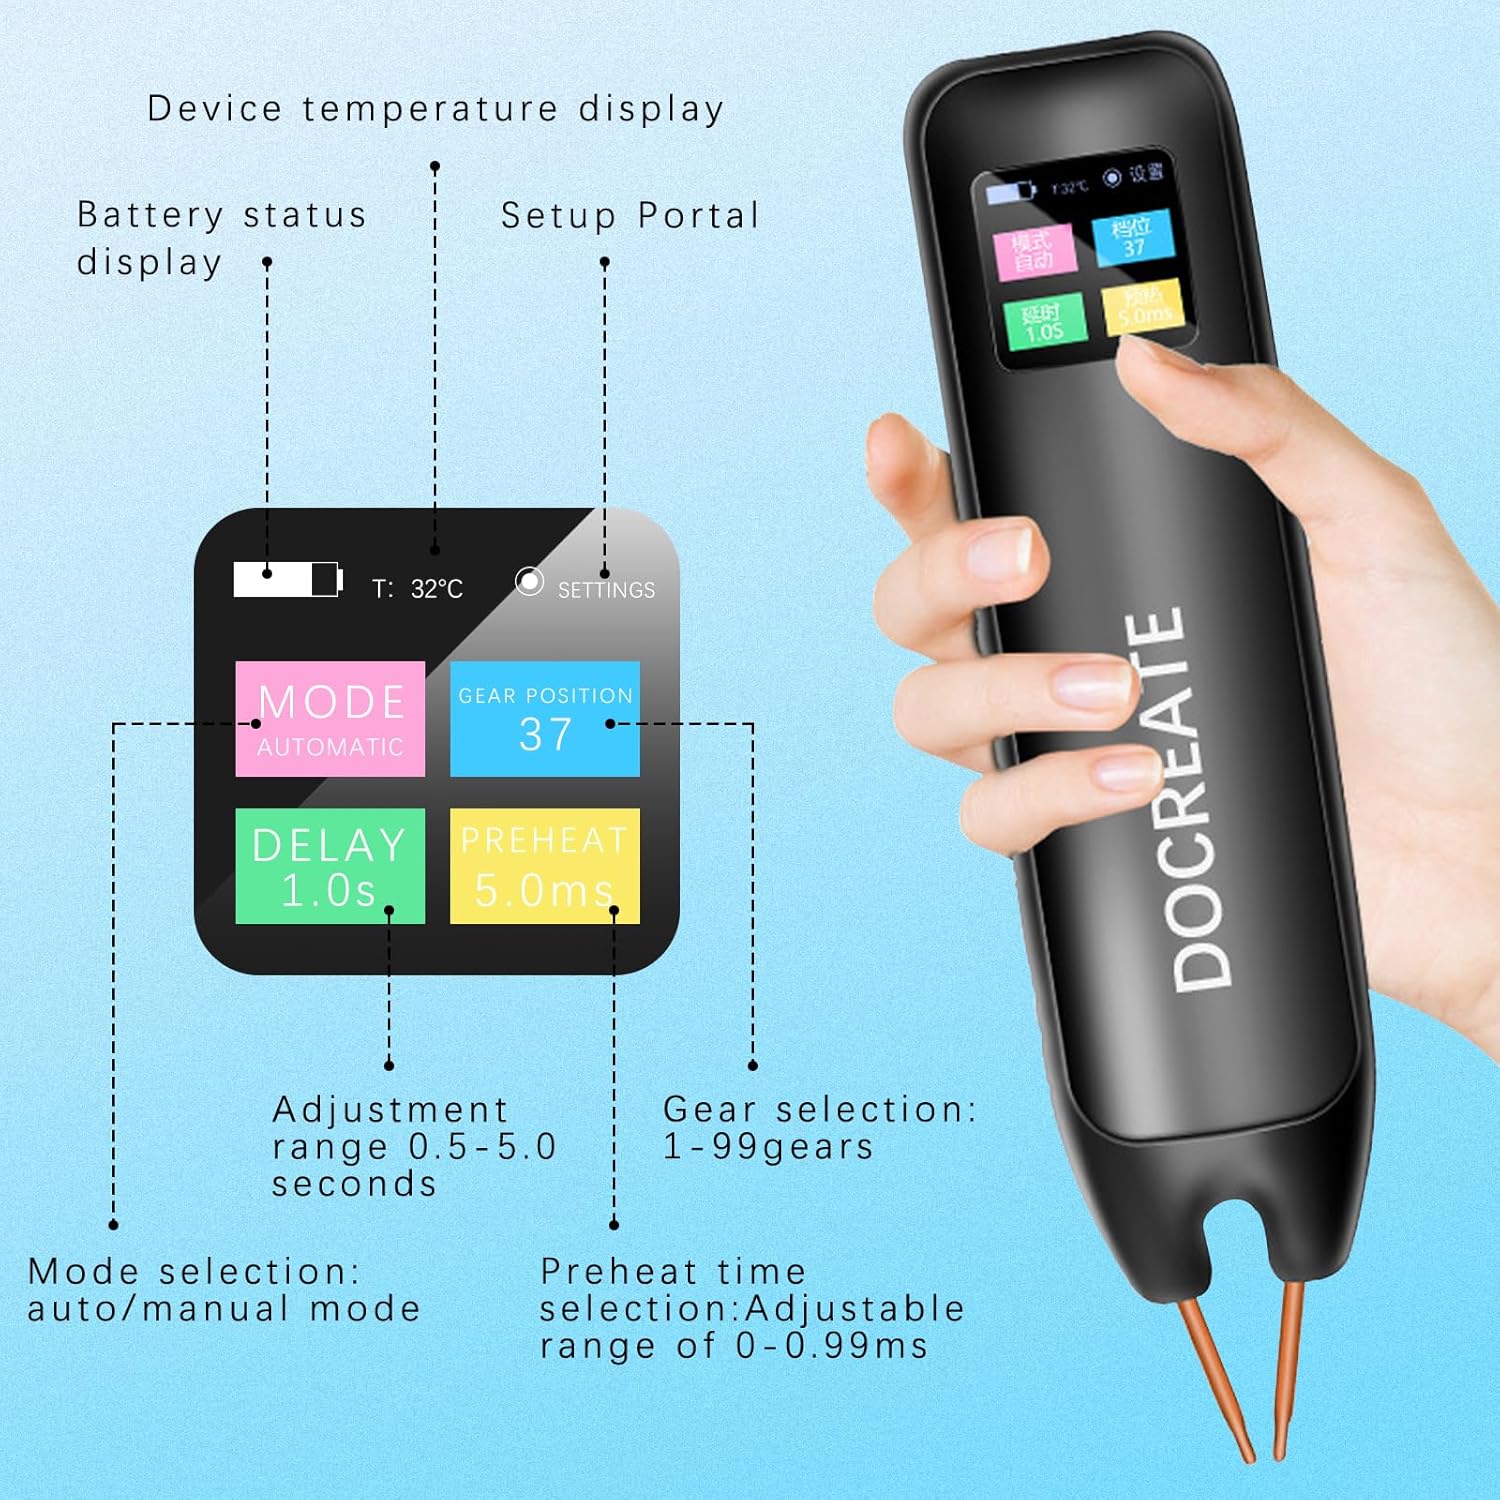
Figure 2.2: Detailed view of the LCD display, highlighting temperature, battery status, mode selection, delay, preheat time, and gear selection.
3. Package Contents
Verify that all items are present in your package:
- 1 x Docreate Spot Welder Unit
- 2 meters x Nickel Rolls
- 1 x Sandpaper
- 1 x Type-C Charging Cable
- 1 x Pen Cap
- 2 x Copper Pins (Welding Needles)
- 1 x Instruction Manual

Figure 3.1: Overview of the complete accessory set provided with the spot welder.
4. Setup
- Initial Charge: Before first use, fully charge the spot welder using the provided Type-C charging cable. Connect the cable to the device and a compatible USB power adapter. The LCD display will indicate charging status.
- Install Welding Needles: Insert the copper pins (welding needles) into the designated slots at the tip of the spot welder. Ensure they are securely seated.
- Power On: Press and hold the power button (usually on the side) to turn on the device. The LCD display will illuminate.
- Prepare Workpiece: Ensure the nickel strip and battery terminals are clean and free of oxidation. Use the included sandpaper if necessary to lightly abrade the surfaces for better conductivity.
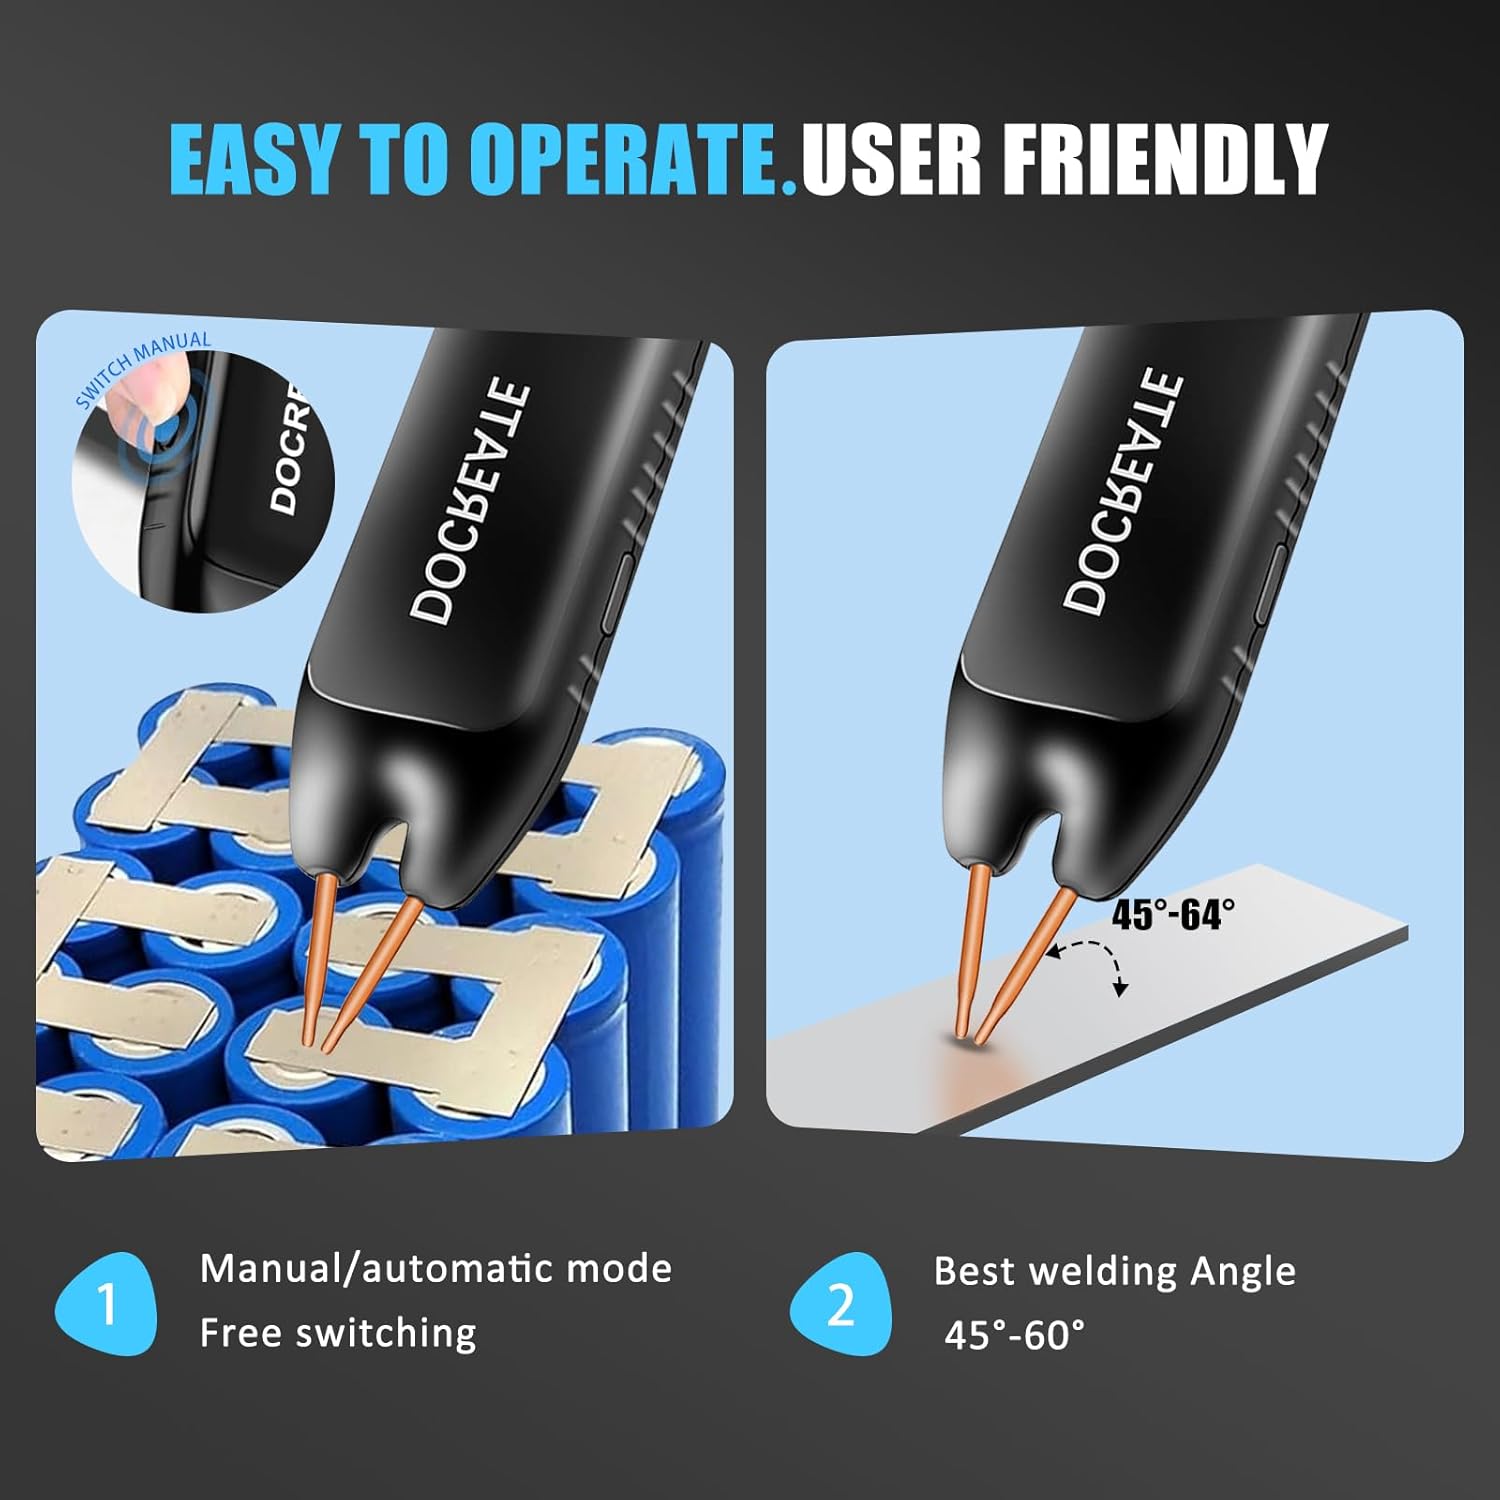
Figure 4.1: Charging the spot welder via its Type-C port.
5. Operating Instructions
5.1. Navigating the LCD Display
The color LCD display provides real-time information and allows for parameter adjustments:
- Temperature Display: Shows the internal temperature of the device.
- Mode Selection: Switch between Automatic and Manual welding modes.
- Preheat Time: Adjustable range (e.g., 0-0.99ms) to prepare the welding area.
- Trigger Time (Delay): Adjustable range (e.g., 0.5-5.0 seconds) for automatic mode.
- Power Level (Gear Selection): Choose from 1-99 gears to adjust welding intensity. Higher gears provide stronger welds.
- Power Display: Indicates remaining battery power.

Figure 5.1: Understanding the various functions and adjustable parameters on the LCD screen.
5.2. Welding Procedure
Follow these steps for effective spot welding:
- Select Mode: Use the controls to select either Automatic or Manual mode based on your preference.
- Adjust Parameters: Set the desired gear (power level), preheat time, and trigger time (delay) according to the thickness of the nickel sheet and the material being welded. Experiment with lower settings first.
- Position Welding Pins: Place both welding pins firmly onto the nickel strip, ensuring good contact with the battery terminal underneath. The recommended welding angle is 45°-60° to the welding surface for optimal results.
- Initiate Weld:
- Automatic Mode: The weld will automatically trigger after the set delay once both pins make proper contact.
- Manual Mode: Press the welding button located on the side of the device to initiate the weld.
- Inspect Weld: After each weld, visually inspect the connection to ensure it is strong and secure.

Figure 5.2: The integrated design of the Docreate spot welder offers enhanced ease of use compared to traditional setups.

Figure 5.3: Proper technique for spot welding, emphasizing the 45° angle and ensuring both pins touch the surface.

Figure 5.4: Switching between manual and automatic modes and the recommended welding angle for best results.

Figure 5.5: The 99-gear adjustment allows for precise control over welding thickness, up to 0.25mm.
6. Maintenance
- Cleaning: Regularly clean the welding pins and the device body with a dry, soft cloth. Ensure no metal dust or debris accumulates around the welding tips.
- Needle Replacement: The copper pins are replaceable. If they become worn or damaged, replace them with new ones to maintain welding quality.
- Storage: Store the spot welder in a cool, dry place, away from direct sunlight and moisture. Keep it out of reach of children.
- Battery Care: For long-term storage, ensure the battery is charged to approximately 50-60% to prolong its lifespan. Recharge periodically if not used for extended periods.
7. Troubleshooting
| Problem | Possible Cause | Solution |
|---|---|---|
| Weak or inconsistent welds | Low battery charge, incorrect gear setting, dirty welding pins/workpiece, poor contact. | Fully charge the device. Increase the gear setting. Clean welding pins and workpiece with sandpaper. Ensure firm and proper contact of both pins at the correct angle. |
| Device does not power on | Battery completely discharged, faulty charging cable/adapter. | Connect to charger and allow sufficient time for charging. Try a different Type-C cable and power adapter. |
| Overheating warning on LCD | Continuous use without cooling, high ambient temperature. | Stop welding and allow the device to cool down. Operate in a well-ventilated area. |
| Automatic mode not triggering | Insufficient contact with workpiece, delay setting too long. | Ensure both pins make firm and simultaneous contact. Adjust the trigger time (delay) to a shorter duration. |
8. Specifications
| Attribute | Value |
|---|---|
| Brand | Docreate |
| Model Number | Docreate-757 |
| Item Weight | 9.9 ounces (approx. 280g) |
| Product Dimensions | 7.72 x 1.62 x 1.62 inches |
| Power Source | Battery Powered |
| Adjustable Gears | 99 Gears |
| Welding Thickness | 0.1-0.25mm (Nickel-plated sheets) |
| Battery Capacity | 3000mAh (Inferred from A+ content image) |
| Charging Port | Type-C |
| Country of Origin | China |
9. Safety Information
Always adhere to the following safety precautions when operating the spot welder:
- Wear appropriate personal protective equipment (PPE), including safety glasses, to protect against sparks and debris.
- Ensure the work area is well-ventilated to disperse any fumes.
- Do not touch the welding pins or the welded area immediately after welding, as they will be hot.
- Keep the device away from flammable materials.
- Do not attempt to weld materials thicker than specified or materials not intended for spot welding.
- Keep the device out of reach of children and untrained individuals.
- Do not disassemble or modify the device. Refer to qualified personnel for repairs.
- Avoid short-circuiting the welding pins.
10. Warranty and Support
For warranty information, technical support, or service inquiries, please contact Docreate customer service through the retailer where the product was purchased or refer to the contact details provided in the product packaging. Keep your purchase receipt as proof of purchase.
While specific warranty details are not provided in this manual, general protection plans may be available through your retailer. Please consult your point of purchase for details on available protection plans.
Related documentsDocreate-757


Ask a question about this manual
Ask about setup, troubleshooting, compatibility, parts, safety, or missing instructions. Manuals+ will review the question and use this page’s manual context to help answer it.