
1. Introduction
This manual provides comprehensive instructions for the installation, operation, and maintenance of the Aoleaby UTH-170 Digital High-Power Electric Heating Film Temperature Controller Module. Please read this manual thoroughly before using the device to ensure safe and efficient operation.
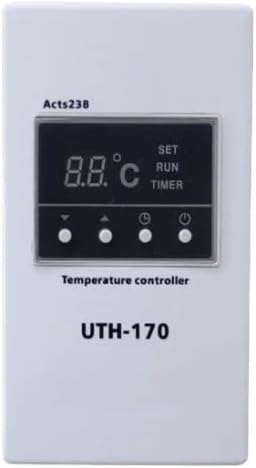
Figure 1: Front view of the Aoleaby UTH-170 Digital Temperature Controller Module, showing the digital display, control buttons, and model number.
2. Safety Information
Always observe the following safety precautions to prevent injury or damage to the device:
- Ensure the power supply matches the device's specifications.
- Do not operate the device in wet or damp conditions.
- Disconnect power before performing any installation, wiring, or maintenance.
- Only qualified personnel should perform electrical wiring.
- Keep the device away from flammable materials.
- Do not attempt to modify or repair the device yourself. Contact support if service is required.
3. Product Overview
The Aoleaby UTH-170 is a digital temperature controller module designed for high-power electric heating film and plate applications. It offers precise temperature control with a user-friendly interface.
Key Features:
- Easy to Operate: User-friendly interface for straightforward control.
- Fast Response: Capable of quick temperature adjustments and readings.
- High Stability: Designed for stable operation over extended periods.
- Data Recording and Analysis: Supports temperature data recording, export, and analysis.
4. Package Contents
Upon opening the package, please verify that all items are present and undamaged:
- UTH-170 Digital Temperature Controller Module (1 unit)
- User Manual (this document)
- (Additional accessories such as temperature probes or mounting hardware may vary by package and should be checked against your specific product listing.)
5. Setup
5.1. Installation
- Choose a suitable mounting location that is dry, well-ventilated, and free from excessive vibration or heat.
- Ensure adequate space around the module for proper heat dissipation and access to wiring terminals.
- Mount the controller securely using appropriate fasteners (not included).
5.2. Wiring Diagram
Important: All wiring should be performed by a qualified electrician and with the power supply disconnected.
Connect the power input, heating element, and temperature sensor according to the wiring diagram provided on the device casing or in supplementary documentation. Ensure all connections are secure and correctly polarized.
5.3. Initial Power-On
- After completing all wiring, carefully restore power to the module.
- The digital display should illuminate, showing the current temperature or a default setting.
- Observe the display for any error codes or unusual behavior.
6. Operating Instructions
The UTH-170 features a digital display and several control buttons for easy operation.
6.1. Control Buttons Overview
- SET: Used to enter setting mode and confirm selections.
- UP Arrow (▲): Increases values or navigates menu options.
- DOWN Arrow (▼): Decreases values or navigates menu options.
- TIMER: Activates or adjusts timer functions.
- POWER (⏻): Turns the device on or off.
6.2. Power On/Off
Press the POWER (⏻) button to turn the controller on or off. The display will show the current status.
6.3. Setting the Target Temperature
- Press the SET button once to enter temperature setting mode. The current target temperature will flash.
- Use the UP Arrow (▲) or DOWN Arrow (▼) buttons to adjust the target temperature to your desired value.
- Press the SET button again to confirm the setting and exit setting mode. The display will return to showing the current temperature.
6.4. Timer Function
The UTH-170 includes a timer function for scheduled operation.
- Press the TIMER button to access timer settings.
- Use the UP Arrow (▲) or DOWN Arrow (▼) buttons to set the desired timer duration or schedule.
- Press the TIMER button again to confirm and activate the timer.
- Refer to the detailed timer programming section in the supplementary documentation for advanced timer configurations.
7. Maintenance
7.1. Cleaning
- Ensure the device is powered off and disconnected from the power source before cleaning.
- Wipe the exterior of the controller with a soft, dry cloth.
- Do not use abrasive cleaners, solvents, or spray liquids directly onto the device.
7.2. Storage
If storing the device for an extended period, ensure it is kept in a cool, dry place, away from direct sunlight and extreme temperatures.
8. Troubleshooting
This section addresses common issues you might encounter with the UTH-170 controller.
| Problem | Possible Cause | Solution |
|---|---|---|
| Device does not power on | No power supply; Loose wiring; Blown fuse | Check power connection; Verify wiring; Replace fuse if necessary. |
| Incorrect temperature reading | Faulty sensor; Sensor not properly connected; Sensor placed incorrectly | Check sensor connection; Ensure sensor is correctly positioned; Replace sensor if damaged. |
| Heating element not activating | Wiring issue; Heating element fault; Temperature setting too low | Verify heating element wiring; Test heating element; Adjust target temperature higher than current. |
| Display shows error code | Internal fault; Sensor error | Note the error code and consult the full product documentation or contact customer support. |
9. Specifications
Technical specifications for the Aoleaby UTH-170 Digital Temperature Controller Module:
| Specification | Value |
|---|---|
| Model Number | UTH-170 |
| Brand | Aoleaby |
| Package Dimensions | 1.18 x 0.79 x 0.39 inches |
| Item Weight | 1.32 pounds |
| Manufacturer | Aoleaby |
| Assembly Required | No |
| Number of Pieces | 1 |
10. Warranty and Support
For warranty information, technical support, or service inquiries, please refer to the product packaging or contact your retailer. Keep your purchase receipt as proof of purchase.