
1. Introduction
This manual provides essential information for the proper installation, operation, and maintenance of the Generic Relay No.219, part number 443951253AA. This relay is designed for use in specific Audi and Volkswagen vehicle applications. Please read this manual thoroughly before attempting any installation or service.
2. Safety Information
Always observe the following safety precautions when working with automotive electrical components:
- Disconnect the vehicle's battery before installing or removing any electrical components to prevent electrical shock or damage to the vehicle's systems.
- Ensure the ignition is off and the vehicle is in park with the parking brake engaged.
- Wear appropriate personal protective equipment, such as safety glasses and gloves.
- If you are unsure about any installation steps, consult a qualified automotive technician.
- Do not attempt to modify the relay or its wiring.
3. Product Overview
The Relay No.219 (part number 443951253AA, also known as 443 951 253 AA) is an automotive electrical relay. Relays are electromechanical switches that allow a low-power signal to control a high-power circuit. This specific relay is designed to meet the performance and reliability standards for its intended applications in Audi and VW vehicles.
Key features include:
- Tested before leaving the factory.
- Strict quality control standards.
- Stable performance and high reliability.
- Easy to install.
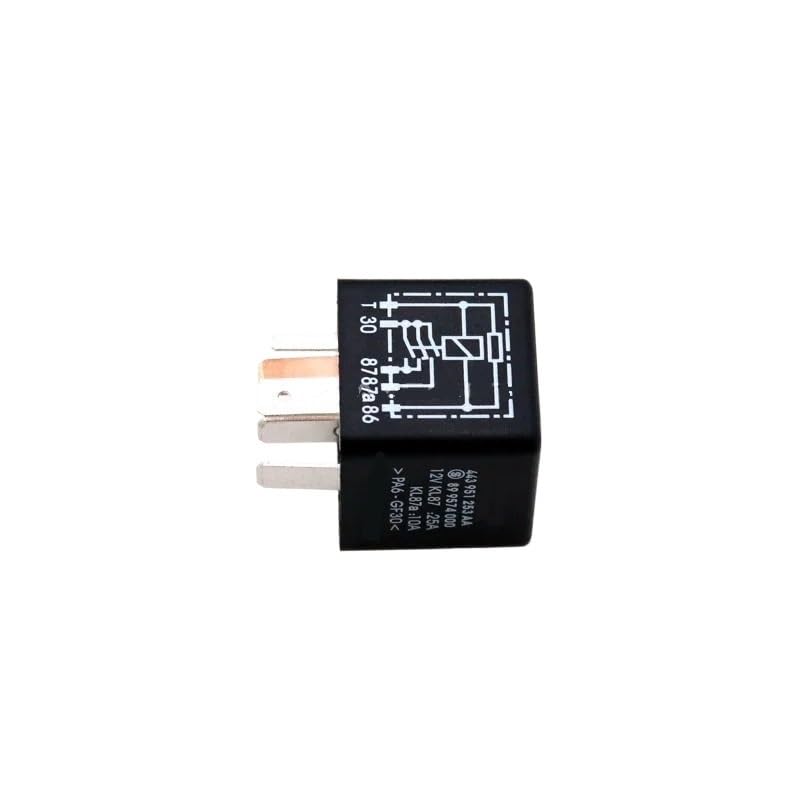
Figure 3.1: Generic Relay No.219 with indicated dimensions (approximately 30.6mm x 30.6mm x 40.3mm).
4. Setup and Installation
Proper installation is crucial for the correct function and longevity of the relay. Always refer to your vehicle's specific service manual for the exact location and procedure for replacing the No.219 relay.
4.1. Pre-Installation Steps
- Ensure the vehicle's ignition is off.
- Disconnect the negative terminal of the vehicle's battery to prevent accidental electrical shorts.
- Locate the existing relay to be replaced. This may require consulting your vehicle's owner's manual or a service diagram.
4.2. Installation Procedure
- Carefully remove the old relay from its socket. Note its orientation.
- Inspect the relay socket for any corrosion or damage. Clean if necessary.
- Align the new Relay No.219 with the socket, ensuring the pins match the corresponding slots.
- Gently push the relay firmly into the socket until it is fully seated. Do not force it.
- Reconnect the negative terminal of the vehicle's battery.
- Test the function controlled by the relay to ensure proper operation.

Figure 4.1: Top view of the Relay No.219, indicating the part number and a simplified internal schematic.

Figure 4.2: Bottom view of the Relay No.219, illustrating the pin configuration and a detailed electrical schematic for connection reference.
5. Operating Principles
The Relay No.219 operates as an electromagnetic switch. When a small electrical current is applied to its control coil (terminals 85 and 86, as often seen in automotive relays), it creates a magnetic field that pulls a contact arm, closing or opening a separate, higher-current circuit (terminals 30 and 87/87a). This allows a low-power signal from a switch or control unit to safely manage a higher-power load, such as a fuel pump, horn, or other vehicle accessories.
This relay is specified as having a "Normally Open" contact type, meaning the high-current circuit is open (disconnected) when the relay coil is not energized. When energized, the contact closes, completing the circuit.
6. Maintenance
Automotive relays like the No.219 are generally sealed units and require minimal maintenance. However, periodic inspection can help ensure continued reliable operation:
- Visual Inspection: Periodically check the relay and its socket for any signs of physical damage, corrosion, or overheating (discoloration or melting).
- Connection Integrity: Ensure the relay remains firmly seated in its socket. Loose connections can lead to intermittent operation or arcing.
- Environmental Factors: Keep the relay area free from excessive moisture, dirt, and debris, which can contribute to corrosion or short circuits.
If any issues are observed, consider replacing the relay. Do not attempt to open or repair the relay, as it is not designed for user servicing.
7. Troubleshooting
If the circuit controlled by the Relay No.219 is not functioning correctly, consider the following troubleshooting steps:
- No Operation: If the controlled component (e.g., horn, fuel pump) does not activate, check the fuse for that circuit. Also, ensure the relay is properly seated in its socket.
- Intermittent Operation: This could indicate a loose connection, a faulty relay, or corrosion in the socket. Inspect connections and consider replacing the relay.
- Relay Not Clicking: A healthy relay typically makes an audible click when energized. If no click is heard, check for power to the relay's control coil (terminals 85 and 86) and ensure the ground connection is good.
- Continuously On/Off: If the controlled component is always on or always off, even when it shouldn't be, the relay contacts may be stuck open or closed. This indicates a faulty relay that needs replacement.
Always consult a professional automotive technician for complex electrical issues or if you are unable to diagnose the problem safely.
8. Specifications
| Feature | Specification |
|---|---|
| Model Number | IIGBBRRDE (Relay No.219, Part No. 443951253AA) |
| Brand | Generic |
| Package Dimensions | 2.54 x 2.54 x 2.54 cm |
| Item Weight | 50 Grams |
| Manufacturer | Generic |
| Country of Origin | China |
| Connector Type | Pin (Based on product images, 'Vis' in source likely refers to pin connection) |
| Contact Material | Silver |
| Contact Type | Normally Open |
| Mounting Type | Socket Mount (Based on typical automotive relay design, 'DIN Rail Mount' in source is likely generic) |
| Operating Mode | Automatic |
| Number of Items | 1 |
Note: Some specifications, such as 'Connector Type' and 'Mounting Type', have been clarified based on typical automotive relay design and product images, as the original source descriptions ('Vis' and 'DIN Rail Mount') may be generic and not perfectly reflect the plug-in nature of this automotive relay. Always verify compatibility with your vehicle's specific requirements.
9. Warranty and Support
Specific warranty information for this Generic product is not provided in the product details. For warranty claims or technical support, please contact the seller or the point of purchase directly. Ensure you retain your proof of purchase for any warranty-related inquiries.