1. Introduction
This manual provides detailed instructions for the installation, operation, and maintenance of your ieGeek 5MP Floodlight Camera ZY-E2. This device is designed to enhance outdoor home security with its advanced features.
Key features include:
- 5MP High-Resolution Video: Captures clear and detailed footage.
- Dual-Band Wi-Fi: Supports both 2.4GHz and 5GHz networks for stable connectivity.
- Smart Motion Detection: Features a 150° PIR sensor with customizable detection zones and sensitivity.
- Integrated Floodlights and Siren: Provides 2600 lumens of illumination and a 110dB siren for deterrence.
- Color Night Vision: Offers enhanced visibility in low-light conditions up to 49 feet (15 meters).
- Two-Way Audio: Enables real-time communication through the camera.
- 24/7 Recording: Continuous recording capability with local and cloud storage options.
- Alexa Compatibility: Integrates with Amazon Alexa for voice control and live view.
- IP65 Weatherproof: Designed for outdoor use in various weather conditions.
2. Package Contents
Verify that all items listed below are included in your package:
- 1 × ieGeek Floodlight Camera
- 1 × Mounting Plate
- 1 × Installation Hook
- 1 × Central Screw
- 1 × Central Screw Cap
- 3 × Plate Screws
- 3 × Wire Nuts
- 1 × Instruction Manual

Image: All components included in the ieGeek Floodlight Camera package.
3. Product Overview
The ieGeek Floodlight Camera ZY-E2 combines a high-resolution camera with powerful floodlights and a motion sensor, all housed in a durable, weatherproof casing. The camera unit is centrally located, flanked by two adjustable LED floodlights. A PIR motion sensor is integrated below the camera lens.

Image: Front view of the ieGeek Floodlight Camera ZY-E2.
The device is designed for hard-wired installation to an existing junction box, ensuring continuous power and reliable operation.
4. Setup and Installation
4.1 Before Installation
- Safety First: Always turn off power at the circuit breaker before beginning any electrical installation.
- Tools Required: You will need a screwdriver, wire strippers, and a drill (if mounting holes are not pre-existing).
- App Download: Download the "ieGeek Cam" app from the App Store (iOS) or Google Play Store (Android).
4.2 Physical Installation
- Prepare Wiring: Ensure power is off. Connect the camera's wires to your existing junction box wiring (Live, Neutral, Ground) using the provided wire nuts.
- Mounting: Secure the mounting plate to the junction box. Attach the camera unit to the mounting plate using the central screw and cap.
- Adjust Angle: The floodlights and camera can be rotated independently to achieve the desired coverage area.

Image: Installation steps for the ieGeek Floodlight Camera.

Image: Wall mounting and ceiling mounting configurations.

Image: Adjusting the camera and floodlight angles.
4.3 App Configuration
- Power On: Restore power at the circuit breaker. The camera will enter setup mode.
- Open App: Launch the "ieGeek Cam" app and follow the on-screen instructions to add a new device.
- Connect to Wi-Fi: The camera supports both 2.4GHz and 5GHz Wi-Fi networks. Select your network and enter the password. Bluetooth pairing is also available for faster initial setup.
- Complete Setup: Follow any remaining prompts to finalize the camera configuration.

Image: App interface for quick device discovery and setup.

Image: Dual-band Wi-Fi connectivity (2.4GHz and 5GHz).

Image: One-touch Bluetooth pairing for faster setup.
5. Operation
5.1 Live View and Recording
Access the live video feed through the ieGeek Cam app. You can view real-time footage, take screenshots, and manually initiate video recordings directly from the app interface.

Image: 5MP UHD video quality from the camera.

Image: ieGeek Cam app live view interface.
5.2 Motion Detection and Alerts
The camera features a 150° PIR motion sensor. When motion is detected, the floodlights can activate, and an optional 110dB siren can sound. Real-time notifications are sent to your smartphone. You can customize detection zones and adjust sensitivity levels (1-10) within the app to minimize false alerts.

Image: Activated lights and siren alarm upon motion detection.

Image: 150° PIR sensor and 130° view angle with night vision range.

Image: Customizable motion detection zones and sensitivity levels.

Image: Real-time alert notification on a smartphone.
5.3 Two-Way Audio
Utilize the built-in microphone and speaker for two-way communication. This allows you to speak with visitors, delivery personnel, or deter unwanted individuals directly through the app.

Image: Two-way audio communication in use.

Image: Interacting with a delivery person using two-way audio.
5.4 Floodlight Control
The floodlights provide 2600 lumens of brightness. You can adjust the brightness levels (1-7) and set custom schedules for the lights to turn on and off via the ieGeek Cam app.

Image: Adjustable 2600 lumens floodlight brightness.

Image: Scheduling floodlight operation via the app.
5.5 Storage Options
Video recordings can be stored in two ways:
- Micro SD Card: Insert a micro SD card (up to 128GB, not included) into the designated slot for local storage.
- Cloud Storage: A free cloud service provides 6 seconds of recording and 7 days of loop coverage. Premium cloud storage plans are available as an optional subscription for extended features.

Image: 24/7 recording capability.

Image: Local Micro SD card and Cloud storage options.
5.6 Alexa Integration
The ieGeek Floodlight Camera is compatible with Amazon Alexa. Link your camera to your Alexa account to enable voice commands for viewing live feeds on compatible Alexa-enabled devices.

Image: Two-way audio and Alexa compatibility.
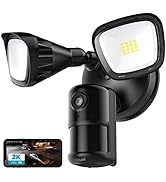
Image: Using Alexa to view the camera feed.
6. Maintenance
- Cleaning: Regularly clean the camera lens and floodlight covers with a soft, damp cloth to ensure optimal performance and clear image quality. Avoid abrasive cleaners.
- Firmware Updates: Check the ieGeek Cam app periodically for available firmware updates. Keeping your camera's firmware up-to-date ensures access to the latest features and security enhancements.
- Weather Protection: The camera has an IP65 waterproof rating, making it suitable for most weather conditions. Ensure all connections are sealed properly during installation to maintain water resistance.

Image: IP65 waterproof rating for outdoor durability.
7. Troubleshooting
- No Power: Ensure the circuit breaker is on and all wiring connections are secure.
- Wi-Fi Connection Issues: Verify your Wi-Fi password is correct. Ensure the camera is within range of your router. Try restarting your router and the camera. The camera supports both 2.4GHz and 5GHz networks.
- Poor Video Quality: Check for obstructions on the lens. Ensure the camera is clean. Verify your internet connection speed.
- Motion Detection Not Working: Check motion detection settings in the app, including sensitivity and detection zones. Ensure the PIR sensor is not obstructed.
- App Not Responding: Close and reopen the app. If the issue persists, reinstall the app.
For further assistance, please refer to the support section or contact customer service.
8. Specifications
| Feature | Specification |
|---|---|
| Model Number | ZY-E2 |
| Video Capture Resolution | 5MP |
| Connectivity | Dual-Band Wi-Fi (2.4GHz/5GHz) |
| Motion Sensor | 150° PIR |
| Floodlight Brightness | 2600 Lumens (Adjustable) |
| Siren | 110dB |
| Night Vision | Color Night Vision (up to 49 feet / 15 meters) |
| Audio | Two-Way Audio |
| Storage Options | Micro SD Card (up to 128GB), Cloud Storage |
| Weather Resistance | IP65 Waterproof |
| Product Dimensions | 11.02 x 7.09 x 5.91 inches |
| Item Weight | 2.88 pounds |
9. Warranty and Support
The ieGeek Floodlight Camera ZY-E2 comes with a 2-year warranty from the date of purchase. This warranty covers manufacturing defects and ensures reliable operation under normal use conditions.
For technical support, warranty claims, or any questions regarding your product, please refer to the contact information provided in your Quick Start Guide or visit the official ieGeek support website. Please have your model number (ZY-E2) and purchase details ready when contacting support.