
Geometric Future GEO-EP-36B
Eskimo Pro 360mm AIO CPU Liquid Cooler User Manual
Model: GEO-EP-36B | Brand: Geometric Future
Introduction
Thank you for choosing the Geometric Future Eskimo Pro 360mm AIO CPU Liquid Cooler. This manual provides comprehensive instructions for the proper installation, operation, and maintenance of your new liquid cooling system. Please read this manual thoroughly before installation to ensure optimal performance and longevity of your product.
The Eskimo Pro 360 is designed to provide efficient and quiet cooling for high-performance CPUs, featuring an advanced K6 liquid pump, a large copper base, and pre-installed Squama 2501 ARGB fans. It is compatible with a wide range of Intel and AMD sockets.

Image: The Eskimo Pro 360mm AIO Liquid Cooler, showcasing its radiator, three RGB fans, and the illuminated CPU block.
Safety Information
- Ensure all power is disconnected from your computer before installation or maintenance.
- Handle components with care to avoid damage.
- Do not open the liquid cooling loop; it is a sealed system.
- Keep out of reach of children.
- Refer to your motherboard and CPU manuals for additional compatibility and installation guidelines.
Package Contents
Verify that all components are present before beginning installation:
- Eskimo Pro 360mm Radiator with Integrated Pump/CPU Block
- 3 x Squama 2501 ARGB Fans
- Intel Mounting Brackets (LGA1700/1200/115X/2011/2066)
- AMD Mounting Brackets (AM5/AM4)
- Backplate for Intel Sockets
- Mounting Screws and Standoffs
- Thermal Paste (GF10 high-conductivity syringe applicator)
- Fan Splitter Cable
- ARGB Controller (if included with specific model variant)
- User Manual
Setup and Installation
1. Prepare Your System
- Power off your computer and disconnect all cables.
- Open your PC case and remove any existing CPU cooler. Clean the CPU surface thoroughly of any old thermal paste.
2. Install Mounting Hardware
Select the appropriate mounting brackets and backplate for your CPU socket (Intel or AMD). Refer to the image below for bracket identification.

Image: Various mounting brackets for Intel and AMD CPUs, ensuring universal compatibility.
- For Intel sockets, attach the backplate to the motherboard from the rear. Secure the standoffs from the front.
- For AMD sockets, use the existing AMD backplate and attach the appropriate standoffs.
- Attach the correct CPU block mounting arms to the pump unit.
3. Apply Thermal Paste
Apply a small amount of the included GF10 thermal paste to the center of your CPU's integrated heat spreader (IHS). A pea-sized dot is generally sufficient.

Image: Illustration of applying high-conductivity thermal paste to a CPU before cooler installation.
4. Mount the CPU Block/Pump
Carefully place the CPU block onto the CPU, aligning the mounting holes with the standoffs. Secure it with the provided thumb screws, tightening them in a diagonal pattern until snug.

Image: Close-up of the Eskimo Pro CPU block, highlighting its unique ARGB lighting and design.
5. Install the Radiator and Fans
Mount the radiator to an available fan mounting location in your PC case (e.g., top, front, or rear). Ensure proper airflow direction (intake or exhaust) based on your case's cooling design. Attach the three Squama 2501 ARGB fans to the radiator using the long screws provided.
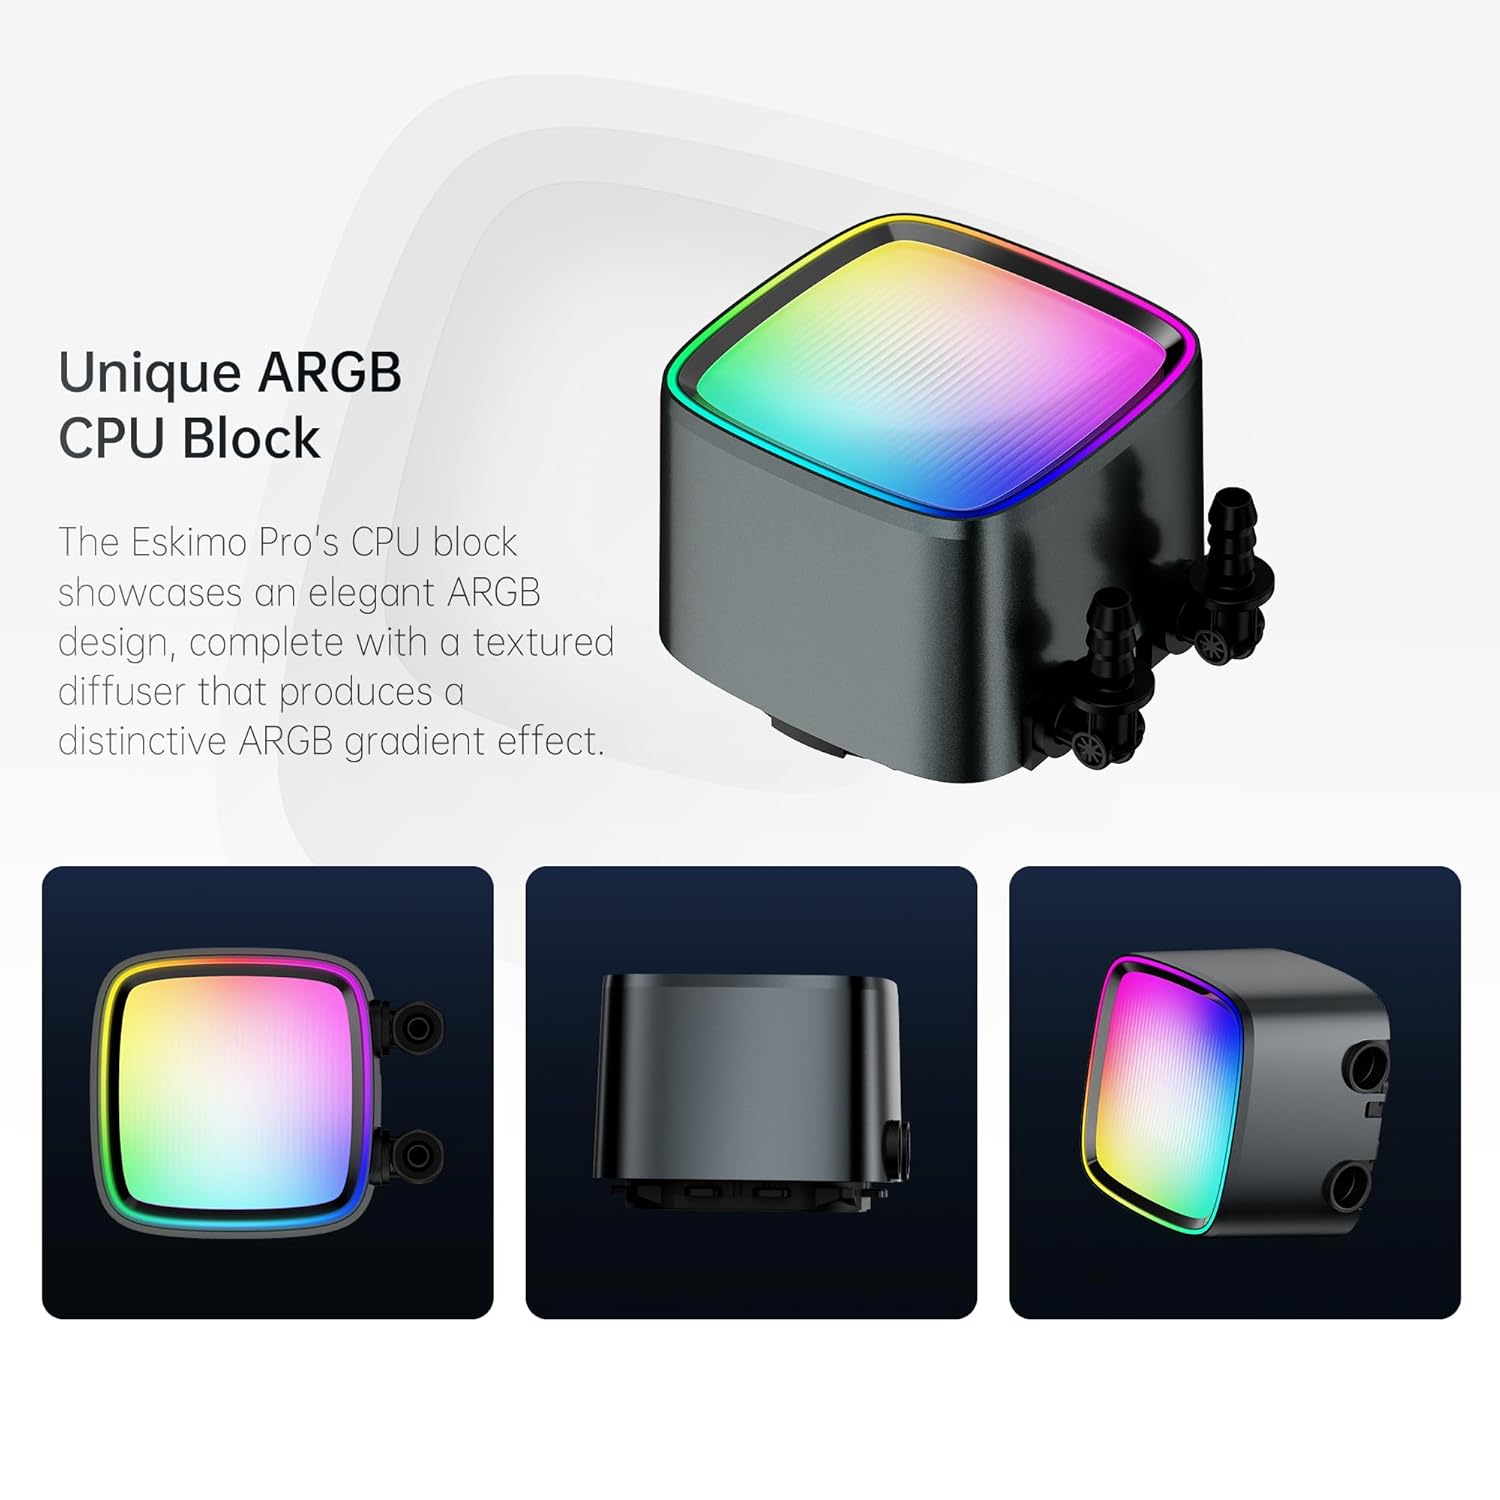
Image: The Eskimo Pro 360mm radiator assembly with three Squama 2501 ARGB fans attached.
6. Connect Cables
- Connect the pump's 3-pin or 4-pin connector to the CPU_FAN or AIO_PUMP header on your motherboard.
- Connect the fan power cables to the fan headers on your motherboard or use the included fan splitter cable to connect them to a single header.
- Connect the ARGB cables from the fans and CPU block to your motherboard's 5V ARGB header or to the included ARGB controller (if applicable). Ensure correct pin alignment to avoid damage.
Operating Instructions
Initial Power-On
After installation, close your PC case and reconnect all external cables. Power on your system. The pump and fans should start operating, and the ARGB lighting should illuminate. Monitor CPU temperatures using system monitoring software to ensure proper cooling.
ARGB Lighting Control
If connected to your motherboard's ARGB header, lighting effects can be controlled via your motherboard's RGB software (e.g., ASUS Aura Sync, MSI Mystic Light Sync, GIGABYTE RGB Fusion, ASRock Polychrome Sync). If using a standalone ARGB controller, refer to its specific instructions for lighting adjustments.
Fan and Pump Speed Control
Fan and pump speeds are typically controlled by your motherboard's BIOS/UEFI settings or through desktop software provided by your motherboard manufacturer. It is recommended to set the CPU_FAN/AIO_PUMP header to full speed or a performance profile to ensure the pump receives consistent power.
Maintenance
- Dust Cleaning: Periodically clean dust from the radiator fins and fan blades using compressed air or a soft brush. Excessive dust can impede airflow and reduce cooling performance.
- Cable Management: Ensure all cables are neatly routed and do not obstruct airflow within the case.
- Liquid Level: The Eskimo Pro is a closed-loop system and does not require coolant refills. Do not attempt to open the loop.
- Thermal Paste: Re-applying thermal paste is generally not necessary unless the cooler is removed from the CPU. If re-installation occurs, clean old paste and apply new paste.
Troubleshooting
| Problem | Possible Cause | Solution |
|---|---|---|
| High CPU Temperatures |
|
|
| Fans/ARGB not lighting up |
|
|
| Pump noise/gurgling sound |
|
|
Specifications

Image: Detailed specifications table for the Eskimo Pro 360 liquid cooler.
| Feature | Detail |
|---|---|
| Model | Eskimo Pro 36 B/W |
| Intel® Socket Compatibility | LGA2066/2011v3/2011/1200/1156/1155/1151/1150/1700/1851 |
| AMD® Socket Compatibility | AM4/AM5 |
| Radiator Dimensions (LxWxH) | 397 x 120 x 27 mm |
| Radiator Material | Aluminum |
| Thermal Paste | GF10 High thermal conductivity paste, syringe applicator |
| Pump Dimensions (LxWxH) | 71.5 x 71.5 x 54 mm |
| Pump Noise | 28.2 dBA |
| ARGB Control | Motherboard synchronized lighting effects |
| Coolant Pump | Three-phase, nine-stage |
| Motor Speed | 3200 RPM (+/-10%) |
| Bearing Type | Ceramic |
| Maximum Flow | 1.5 L/min |
| Input Voltage | 12V |
| Input Current (without fan) | 0.55A |
| Rated Power (without fan) | 4.2W |
| Tube Length | 450 mm |
| Tube Material | Low-Volatility Polymer tubing, Nylon-braided mesh rubber casing |
| Tube Connector | Aluminum pagoda head |
| MTTF | >40000 hours |
| Fan Model | Squama 2501 B/W Fan x 3 |
| Fan Dimensions | 120 x 120 x 25 mm |
| Fan Control | ARGB control, PWM control |
| Fan Noise | 34.2 dBA |
| Fan Speed | 2000 RPM (+/-10%) |
| Fan Airflow | 80.81 CFM |
| Fan Pressure | 2.78 mmH₂O |
| ARGB Rated Voltage | 5V |
| ARGB Rated Current | 0.18A |
| ARGB Rated Power | 0.9W |
| Fan Rated Voltage | 12V |
| Fan Rated Current | 0.36A |
| Fan Rated Power | 4.32W |
| Warranty | 3 years |
Warranty and Support
The Geometric Future Eskimo Pro 360mm AIO CPU Liquid Cooler comes with a 3-year warranty from the date of purchase. This warranty covers defects in materials and workmanship under normal use.
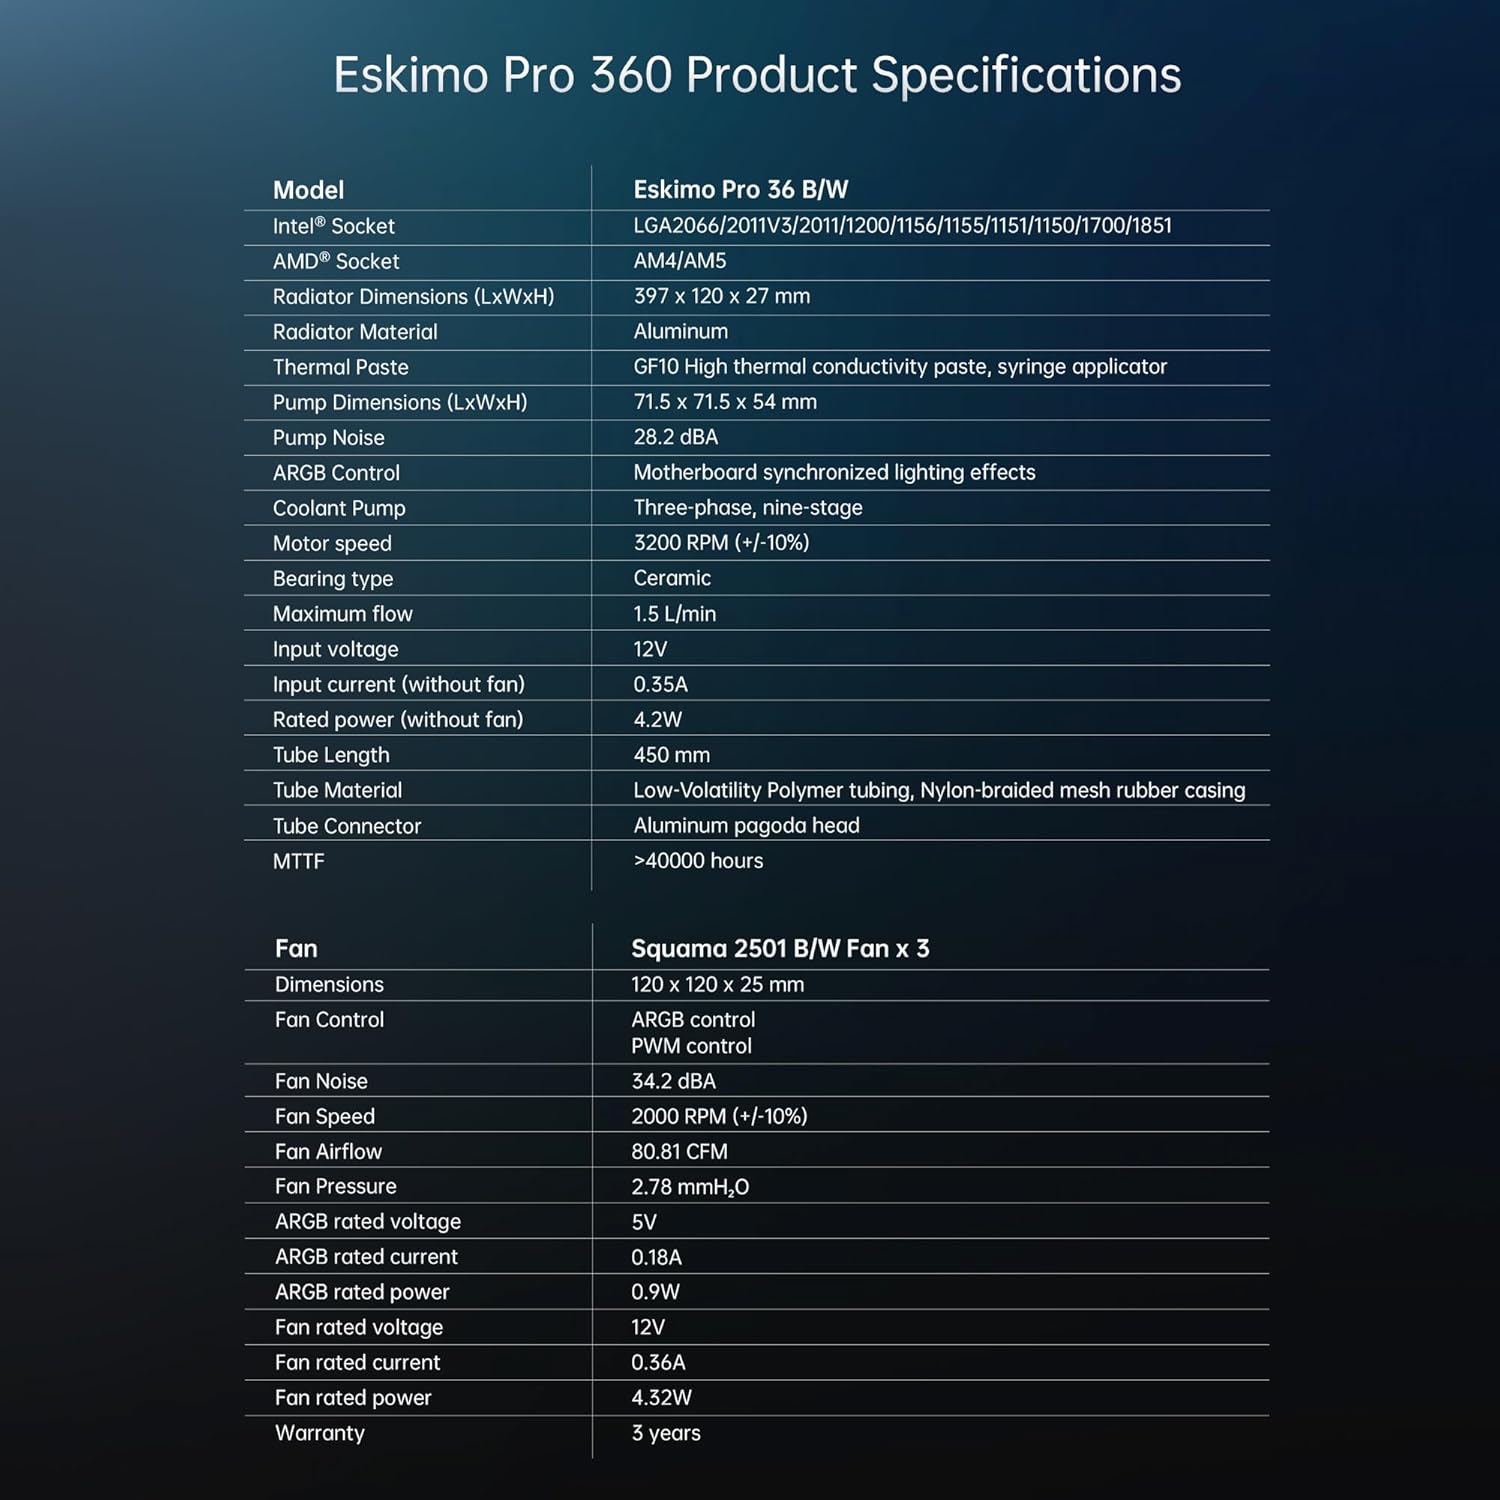
Image: Icons representing Quality Assurance, After-Sales Support, Service Commitment, and various certifications (CE, FC, RoHS, UKCA).
Exclusions:
- Damage caused by improper installation, accident, abuse, misuse, natural disaster, or unauthorized modification.
- Damage caused by operating the product outside the published guidelines.
- Normal wear and tear.
Customer Support:
For technical support, warranty claims, or general inquiries, please visit the official Geometric Future website or contact their customer service department. Keep your proof of purchase for warranty validation.
Website: www.geometricfuture.com
Related documentsGEO-EP-36B

Ask a question about this manual
Ask about setup, troubleshooting, compatibility, parts, safety, or missing instructions. Manuals+ will review the question and use this page’s manual context to help answer it.