
1. Introduction
The Pixhawk PX4 PIX 2.4.8 Flight Controller is an advanced 32-bit flight control board designed for FPV quadcopters, multirotor drones, and other unmanned aerial vehicles. It integrates cutting-edge chip and sensor technology to provide a robust and reliable real-time operating system for precise flight control. This manual provides essential information for setting up, operating, and maintaining your flight controller.
2. Package Contents
Verify that all items listed below are included in your package. If any components are missing or damaged, please contact customer support.
- 1 x Pixhawk px4 2.4.8 32 bit ARM Flight Controller with shell
- 1 x Safety button
- 1 x Buzzer
- 1 x 4G TF card (IO firmware pre-written)
- 1 x Pixhawk-I2C Splitter Expand board
- 1 x Servo cable
- 1 x 4pin turn 4pin cable
- 1 x 3pin DuPont line

Image: All components included in the Pixhawk PX4 PIX 2.4.8 Flight Controller package.
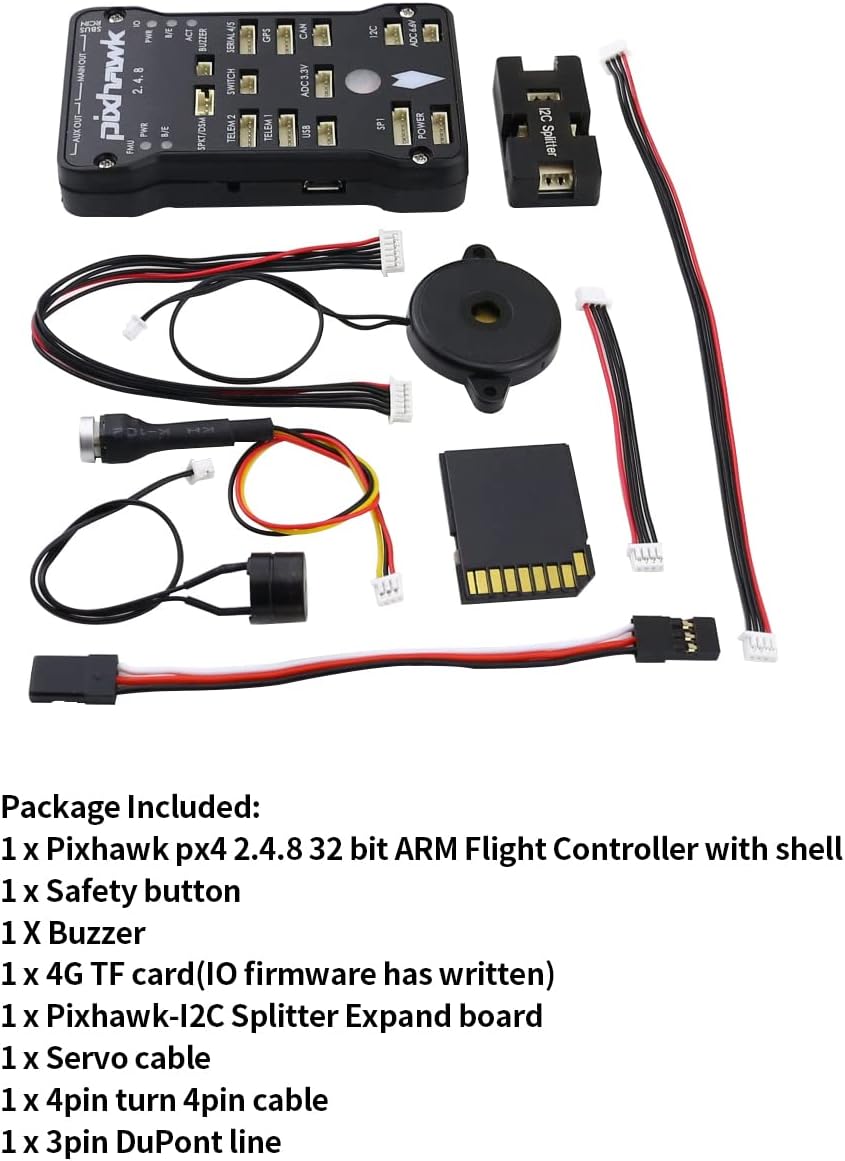
Image: Detailed view of the Pixhawk PX4 PIX 2.4.8 Flight Controller and its accompanying accessories.
3. Technical Specifications
| Category | Specification |
|---|---|
| Processor | 32-bit 2M flash memory STM32F427 Cortex M4, with hardware floating point |
| Processing Unit | Main frequency: 168MHZ, 256K RAM; 32-bit STM32F103 back up processor |
| Sensors | L3GD20 3-axis digital 16-bit gyroscope, LSM303D 3-axis 14 acceleration/magnetometer, MPU6000 6-axis acceleration/magnetometer |
| Interfaces | 5 UART (one compatible high voltage, two with hardware flow control), Two CAN, Spektrum DSM/DSM2/DSM-X satellite receiver compatible input, Futaba SBUS compatible input and output, PPM signal input, RSSI (PWM or voltage) output, I2C, SPI, 3.3 and 6.6V ADC input, External MICRO USB interface |
| Output | 14 PWM/Servo Output |
| Power | Integrated backup power and failover controller, redundant power supply input |
| Indicators | Multicolor LED light, Multi-sound buzzer interface |
| Data Logging | Micro SD records flying data |
| Dimensions | 4"L x 3"W x 1"H |
| Weight | 3.2 ounces |
4. Setup and Installation
Proper setup is crucial for the optimal performance of your Pixhawk flight controller. Follow these guidelines for installation and initial configuration.
4.1 Component Identification
Familiarize yourself with the various ports and components of the flight controller. Refer to the diagram below for detailed labeling.

Image: Labeled diagram of the Pixhawk PX4 PIX 2.4.8 Flight Controller's ports and connections.
4.2 Physical Installation
Mount the flight controller securely on your drone frame, ensuring it is level and protected from vibrations. Connect all necessary peripherals such as GPS, telemetry modules, ESCs, and receivers to their respective ports as indicated in the component identification diagram.

Image: Example installation of the Pixhawk PX4 PIX 2.4.8 Flight Controller on a multirotor drone frame.
4.3 Initial Configuration and Calibration
For initial connection and calibration, it is essential to use the Mission Planner application. This software allows you to configure flight modes, calibrate sensors (accelerometer, compass, gyroscope), and set up other critical parameters for stable flight.
- Download and install the latest version of Mission Planner from the official ArduPilot website.
- Connect the Pixhawk flight controller to your computer using the provided Micro USB cable.
- Launch Mission Planner and establish a connection to the flight controller.
- Follow the on-screen prompts within Mission Planner for initial setup and sensor calibration.
Note: If you encounter difficulties connecting or calibrating, ensure all drivers are correctly installed and refer to the Mission Planner documentation or online tutorials for detailed guidance.
5. Operation
The Pixhawk flight controller supports both automatic and manual flight modes, providing flexibility for various applications. Its real-time operating system ensures precise control and responsiveness.
5.1 Flight Modes
The flight controller can be configured with various flight modes, including stabilized, altitude hold, loiter, and autonomous mission modes. These modes are typically selected via your remote control transmitter after being configured in Mission Planner.
5.2 Data Logging
The integrated Micro SD card records comprehensive flight data, including sensor readings, GPS coordinates, and system status. This data is invaluable for post-flight analysis, troubleshooting, and performance optimization.
5.3 Safety Features
The Pixhawk features an integrated backup power system and a failover controller. In the event of a main controller failure, the system can safely switch to the backup control, enhancing flight safety. The included safety button and buzzer provide audible and visual indications of system status and warnings.
6. Maintenance
Regular maintenance helps ensure the longevity and reliable performance of your Pixhawk flight controller.
- Keep Clean: Periodically inspect the flight controller and its connections for dust, dirt, or debris. Use a soft, dry brush or compressed air to gently clean the components.
- Inspect Connections: Before each flight, verify that all cables are securely connected and free from damage. Loose connections can lead to unpredictable behavior.
- Firmware Updates: Regularly check for and install the latest firmware updates for the Pixhawk via Mission Planner. Firmware updates often include performance improvements, bug fixes, and new features.
- Storage: When not in use, store the flight controller in a dry, cool environment, away from direct sunlight and extreme temperatures.
7. Troubleshooting
This section addresses common issues you might encounter with your Pixhawk flight controller.
| Problem | Solution |
|---|---|
| Cannot connect or calibrate successfully | Ensure you are using the Mission Planner application. Verify that the correct drivers are installed on your computer. Check the USB cable and port. Restart both the flight controller and Mission Planner. Refer to Mission Planner's official documentation for detailed connection and calibration procedures. |
| No power or erratic behavior | Check all power connections, including the main power input and any auxiliary power sources. Ensure the power module (if used) is functioning correctly. Inspect cables for damage. |
| Buzzer or LED indicators not working as expected | Verify that the buzzer and LED components are correctly connected to the flight controller. Consult the Mission Planner software for status indications and error codes. |
| Unstable flight or incorrect sensor readings | Recalibrate all sensors (accelerometer, compass, gyroscope) using Mission Planner. Ensure the flight controller is securely mounted and isolated from vibrations. Check for any magnetic interference near the compass. |
For further assistance, consult online forums, community resources for Pixhawk/ArduPilot, or contact SoloGood customer support.
8. Warranty and Support
For detailed information regarding the product warranty, please refer to the documentation provided with your purchase or visit the official SoloGood website. Warranty terms typically cover manufacturing defects under normal use conditions.
For technical support, troubleshooting beyond this manual, or inquiries about replacement parts, please contact SoloGood customer service through their official channels. Providing your product model number (PX4) and purchase details will help expedite your support request.