
1. Safety Warnings
Please read all safety warnings carefully before operating the heater. Failure to follow these instructions may result in fire, injury, or property damage.

Warning: To avoid suffocation hazard, keep this plastic bag away from babies and children.
- Use only kerosene as fuel. Never use gasoline, alcohol, or other volatile fuels.
- Ensure adequate ventilation when operating the heater indoors.
- Keep flammable materials at a safe distance from the heater.
- Do not leave the heater unattended while in operation.
- Keep children and pets away from the heater.
- Do not move the heater while it is lit or hot.
- Refuel only when the heater is cool and extinguished.
2. Product Overview and Components
Familiarize yourself with the parts of your Kavolet Portable Kerosene Heater for proper operation and maintenance.
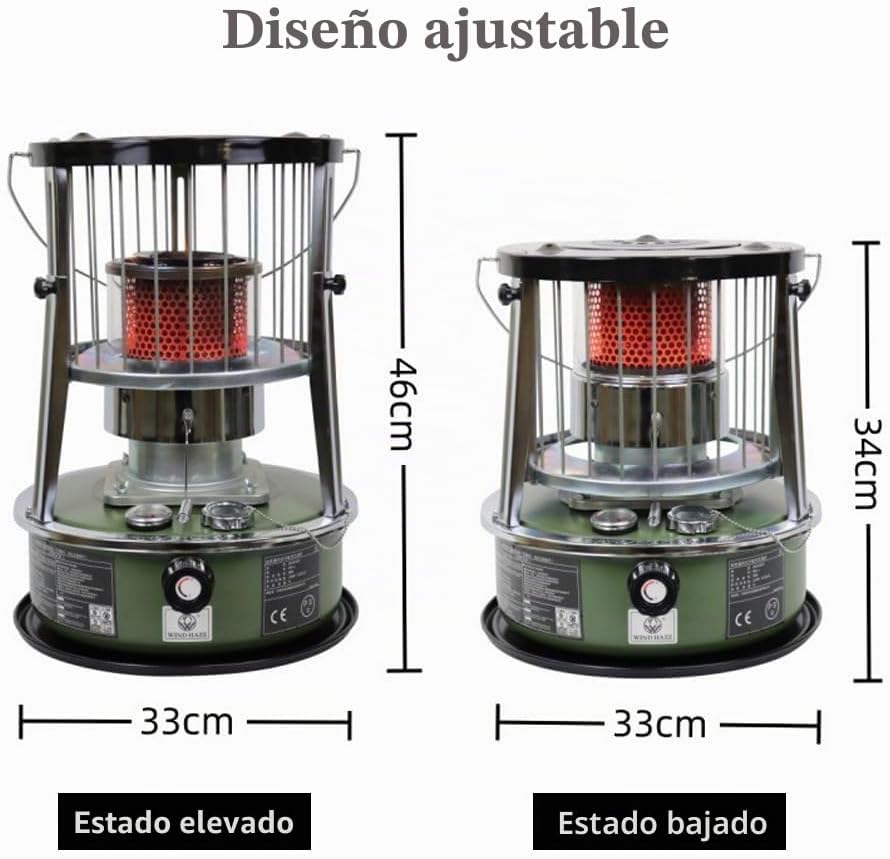
Image: Labeled diagram of the Kavolet Portable Kerosene Heater, showing components such as the handle, top cover, mesh cover lifting knob, alloy high temperature resistant glass chimney, reinforced frame, protective anti-scalding net, fuel gauge, ignition handle, fuel tank cap, wick power adjustment knob, and chassis.
Key Components:
- Handle: For safe transport when the unit is cool.
- Top Cover: Protects the internal components.
- Mesh Cover Lifting Knob: Used to raise the protective mesh.
- Alloy High Temperature Resistant Glass Chimney: Encloses the flame for efficient combustion and safety.
- Reinforced Frame: Provides structural stability.
- Protective Anti-Scalding Net: Prevents direct contact with hot surfaces.
- Fuel Gauge: Indicates the kerosene level in the tank.
- Ignition Handle: Used to ignite the wick.
- Fuel Tank Cap: Secures the fuel tank opening, often with a chain to prevent loss.
- Wick Power Adjustment Knob: Controls the height of the wick, thereby adjusting the flame size and heat output.
- Chassis: The base structure of the heater.
3. Setup
3.1 Unpacking and Placement
- Carefully remove all packaging materials.
- Place the heater on a stable, level, non-flammable surface.
- Ensure there is ample clearance from walls, furniture, and other combustible materials (at least 1 meter / 3 feet in all directions).
- If using indoors, ensure the area is well-ventilated.
3.2 Fueling the Heater
The fuel tank capacity is approximately 5.2 liters, providing a continuous supply for about 20-25 hours.
- Ensure the heater is turned off and completely cool before refueling.
- Remove the fuel tank cap.
- Carefully fill the fuel tank with clean kerosene only, using a pump or funnel to prevent spills.
- Monitor the fuel gauge. Stop filling when the pointer reaches the "F" (Full) mark. Do not overfill.
- Securely replace the fuel tank cap.

Image: Detail of the fuel gauge and fuel tank cap. The gauge indicates the fuel level, and the cap secures the tank opening.
3.3 Wick Preparation
The cotton wick is pre-installed. For first-time use or after refueling, allow the wick to soak in kerosene for approximately 30 minutes to ensure it is fully saturated before lighting.

Image: Detail of the cotton core adjustment knob, used to raise or lower the wick.
4. Operating Instructions
4.1 Lighting the Heater
- Turn the wick controller knob clockwise until it stops, raising the wick to its highest position.
- Lift the lampshade handle to expose the wick.
- Use an igniter or match to carefully light the wick.
- Gently lower the lampshade and use its handle to adjust it for balance over the flame.
- After ignition, observe the flame for stability within the first 15 minutes. Adjust the wick as necessary (see Firepower Adjustment).
4.2 Firepower Adjustment
The rotary regulation valve allows you to adjust the flame intensity according to your heating or cooking needs.
- Turn the wick adjustment knob to raise the wick for a larger flame and more heat.
- Turn the wick adjustment knob to lower the wick for a smaller flame and less heat.
- Ensure the flame is stable and does not produce excessive smoke. An ideal flame is bright and steady.
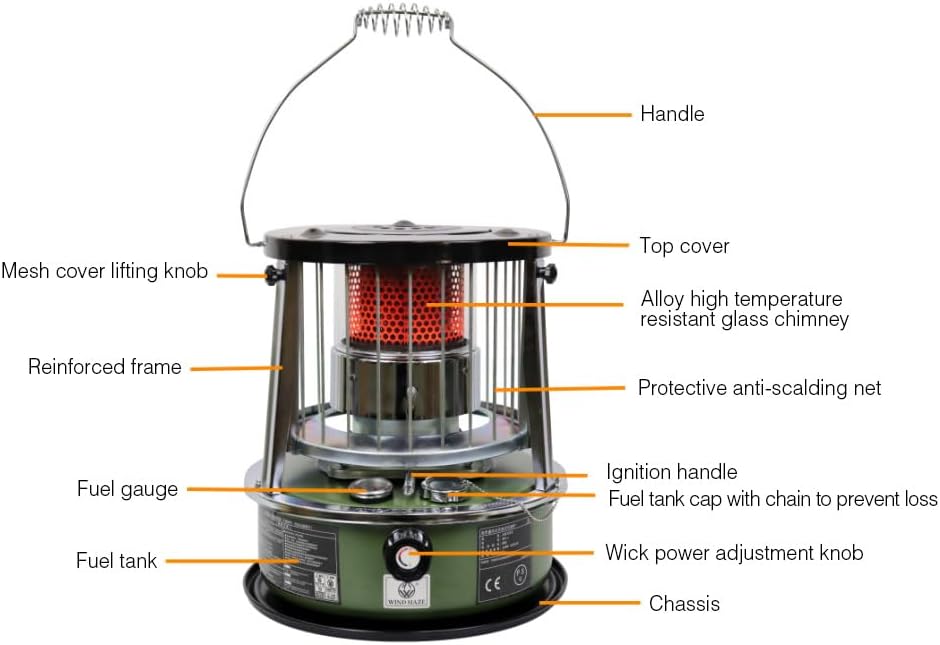
Image: Visual guide for firepower adjustment, illustrating flames that are too small, too large, and the correct flame size for optimal operation.
4.3 Turning Off the Heater
To extinguish the flame, turn the wick adjustment knob counter-clockwise until the wick is fully retracted and the flame goes out. Ensure the flame is completely extinguished before leaving the heater unattended.
4.4 General Usage
- This portable heater is suitable for both indoor and outdoor use, providing warmth without electricity.
- The top rack allows for heating, boiling water, and cooking.

Image: A person using the Kavolet kerosene heater for cooking outdoors, demonstrating its versatility.
5. Maintenance
5.1 Cleaning
- Ensure the heater is completely cool before cleaning.
- Wipe the exterior with a soft, damp cloth. Do not use abrasive cleaners or solvents.
- Periodically clean the glass chimney to ensure clear visibility of the flame and efficient heat transfer.
- Remove any dust or debris from the protective anti-scalding net.
5.2 Wick Care and Replacement
- Regularly inspect the wick for charring or damage. A properly maintained wick ensures efficient burning.
- If the wick becomes heavily charred or no longer provides a stable flame, it may need to be trimmed or replaced. Refer to a qualified technician or the manufacturer's website for wick replacement instructions.
5.3 Storage
- Before storing, ensure the fuel tank is empty or contains only a small amount of fresh kerosene.
- Store the heater in a cool, dry place, away from direct sunlight and extreme temperatures.
- Keep out of reach of children and pets.
6. Troubleshooting
If you encounter issues with your Kavolet Portable Kerosene Heater, refer to the following common troubleshooting steps:
| Problem | Possible Cause | Solution |
|---|---|---|
| Heater will not light | No fuel, wick not saturated, wick too low, faulty igniter. | Check fuel level and refill. Allow wick to soak. Raise wick. Use a new igniter or matches. |
| Flame is weak or unstable | Low fuel, wick needs trimming/replacement, poor ventilation. | Refuel. Inspect and trim/replace wick. Ensure adequate ventilation. |
| Excessive smoke or odor | Improper fuel, wick too high, poor ventilation, dirty wick/chimney. | Ensure only kerosene is used. Lower wick slightly. Improve ventilation. Clean wick and chimney. |
| Heater produces insufficient heat | Wick too low, low fuel, unit too small for space. | Raise wick. Refuel. Consider if the heater's output matches the room size. |
If problems persist after attempting these solutions, please contact customer support.
7. Specifications
Detailed technical specifications for the Kavolet Portable Kerosene Heater, Model PNW0479181440606AS.
| Feature | Detail |
|---|---|
| Brand | Kavolet |
| Model Number | PNW0479181440606AS |
| Fuel Type | Kerosene |
| Material | Alloy Steel |
| Product Dimensions (L x W x H) | 34 cm x 33 cm x 34 cm (lowered) / 46 cm (elevated) |
| Power Source | Kerosene Powered (Non-electric) |
| Maximum Power Output | 2.6 Kilowatts |
| Fuel Tank Capacity | Approx. 5.2 Liters |
| Continuous Supply Time | Approx. 20-25 hours |
| Country of Origin | China |
8. Warranty Information
Kavolet products are manufactured to high-quality standards. For specific warranty terms and conditions, please refer to the documentation included with your purchase or contact the retailer. Typically, warranties cover manufacturing defects under normal use.
9. Customer Support
If you have any questions, require technical assistance, or need to report an issue with your Kavolet Portable Kerosene Heater, please contact your retailer or visit the official Kavolet website for support contact information. When contacting support, please have your model number (PNW0479181440606AS) and purchase date available.