1. Introduction
Thank you for choosing the ECHTPower Wireless Pro Controller. This advanced controller is designed to enhance your gaming experience across multiple platforms, including Nintendo Switch (OLED/Lite), PC, Android, and iOS devices. It features vibrant RGB lighting, precise Hall Effect triggers, customizable macro buttons, a powerful turbo function, and adjustable vibration feedback. Please read this manual carefully to ensure proper use and optimal performance of your controller.
2. Package Contents
- 1 x ECHTPower Wireless Pro Controller
- 1 x USB Charging Cable
- 1 x User Manual
3. Product Features
3.1 Enhanced Compatibility
The ECHTPower Wireless Pro Controller offers broad compatibility, connecting seamlessly with Nintendo Switch, Switch OLED, Switch Lite, PC (via wired or Bluetooth connection), Android, and iOS systems. This versatility allows you to enjoy your favorite games across various devices with a single controller.

Image: ECHTPower Wireless Pro Controller, showcasing its ergonomic design and button layout.

Image: The controller's joysticks and D-pad illuminated with vibrant RGB LED lighting.
3.2 Dynamic LED Lighting
Experience immersive gaming with stunning LED lights surrounding the joysticks and D-pad. Choose from 9 colors and 5 lighting modes to personalize your controller and create a captivating gaming atmosphere. This feature adds a unique visual flair to your setup.
3.3 Hall Effect Triggers & Precision Joysticks
Equipped with Hall Effect triggers, this controller utilizes electromagnetic induction technology for highly sensitive and durable input, ensuring a long lifespan. The high-precision joysticks offer quick response times and prevent drift, providing accurate control for all game genres, from adventure to fighting games.

Image: An internal diagram illustrating the Hall Effect trigger mechanism for precise input.

Image: The controller with the Turbo button and its function highlighted, indicating rapid input.
3.4 Turbo Function
The ECHTPower Pro Controller supports both manual and automatic Turbo functions. This feature allows you to continuously press a button without repeated physical input, reducing finger fatigue and giving you an edge in fast-paced games. It is ideal for titles like “Super Mario Bros. Wonder,” “Zelda Tears of the Kingdom,” and “Mario Kart.”
3.5 Long Battery Life & Programmable Buttons
Equipped with a high-capacity 1000mAh battery, the controller offers up to 18 hours of playtime on a full 3-hour charge, significantly longer than many standard controllers. Additionally, two customizable buttons (M1 and M2) on the back allow you to assign single buttons or complex combinations for quick, one-touch combos in intense gaming scenarios.

Image: Visual representation of the controller's 1000mAh battery, charging time, and play duration.

Image: The back of the controller showing the M1 and M2 programmable buttons and their mapping capabilities.
3.6 Adjustable Double Vibration
The controller features dual vibration motors with 4 adjustable intensity levels (0%, 30%, 70%, 100%). This allows you to customize the haptic feedback for a more realistic and immersive gaming experience, adapting to different game scenarios and personal preferences.
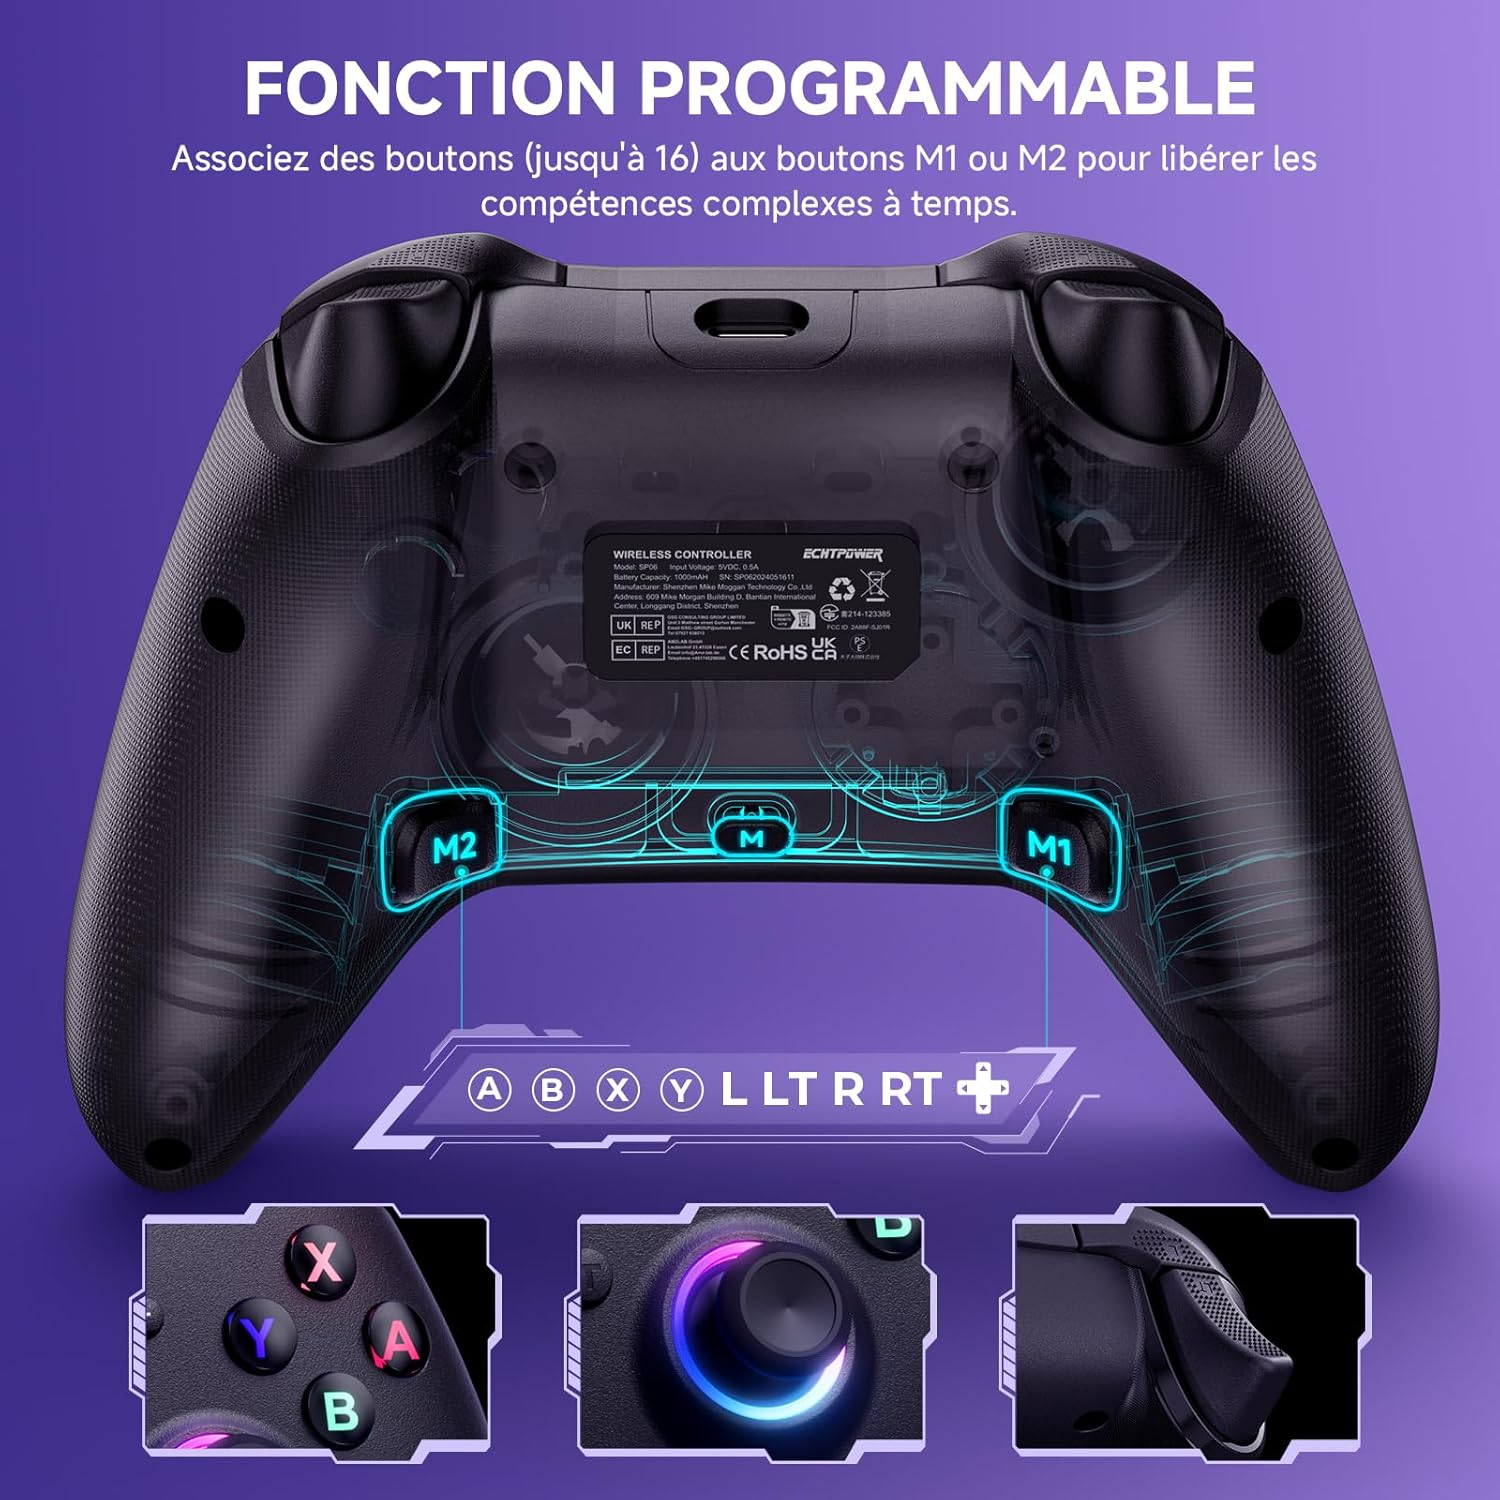
Image: A transparent view of the controller highlighting the vibration motors and adjustable intensity levels.
4. Setup and Connection
4.1 Connecting to Nintendo Switch/OLED/Lite
- Turn on your Nintendo Switch console.
- From the HOME Menu, select 'Controllers' > 'Change Grip/Order'.
- Press and hold the SYNC button on the top of the ECHTPower controller until the player LEDs begin to flash.
- Once connected, the player LED(s) on the controller will light up solid.
- The controller supports wake-up function: press the Home button to wake up the console from sleep mode.
4.2 Connecting to PC (Wired)
- Connect the controller to your PC using the provided USB charging cable.
- The PC should automatically detect and install the necessary drivers.
- The controller will be ready for use once the installation is complete.
4.3 Connecting to PC/Android/iOS (Bluetooth)
- Ensure Bluetooth is enabled on your PC, Android, or iOS device.
- On your device, go to Bluetooth settings and search for new devices.
- Press and hold the Bluetooth pairing button (refer to controller diagram if available, typically a small button near the USB port or a combination of buttons) on the ECHTPower controller until its indicator light flashes rapidly.
- Select 'ECHTPower Controller' (or similar name) from the list of available devices to pair.
- For advanced settings and customization, download and use the 'KeyLinker' app on your smartphone. Pair the controller within the app, not just your phone's Bluetooth settings.
5. Operating Instructions
5.1 Basic Button Functions
The controller features standard gaming buttons including A, B, X, Y, D-pad, Left/Right Analog Sticks, L/R, ZL/ZR triggers, Home, Screenshot, Plus (+), Minus (-) buttons, and two programmable M1/M2 buttons on the back.
5.2 Adjusting LED Lighting
To cycle through the 9 colors and 5 lighting modes for the joysticks and D-pad, locate the dedicated LED control button (refer to controller diagram if available, often marked with a light icon) or a specific button combination. Press this button repeatedly to change modes and colors according to your preference.
5.3 Using the Turbo Function
The Turbo function allows for rapid, continuous input of a button. To activate/deactivate Turbo:
- Manual Turbo: Press the Turbo button (T) and the desired action button simultaneously. The button will now send continuous input as long as you hold it.
- Automatic Turbo: Press the Turbo button (T) and the desired action button twice. The button will now send continuous input automatically without needing to be held down.
- To clear Turbo for a specific button, repeat the activation steps. To clear all Turbo settings, press and hold the Turbo button for a few seconds.
5.4 Programming M1/M2 Buttons
The M1 and M2 buttons on the back of the controller can be programmed to single buttons or a sequence of button presses (macros).
- Press and hold the M button (usually located between M1 and M2) until the indicator light flashes.
- Press the M1 or M2 button you wish to program.
- Input the desired button(s) or sequence of buttons you want to assign. This can include analog stick movements.
- Press the M button again to save the programming. The indicator light will stop flashing.
- To clear a programmed button, repeat the process without inputting any buttons in step 3, or refer to the KeyLinker app for easier management.
5.5 Adjusting Vibration Intensity
The controller offers 4 levels of vibration intensity. To adjust, press and hold the Vibration button (or a specific button combination, refer to controller diagram) and use the D-pad Up/Down to cycle through the intensity levels (0%, 30%, 70%, 100%).
6. Maintenance
6.1 Charging the Controller
When the battery is low, the indicator light will flash. Connect the controller to a USB power source (e.g., console, PC, USB wall adapter) using the provided USB charging cable. A full charge takes approximately 2-3 hours. The indicator light will change to solid when fully charged.
6.2 Cleaning
To clean the controller, use a soft, dry cloth. For stubborn dirt, a slightly damp cloth can be used, but ensure no liquid enters the controller's openings. Do not use harsh chemicals or abrasive cleaners.
7. Troubleshooting
7.1 Controller Not Connecting/Pairing
- Ensure the controller is sufficiently charged.
- Verify Bluetooth is enabled on your device and that the controller is in pairing mode.
- Try restarting both the controller and your device.
- If connecting to PC via Bluetooth, ensure you are pairing through the device's Bluetooth settings, and consider using the KeyLinker app for a more stable connection.
7.2 Buttons Not Responding or Drifting
- Check if the controller's battery is low.
- Ensure the controller's firmware is up to date (check the ECHTPower website or KeyLinker app for updates).
- If experiencing joystick drift, recalibrate the joysticks through your console's settings or the KeyLinker app.
7.3 Accidental Macro Reset
Some users may accidentally reset programmed macro buttons (M1/M2). To prevent this, ensure you are not inadvertently pressing the 'M' programming button during gameplay. If a macro is reset, simply reprogram it following the instructions in Section 5.4. For more robust control over macro settings, utilize the KeyLinker app.
7.4 Controller Disconnects Frequently or Shuts Off Too Soon
The controller has a default inactivity shutdown time. This can be adjusted using the 'KeyLinker' app. Connect the controller to the app, navigate to the 'Other' tab, and modify the 'no operation shutdown time' setting. You can set it up to 30 minutes or to never shut off due to inactivity.
8. Specifications
| Model Number | SP06-BK |
| Battery Capacity | 1000mAh Lithium Battery |
| Charging Time | Approx. 2-3 hours |
| Playtime | Approx. 18 hours |
| Dimensions (L x W x H) | 15.5 x 15 x 6.5 cm |
| Weight | 270 grams |
| Connectivity | Bluetooth, Wired USB |
| Compatibility | Nintendo Switch/OLED/Lite, PC, Android, iOS |
| Country of Origin | China |
9. Warranty and Support
ECHTPower is committed to providing high-quality products and excellent customer service. While specific warranty details are not provided in this manual, if you encounter any issues or have questions regarding your ECHTPower Wireless Pro Controller, please do not hesitate to contact our professional support team. We are dedicated to assisting you and ensuring your satisfaction.
For support, please refer to the contact information provided on the product packaging or the official ECHTPower website.


