
BuTure VAC JR500
BuTure VAC Cordless Vacuum Cleaner JR500 User Manual
Model: JR500
1. Important Safety Information
Please read all instructions carefully before using this appliance. Retain this manual for future reference.
- This appliance is for household use only. Do not use outdoors or on wet surfaces.
- Do not allow children to operate the vacuum cleaner. Close supervision is necessary when used near children.
- Do not pick up flammable or combustible liquids, such as gasoline, or use in areas where they may be present.
- Do not pick up anything that is burning or smoking, such as cigarettes, matches, or hot ashes.
- Do not use without the dust cup and filters in place.
- Turn off the appliance before connecting or disconnecting the motorized brush, telescopic tube, or other accessories.
- Use only manufacturer's recommended attachments.
- If the charging cable is damaged, it must be replaced by the manufacturer, its service agent, or similarly qualified persons to avoid a hazard.
2. Product Overview and Components
Familiarize yourself with the components of your BuTure VAC JR500 Cordless Vacuum Cleaner.

Image 2.1: Overview of the BuTure VAC JR500 Cordless Vacuum Cleaner and its included accessories. This image displays the main vacuum body, telescopic tube, electric floor brush, two HEPA filters, soft bristle brush, crevice brush, battery, charger, small cleaning tool, and wall mount stand.
Included Components:
- Vacuum Main Body
- Telescopic Tube
- Electric Floor Brush (Hard and Soft Bristle Integrated)
- HEPA Filter (2 pieces: 1 installed, 1 for replacement)
- Soft Bristle Brush
- Crevice Brush
- Battery
- Charger
- Small Cleaning Tool
- Wall Mount Stand
- User Manual (this document)
3. Setup and Assembly
3.1. Battery Installation and Charging
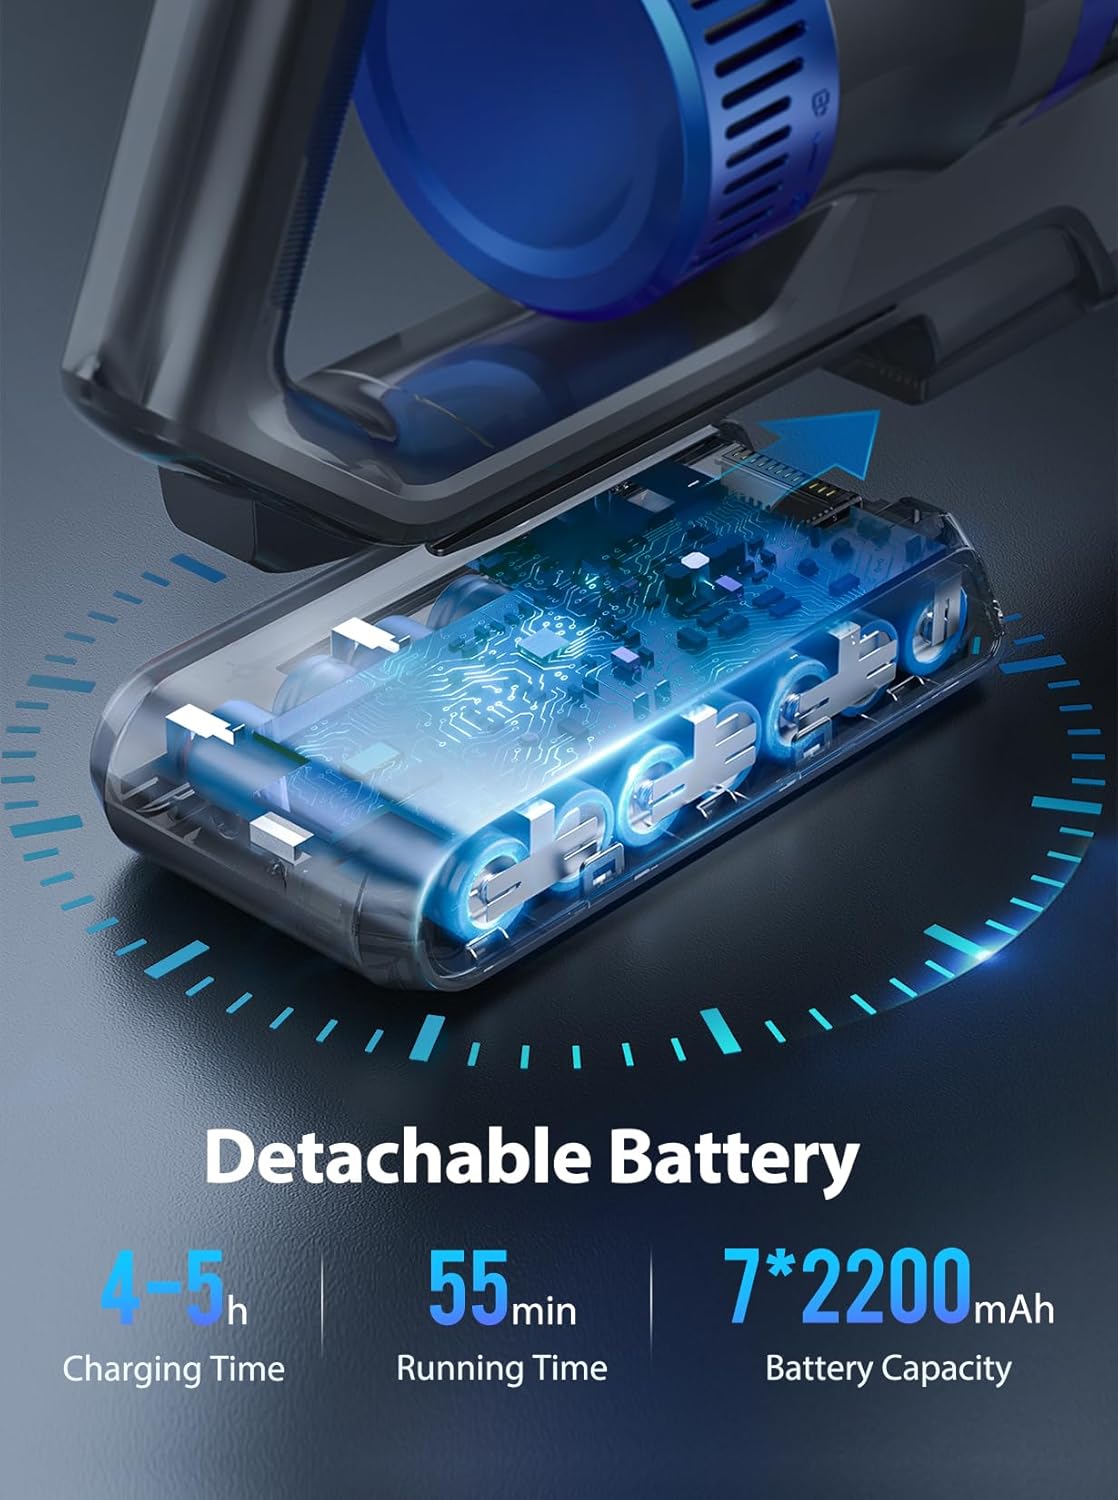
Image 3.1: Illustration of the detachable battery for the BuTure VAC JR500, highlighting its charging time, running time, and capacity.
- Insert the battery into the main vacuum body until it clicks securely into place.
- Connect the charger to the battery port or directly to the main body if the battery is installed.
- Plug the charger into a power outlet. The charging indicator light will illuminate.
- Allow 4-5 hours for a full charge. The indicator light will change or turn off when charging is complete.
3.2. Assembling the Vacuum
- Attach the Telescopic Tube: Align the telescopic tube with the main vacuum body and push until it clicks.
- Attach the Floor Brush: Connect the electric floor brush to the other end of the telescopic tube, ensuring it clicks into place.
- Adjust Telescopic Tube Length: Press the release button on the telescopic tube and extend or retract it to your desired length (42-65cm). Release the button to lock.
3.3. Wall Mount Installation
- Choose a suitable location near a power outlet for convenient charging and storage.
- Mark the drilling points for the wall mount stand.
- Drill holes and insert wall plugs if necessary.
- Secure the wall mount stand to the wall using screws.
- Hang the assembled vacuum cleaner on the wall mount for storage and charging.
4. Operating Instructions
4.1. Power On/Off and Suction Modes
- Power On: Press the power button on the main body to start the vacuum cleaner.
- Adjust Suction: Press the mode button to cycle through the three suction speeds (15KPA, 25KPA, 38KPA). Select the appropriate power for your cleaning task.
- Power Off: Press the power button again to turn off the vacuum cleaner.
4.2. Using Attachments

Image 4.1: The BuTure VAC JR500 in various operational modes, demonstrating the adjustable telescopic tube for high-reach cleaning and its lightweight design for handheld use on furniture.
- Electric Floor Brush: Ideal for cleaning various floor types, including hardwood and carpet. The integrated LED lights illuminate dark areas.
- Crevice Brush: Attach directly to the main body or telescopic tube for cleaning narrow gaps, corners, and edges.
- Soft Bristle Brush: Suitable for delicate surfaces, upholstery, and removing dust from curtains or keyboards.
- Handheld Mode: Detach the telescopic tube and floor brush to use the main body with attachments for handheld cleaning of furniture, car interiors, or stairs.
5. Maintenance
Regular maintenance ensures optimal performance and extends the lifespan of your vacuum cleaner.
5.1. Emptying the Dust Cup

Image 5.1: Demonstration of the one-touch emptying mechanism for the 1.2L large capacity dust cup of the BuTure VAC JR500, showing collected debris being released into a waste bin.
- When the dust cup is full, hold the main body over a trash bin.
- Press the dust cup release button (indicated by an arrow) to open the bottom flap and empty the contents.
- Close the flap securely after emptying.
5.2. Cleaning the Filtration System

Image 5.2: An internal view illustrating the 6-stage cyclonic filtration system of the BuTure VAC JR500, showing the airflow and separation of dust particles.
- The vacuum features a 6-stage filtration system, including HEPA filters.
- To clean, twist and remove the dust cup from the main body.
- Remove the internal filter components (mesh filter, HEPA filter).
- Tap off loose dust. Rinse the washable components (excluding the main motor unit) under cold water.
- Ensure all parts are completely dry before reassembling and reinserting into the vacuum.
- Replace HEPA filters every 3-6 months, or as needed, for optimal performance.
5.3. Cleaning the Anti-Winding Brush

Image 5.3: Close-up view of the anti-winding V-shaped roller brush head of the BuTure VAC JR500, demonstrating its design to prevent hair tangling during operation.
- Turn off the vacuum and detach the electric floor brush.
- Locate the brush roll release tab or button on the side of the brush head.
- Remove the brush roll. Use the small cleaning tool to cut and remove any tangled hair or debris.
- Reinsert the brush roll, ensuring it clicks back into place.
6. Troubleshooting
Refer to this section for common issues and their solutions.
| Problem | Possible Cause | Solution |
|---|---|---|
| Vacuum does not turn on | Battery not charged or not installed correctly. | Ensure battery is fully charged and securely inserted. |
| Low suction power | Dust cup full, filters clogged, or blockage in hose/brush. | Empty dust cup. Clean or replace filters. Check for and remove blockages. |
| Brush roll not rotating | Hair/debris tangled in brush roll, or brush roll not installed correctly. | Clean brush roll of tangled debris. Ensure brush roll is correctly reinserted. |
| Battery life is short | Using high suction mode continuously, or battery degradation. | Use lower suction modes for longer runtime. Consider purchasing a replacement battery if degradation is significant. |
| Unusual noise | Blockage in the air path or foreign object in the brush roll. | Turn off and inspect all parts for blockages or foreign objects. |
7. Specifications
| Feature | Specification |
|---|---|
| Model Name | JR500 |
| Brand | BuTure VAC |
| Motor Power | 450W Brushless Motor |
| Suction Power | 15KPA - 38KPA (3 speeds) |
| Battery Type | 7 * 2200 mAh Lithium Battery (Detachable) |
| Running Time | Up to 55 minutes (low suction) |
| Charging Time | 4-5 hours |
| Dust Cup Capacity | 1.2 Liters |
| Filtration System | 6-Stage, HEPA Filter |
| Special Features | Anti-winding Brush, LED Light on Floor Brush, Adjustable Telescopic Tube (42-65cm), Wall Mount Storage, Low Noise (≤ 68 dB) |
| Product Dimensions | 10"L x 7"W x 17"H |
| Item Weight | 7 pounds |
8. Warranty and Support
For warranty information or technical support, please refer to the product packaging or contact BuTure VAC customer service through their official website or the retailer where the product was purchased.
Ask a question about this manual
Ask about setup, troubleshooting, compatibility, parts, safety, or missing instructions. Manuals+ will review the question and use this page’s manual context to help answer it.