
SANITMAX Sm1050b
SANITMAX 41.3" Battery-Powered Walk-Behind Floor Sweeper User Manual
Model: Sm1050b
1. Introduction
This manual provides essential information for the safe and efficient operation, maintenance, and troubleshooting of your SANITMAX 41.3" Battery-Powered Walk-Behind Floor Sweeper, Model Sm1050b. Please read this manual thoroughly before operating the machine to ensure proper use and to prevent injury or damage.
2. Safety Instructions
Always adhere to the following safety guidelines to prevent accidents and ensure safe operation.
General Safety
- Read all instructions before use.
- Do not operate the sweeper in hazardous environments or near flammable liquids/gases.
- Keep children and unauthorized personnel away from the operating area.
- Wear appropriate personal protective equipment (PPE) such as safety glasses and non-slip footwear.
- Ensure all guards and safety devices are in place and functioning correctly before operation.
Electrical Safety
- Use only the provided battery charger.
- Do not operate the sweeper with a damaged power cord or plug.
- Keep the charger and battery dry. Do not expose to rain or wet conditions.
- Unplug the charger from the outlet before performing any maintenance or cleaning.
Battery Safety
- Do not short-circuit the battery terminals.
- Do not expose the battery to extreme temperatures or direct sunlight.
- Dispose of batteries according to local regulations.
3. Components and Parts Identification
Familiarize yourself with the main components of your SANITMAX floor sweeper.

Figure 3.1: Overall view of the SANITMAX floor sweeper with its included battery charger.
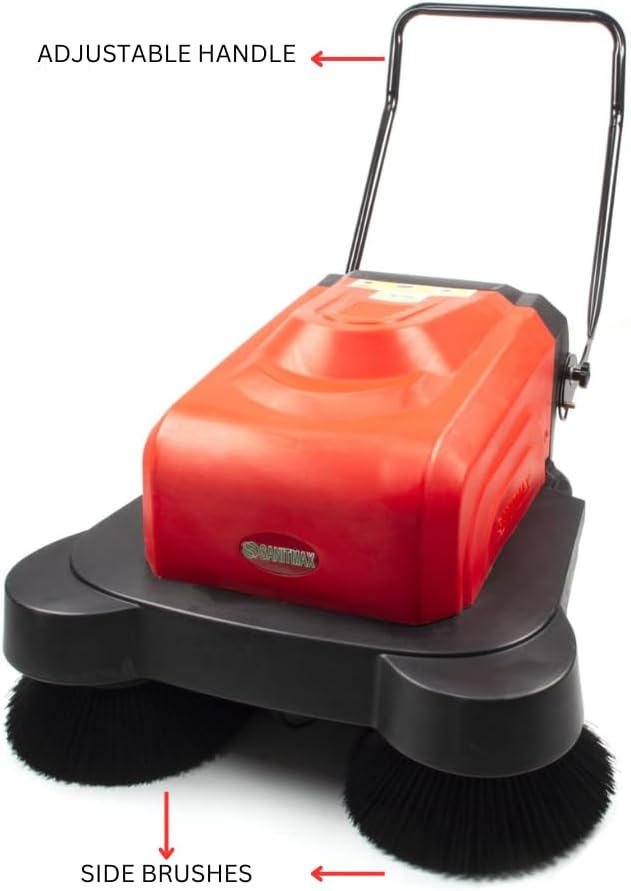
Figure 3.2: Key external components including the adjustable handle and side brushes.

Figure 3.3: Detailed view of the control panel with battery capacity display, main brush switch, side brush switch, watering switch, and key ignition.

Figure 3.4: Side view highlighting the overload protection switches, charger interface, removable trash can, and water tank inlet.

Figure 3.5: Underside view showing the side brushes and the integrated water spray nozzles for dust suppression.
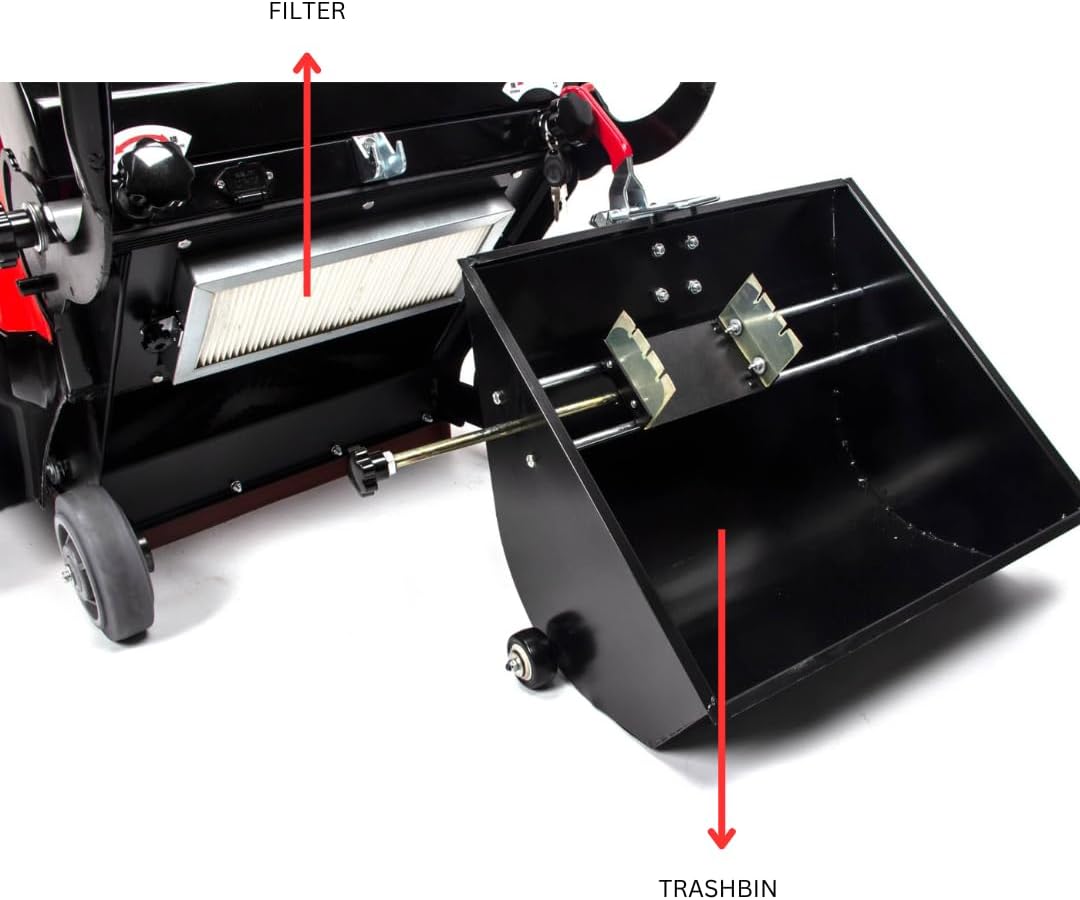
Figure 3.6: Internal view revealing the air filter and the large capacity trashbin.
4. Setup
Initial Assembly
- Unpack all components from the packaging.
- Attach the adjustable handle to the main body of the sweeper, securing it with the provided fasteners. Ensure it is firmly in place.
- Verify that the side brushes are correctly installed and rotate freely.
- Ensure the trashbin is properly seated within its compartment.
Charging the Battery
- Locate the charger interface on the side of the sweeper (refer to Figure 3.4).
- Connect the provided battery charger to the charger interface.
- Plug the charger into a standard electrical outlet.
- Allow the battery to charge fully before first use. The battery capacity display on the control panel (Figure 3.3) will indicate the charge level. A full charge typically takes approximately 4 hours.
- Once fully charged, disconnect the charger from both the sweeper and the outlet.
Filling the Water Tank
- Locate the water tank inlet (refer to Figure 3.4).
- Open the cap and fill the tank with clean water. Do not overfill.
- Securely close the cap after filling.
5. Operating Instructions
Starting the Sweeper
- Ensure the battery is sufficiently charged.
- Insert the key into the ignition on the control panel (Figure 3.3) and turn it to the "ON" position.
- Press the "Main Brush" switch to activate the main sweeping brush.
- Press the "Side Brush" switch to activate the side brushes, which help sweep debris from edges and corners into the path of the main brush.
- If dust suppression is desired, press the "Watering" switch to activate the water spray nozzles.
Sweeping Operation
- Push the sweeper forward at a steady, comfortable pace.
- Overlap each pass slightly to ensure complete coverage.
- For heavily soiled areas, a slower pace or multiple passes may be required.
- The sweeper is designed for hard floor surfaces such as concrete, tile, hardwood, and linoleum.
Stopping the Sweeper
- Turn off the "Watering" switch, then the "Side Brush" switch, and finally the "Main Brush" switch.
- Turn the key to the "OFF" position and remove it.
6. Maintenance
Regular maintenance ensures optimal performance and extends the lifespan of your sweeper.
Emptying the Trashbin
- Empty the trashbin after each use or when it is full (refer to Figure 3.6).
- Pull out the trashbin, dispose of collected debris, and reinsert it securely.
Cleaning the Filter
- Regularly inspect and clean the air filter (refer to Figure 3.6).
- Remove the filter and gently tap it to dislodge dust. For deeper cleaning, use compressed air or wash with water if the filter type allows (consult product specifications for filter type). Ensure it is completely dry before reinstallation.
Brush Inspection and Replacement
- Periodically check the main and side brushes for wear or damage.
- Replace brushes when bristles are significantly worn or damaged to maintain effective sweeping performance.
Battery Care
- Always fully charge the battery after each use.
- If storing the sweeper for an extended period, ensure the battery is fully charged and recharge it every 1-2 months to prevent deep discharge.
General Cleaning
- Wipe down the exterior of the sweeper with a damp cloth.
- Do not use harsh chemicals or abrasive cleaners.
7. Troubleshooting
Refer to this section for common issues and their solutions.
| Problem | Possible Cause | Solution |
|---|---|---|
| Sweeper does not turn on. | Battery is discharged. Key not fully inserted/turned. Overload protection activated. | Charge the battery. Ensure key is fully inserted and turned to "ON". Check overload protection switches (Figure 3.4) and reset if tripped. |
| Brushes not rotating. | Brush switch off. Obstruction in brushes. Motor issue. | Ensure main/side brush switches are "ON". Inspect brushes for tangled debris and remove. Contact customer support if motor issue is suspected. |
| Water spray not working. | Water tank empty. Watering switch off. Nozzles clogged. | Refill water tank. Ensure watering switch is "ON". Clean water spray nozzles (Figure 3.5) to remove blockages. |
| Poor sweeping performance. | Trashbin full. Brushes worn or dirty. Filter clogged. | Empty trashbin. Clean or replace brushes. Clean or replace filter. |
8. Specifications
Key technical specifications for the SANITMAX Sm1050b Floor Sweeper.
| Feature | Detail |
|---|---|
| Model Name | Sm1050b |
| Cleaning Path | 41.3 inches |
| Power Source | Battery-Powered |
| Operation Time | Up to 4 hours (continuous) |
| Cleaning Efficiency | Up to 64,500 sq ft/hr |
| Dustbin Capacity | 9.25 Gallons |
| Special Features | Triple Brushes, Water Sprinklers For Dust Control |
| Recommended Surfaces | Hardwood, Tile and Grout, Vinyl and Linoleum, Concrete, Marble and Natural Stone, Laminated Floors |
| Product Dimensions | 41.3"W x 55"H |
| Item Weight | 178.5 Pounds |
| Material | Plastic, Metal |
| Included Components | Battery Charger |
9. Warranty and Support
For warranty information and customer support, please contact SANITMAX directly or refer to your purchase documentation.
- Returns: This product typically offers a 30-day easy return policy. Please refer to your retailer's return policy for specific details.
- Manufacturer: Sanitmax
- Customer Service: For technical assistance, parts, or service, please visit the official SANITMAX store on Amazon or contact their customer support channels.
Related documentsSm1050b

Ask a question about this manual
Ask about setup, troubleshooting, compatibility, parts, safety, or missing instructions. Manuals+ will review the question and use this page’s manual context to help answer it.