
Introduction
This manual provides essential information for the safe and efficient operation, installation, and maintenance of your Fresh Gas Cooker with Oven, Model 123. Please read these instructions carefully before using the appliance and keep them for future reference. Proper use and care will ensure optimal performance and extend the lifespan of your cooker.
Safety Information
Always prioritize safety when operating gas appliances. Failure to follow these instructions may result in fire, explosion, electric shock, or other injuries.
- Gas Leaks: If you smell gas, immediately shut off the gas supply, open windows, and evacuate the area. Do not operate electrical switches or use any open flames. Contact a qualified technician.
- Ventilation: Ensure adequate ventilation in the kitchen when using the gas cooker. Use an extractor fan if available.
- Children and Pets: Keep children and pets away from the appliance during operation and when it is cooling down. Hot surfaces can cause severe burns.
- Hot Surfaces: The oven and hob surfaces become very hot during and after use. Use oven mitts and avoid touching hot parts.
- Flammable Materials: Do not store or use flammable materials near the cooker.
- Electrical Connection: Ensure the appliance is properly grounded and connected to a suitable power supply as per local regulations.
- Installation: Installation and gas connection must be performed by a qualified and certified technician in accordance with all local codes and regulations.
- Cleaning: Always disconnect the appliance from the power supply before cleaning.
Product Overview
The Fresh Gas Cooker with Oven, Model 123, is a freestanding appliance designed for versatile cooking. It features a spacious hob with six gas burners and a multi-functional oven.


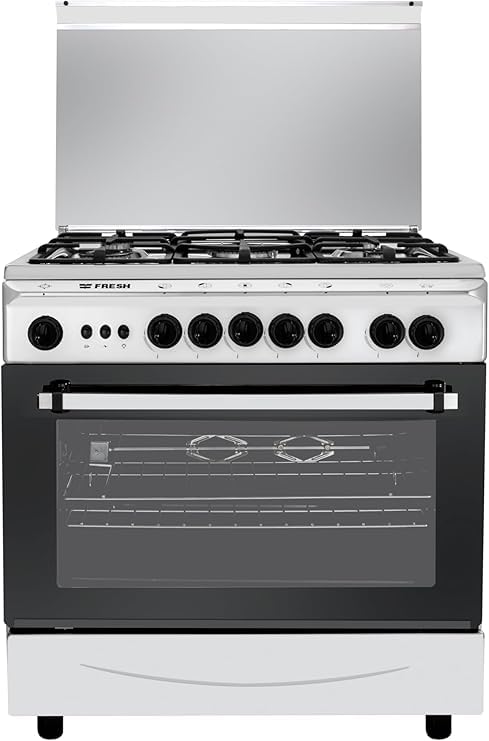
Key Features:
- Spacious Cooking Surface: Equipped with 6 durable gas burners for diverse cooking needs.
- Versatile Oven: Large interior for baking, grilling, and roasting.
- Precise Temperature Control: Adjustable knobs for accurate heat regulation.
- Durable Construction: High-quality stainless steel materials for longevity.
- Easy to Clean: Smooth, wipeable surfaces for simplified maintenance.
Setup and Installation
Proper installation is crucial for the safe and efficient operation of your gas cooker. It is highly recommended that installation be carried out by a qualified and certified technician.
1. Unpacking:
- Carefully remove all packaging materials.
- Check the appliance for any signs of damage. If damaged, do not install or use it, and contact your supplier.
- Remove all accessories and internal packaging from the oven cavity.
2. Positioning:
- Place the cooker on a flat, stable surface.
- Ensure there is adequate clearance from adjacent walls and cabinets as specified in local building codes.
- Level the cooker using the adjustable feet to ensure stability and even cooking.
3. Gas Connection:
- This appliance is designed for use with natural gas or LPG, depending on the model. Ensure the gas supply matches the appliance's requirements.
- The gas connection must be made by a qualified gas fitter.
- Check for gas leaks using a soapy water solution; never use an open flame.
4. Electrical Connection:
- Connect the cooker to a properly grounded electrical outlet.
- Ensure the voltage and frequency match the specifications on the appliance rating plate.
- Do not use extension cords or adapters.
5. Initial Cleaning:
- Before first use, wipe all surfaces with a damp cloth and mild detergent.
- Run the oven empty for approximately 30 minutes at 200°C (392°F) to burn off any manufacturing residues. Ensure good ventilation during this process.
Operating Instructions
1. Using the Gas Burners:
- Place your cookware centrally on the burner grate.
- Push and turn the corresponding burner control knob counter-clockwise to the maximum flame setting.
- The burner will ignite automatically (if equipped with automatic ignition). If not, use a long match or lighter to ignite the flame while turning the knob.
- Once ignited, hold the knob for a few seconds to activate the flame failure device (if present).
- Adjust the flame size by turning the knob between the maximum and minimum settings. Ensure the flame does not extend beyond the base of your cookware.
- To turn off, turn the knob clockwise to the 'OFF' position.
2. Using the Oven:
- Setting Temperature: Turn the oven temperature control knob to the desired temperature.
- Preheating: Allow the oven to preheat for approximately 10-15 minutes to reach the set temperature. The indicator light will usually turn off when the temperature is reached.
- Oven Functions: Depending on your model, select the desired cooking function (e.g., Bake, Grill) using the function selector knob.
- Loading Food: Carefully place food into the oven using oven mitts.
- Oven Light: The oven may have an internal light controlled by a separate switch or integrated with a function knob.
- Turning Off: Turn both the temperature and function knobs to the 'OFF' position after cooking.
Maintenance and Cleaning
Regular cleaning and maintenance will keep your cooker in optimal condition and ensure safe operation.
- Before Cleaning: Always ensure the cooker is cool and disconnected from the power supply and gas supply (if performing deep cleaning).
- Hob Surface: Wipe spills immediately with a damp cloth. For stubborn stains, use a mild non-abrasive cleaner suitable for stainless steel.
- Burner Caps and Grates: Remove burner caps and grates after they have cooled. Wash them in warm soapy water, rinse, and dry thoroughly before replacing. Ensure they are correctly positioned.
- Oven Interior: For light soiling, wipe with a damp cloth and mild detergent. For heavier grease and food residue, use a specialized oven cleaner, following the product instructions carefully. Ensure all cleaner residue is removed before next use.
- Oven Door: Clean the glass with a non-abrasive glass cleaner. Be careful not to scratch the surface.
- Exterior: Clean stainless steel surfaces with a soft cloth and a stainless steel cleaner to maintain its finish. Avoid abrasive pads or cleaners.
Troubleshooting
Before contacting service, please check the following common issues and solutions:
| Problem | Possible Cause | Solution |
|---|---|---|
| Burner does not ignite. | No gas supply, igniter dirty, burner cap not seated correctly. | Check gas supply. Clean igniter. Re-seat burner cap. |
| Oven not heating. | Power supply issue, gas supply issue, temperature knob not set. | Check electrical and gas supply. Ensure temperature knob is set. |
| Uneven cooking in oven. | Oven not preheated, food placed incorrectly, oven not level. | Preheat oven fully. Ensure proper air circulation around food. Level the cooker. |
| Gas smell. | Gas leak. | Immediately shut off gas, ventilate, evacuate, and call a qualified technician. |
If the problem persists after attempting these solutions, please contact customer support.
Specifications
Detailed technical specifications for the Fresh Gas Cooker with Oven, Model 123.
| Brand: | Fresh |
| Model Number: | 123 |
| Product Dimensions (W x D x H): | 80 cm x 65 cm x 85 cm |
| Shipping Dimensions: | 89 cm x 60 cm x 40 cm |
| Item Weight: | 17 Kilograms |
| Fuel Type: | Gas |
| Number of Burners: | 6 |
| Oven Racks: | 2 |
| Material: | Stainless Steel |
| Finish Type: | Stainless Steel |
| Form Factor: | Freestanding |
| Control Type: | Rotary Knobs |
| Efficiency: | A |
| Country of Origin: | China |
Warranty and Support
Warranty Information:
This Fresh Gas Cooker with Oven, Model 123, comes with a two-year warranty from the date of purchase. This warranty covers manufacturing defects and faulty materials under normal domestic use. It does not cover damage caused by improper installation, misuse, abuse, accidental damage, or unauthorized repairs.
Please retain your proof of purchase for warranty claims.
Customer Support:
For technical assistance, warranty claims, or to purchase spare parts, please contact Fresh customer service. You may find contact details on the Fresh official website or your purchase documentation.
When contacting support, please have your model number (123) and purchase date ready.


