
Introduction
Thank you for choosing the BLOW KM200 Trail Camera. This manual provides essential information for the proper setup, operation, and maintenance of your device. Please read it thoroughly before use to ensure optimal performance and longevity of your camera. The KM200 is designed for outdoor security and wildlife monitoring, featuring high-resolution imaging and motion detection capabilities.
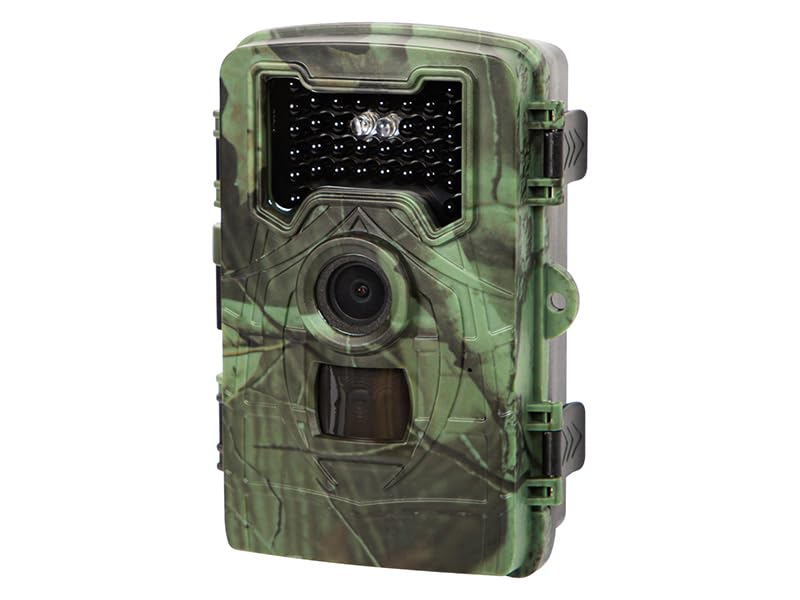
Image: The BLOW KM200 Trail Camera, showcasing its camouflage casing suitable for outdoor environments.
Package Contents
Verify that all items listed below are present in your package. If any items are missing or damaged, please contact your retailer.
- BLOW KM200 Trail Camera
- USB Cable
- Power Cable
- Mounting Strap
- User Manual (this document)

Image: Included accessories for the BLOW KM200 Trail Camera, showing the USB cables and the mounting strap.
Product Overview
Familiarize yourself with the main components and controls of your BLOW KM200 Trail Camera.

Image: A close-up view of the camera's internal control panel, revealing buttons for menu navigation, shot, replay, and mode, along with various ports.
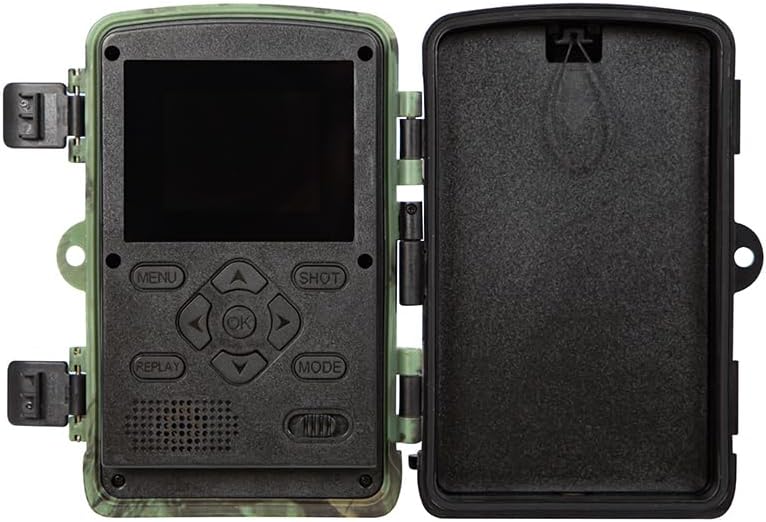
Image: The BLOW KM200 Trail Camera with its front cover open, displaying the internal control panel, LCD screen, and the empty battery compartment on the right side.

Image: The BLOW KM200 Trail Camera with its front cover open, showing the control panel and the battery compartment with its protective cover removed, revealing the battery slots.
Setup
1. Battery Installation
The camera can be powered by 4 or 8 AA batteries. For extended operation, 8 AA batteries are recommended. Ensure correct polarity when inserting batteries.
- Open the camera's front cover.
- Remove the battery compartment cover.
- Insert 4 or 8 AA batteries, observing the polarity markings (+/-).
- Replace the battery compartment cover and close the camera's front cover securely.
2. Memory Card Installation
A MicroSD card (not included) is required to store photos and videos. The camera supports cards up to a certain capacity (refer to the specifications section for details).
- With the camera powered off, open the front cover.
- Locate the MicroSD card slot.
- Insert the MicroSD card with the contacts facing down until it clicks into place.
- To remove, press the card gently until it springs out.
3. Mounting the Camera
The camera is designed for pole mounting using the included strap. Ensure the camera is securely fastened and positioned to capture the desired area.
- Thread the mounting strap through the slots on the back of the camera.
- Secure the camera to a tree or pole at the desired height and angle.
- Ensure the camera is stable and will not move due to wind or animal contact.

Image: The back of the BLOW KM200 Trail Camera, highlighting the integrated slots designed for threading the mounting strap.
Operating Instructions
1. Powering On/Off
Locate the power switch inside the camera's front cover. It typically has OFF, TEST, and ON positions.
- OFF: Camera is powered off.
- TEST: Allows you to access the menu, adjust settings, and manually take photos/videos. The motion sensor is active in this mode for testing.
- ON: Camera is in active monitoring mode. The screen will turn off after a few seconds, and the camera will begin recording based on its settings (motion detection).
2. Menu Navigation
In TEST mode, use the control buttons to navigate the menu and adjust settings.
- MENU: Enters/exits the settings menu.
- UP/DOWN/LEFT/RIGHT (Arrow buttons): Navigate through menu options.
- OK: Confirms selection or enters a sub-menu.
- MODE: Switches between Photo, Video, and Playback modes.
- SHOT: Manually takes a photo or starts/stops video recording in TEST mode.
- REPLAY: Enters playback mode directly.
3. Basic Settings (in TEST mode)
Press MENU to access settings. Common settings include:
- Mode: Select Photo, Video, or Photo+Video.
- Photo Resolution: Set image quality (e.g., 36MP, 20MP, 12MP).
- Video Resolution: Set video quality (e.g., 1080p, 720p).
- PIR Sensitivity: Adjust motion sensor sensitivity (Low, Medium, High).
- PIR Interval: Set the delay between motion detections.
- Time Lapse: Enable time-lapse photography.
- Date/Time: Set the current date and time.
- Language: Select menu language (e.g., English).
- Format Card: Erase all data on the MicroSD card. Warning: This will delete all files.
4. Playback Mode
In TEST mode, press REPLAY or navigate to Playback mode using MODE button.
- Use UP/DOWN arrows to browse through recorded photos and videos.
- Press OK to view a photo or play a video.
- Press MENU to access playback options (e.g., delete file).
Key Features

Image: The BLOW KM200 Trail Camera showcasing its night vision feature, with examples of wildlife captured in dark conditions.
Night Vision
The camera is equipped with infrared LEDs for clear night vision, allowing it to capture images and videos in complete darkness without disturbing wildlife.

Image: The BLOW KM200 Trail Camera with a visual representation of its motion detection zone, highlighting its ability to detect and capture moving subjects like a deer.
Motion Sensor (PIR)
The Passive Infrared (PIR) sensor detects movement of warm bodies within its detection range, triggering the camera to record photos or videos automatically. Sensitivity can be adjusted in the settings.

Image: The BLOW KM200 Trail Camera showing a winter scene on its internal screen, accompanied by a separate image of a deer in a snowy landscape, illustrating its performance in various weather conditions.
Water-Resistant Design (IP66)
The camera features an IP66 rating, meaning it is protected against dust ingress and powerful water jets from any direction. This makes it suitable for outdoor use in various weather conditions, but it is not designed for submersion in water.
Maintenance
- Cleaning: Use a soft, dry cloth to clean the camera lens and body. Do not use abrasive cleaners or solvents.
- Battery Care: Remove batteries if the camera will not be used for an extended period to prevent leakage. Replace all batteries at the same time.
- Storage: Store the camera in a cool, dry place away from direct sunlight when not in use.
- Firmware Updates: Check the manufacturer's website periodically for any available firmware updates.
Troubleshooting
| Problem | Possible Cause | Solution |
|---|---|---|
| Camera does not power on. | Low or dead batteries; incorrect battery polarity; faulty power switch. | Replace batteries; check polarity; ensure switch is in TEST or ON position. |
| No photos/videos recorded. | No MicroSD card; full MicroSD card; incorrect mode; low PIR sensitivity; camera in OFF mode. | Insert/replace MicroSD card; format card; set to Photo/Video mode; increase PIR sensitivity; switch to ON mode. |
| Poor image/video quality. | Dirty lens; low resolution setting; insufficient lighting. | Clean lens; increase photo/video resolution in settings; ensure adequate lighting or proper night vision activation. |
| Motion sensor not triggering. | Low PIR sensitivity; PIR interval too long; obstructions in detection zone. | Increase PIR sensitivity; shorten PIR interval; clear detection path. |
Specifications
| Feature | Detail |
|---|---|
| Model Name | KM200 |
| Photo Resolution | Up to 36 MP |
| Video Resolution | 1080p Full HD (AVI format) |
| Viewing Angle | 130 Degrees |
| Special Functions | Image Sensor, Motion Sensor (PIR), Brightness Control, Night Vision, Portable |
| Connectivity | Wired, Bluetooth |
| Power Source | 4x AA / 8x AA Batteries, External DC (Power Cable included) |
| Water Resistance | IP66 (Protected against dust and powerful water jets) |
| Usage Environment | Outdoor |
| Mounting Type | Pole Mounting |
| Dimensions (L x W x H) | 14 x 10 x 7.3 cm |
| Material | Plastic |
Warranty and Support
For warranty information and technical support, please refer to the documentation provided with your purchase or visit the official BLOW website. Keep your proof of purchase for warranty claims.
Manufacturer: BLOW
Country of Origin: China